
Ever wonder why your baked goods never turn out like the recipe promises or why your knife keeps slipping while chopping vegetables? Knowing how to use kitchen tools properly separates frustrated beginners from confident home cooks. When you understand the specific purpose and correct technique for each piece of equipment in your kitchen, cooking transforms from a stressful chore into an enjoyable creative process. This guide reveals exactly how to use kitchen tools for optimal results, with professional techniques you won’t find in most recipe books.
Most home cooks own the right tools but use them incorrectly, leading to inconsistent results and unnecessary frustration. The difference between a rubbery cake and a perfect sponge often comes down to using the right pan and measuring accurately. Whether you’re preparing a simple weeknight dinner or an elaborate holiday feast, mastering how to use kitchen tools ensures your efforts translate into delicious, restaurant-quality dishes every time.
How to Use Bakeware for Perfect Cakes and Cookies Every Time
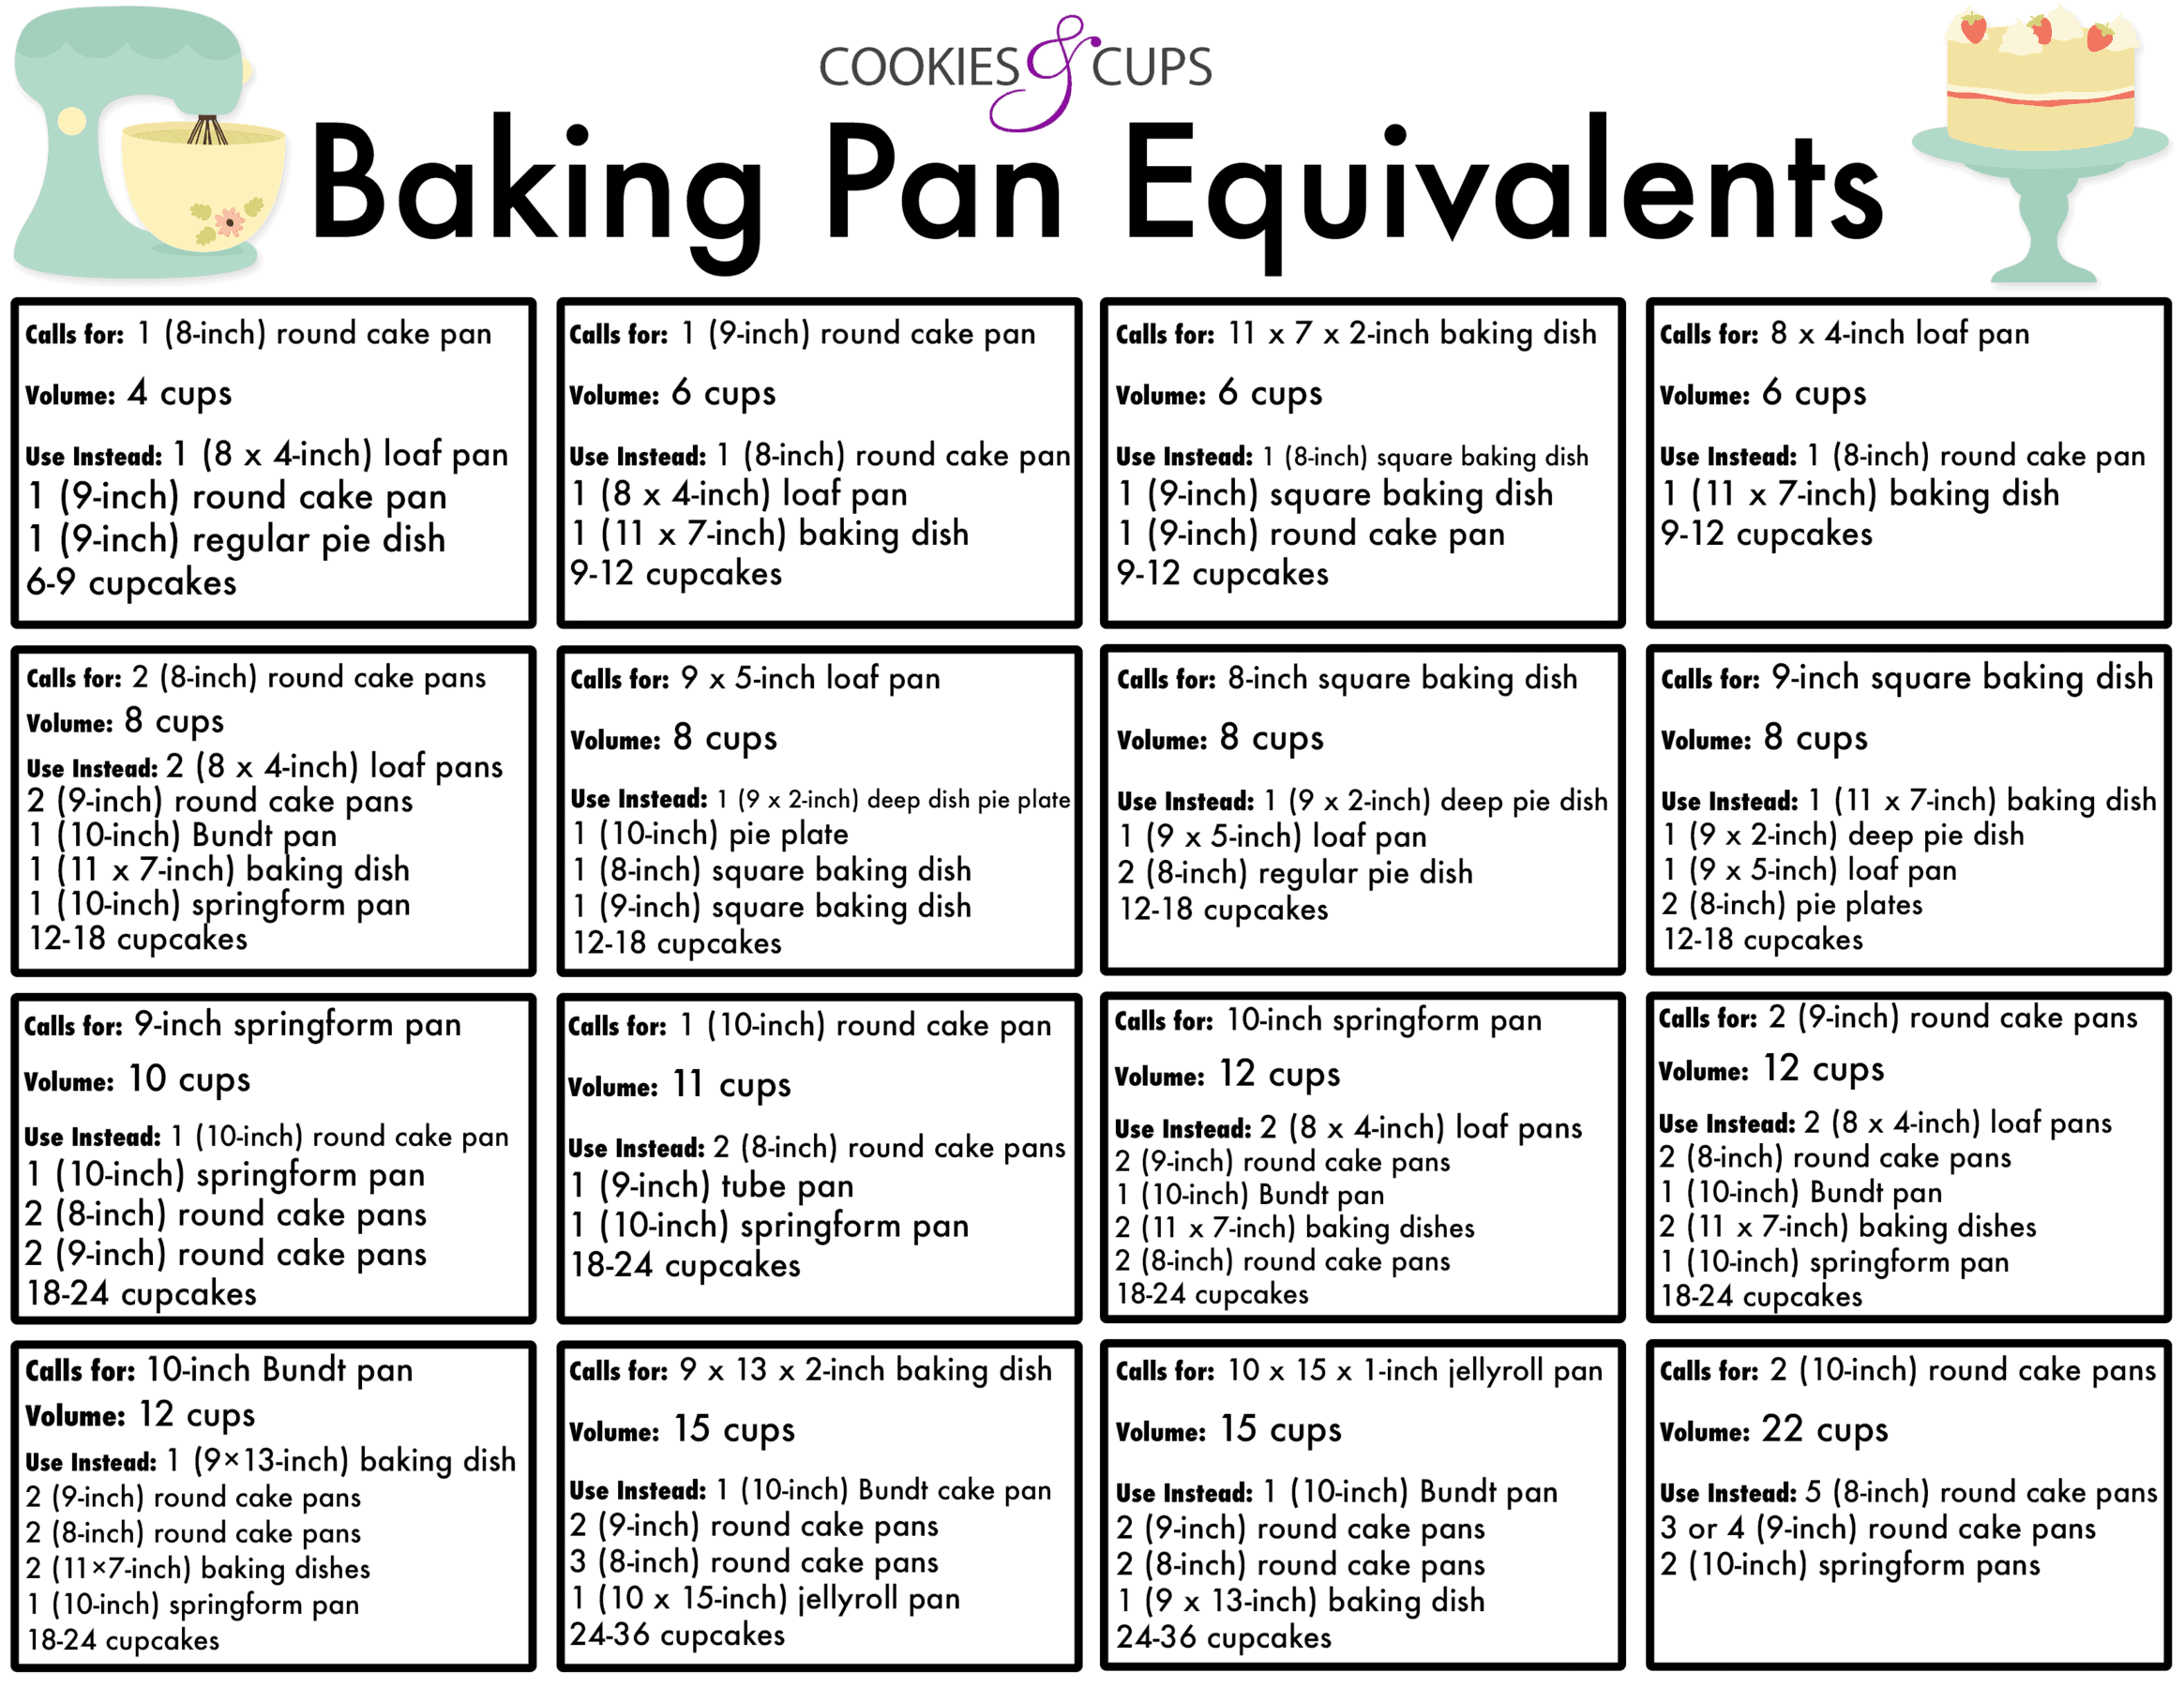
Selecting and using the right bakeware makes or breaks your baked goods. Baking sheets come in standard 17×14-inch and 12×15-inch sizes, but insulated versions require 10-15% longer baking times since the air layer between metal sheets slows heat transfer. For even cookie baking, rotate the sheet halfway through cooking time—this compensates for hot spots in your oven.
How to Use Jelly-Roll Pans Without Sticking Issues
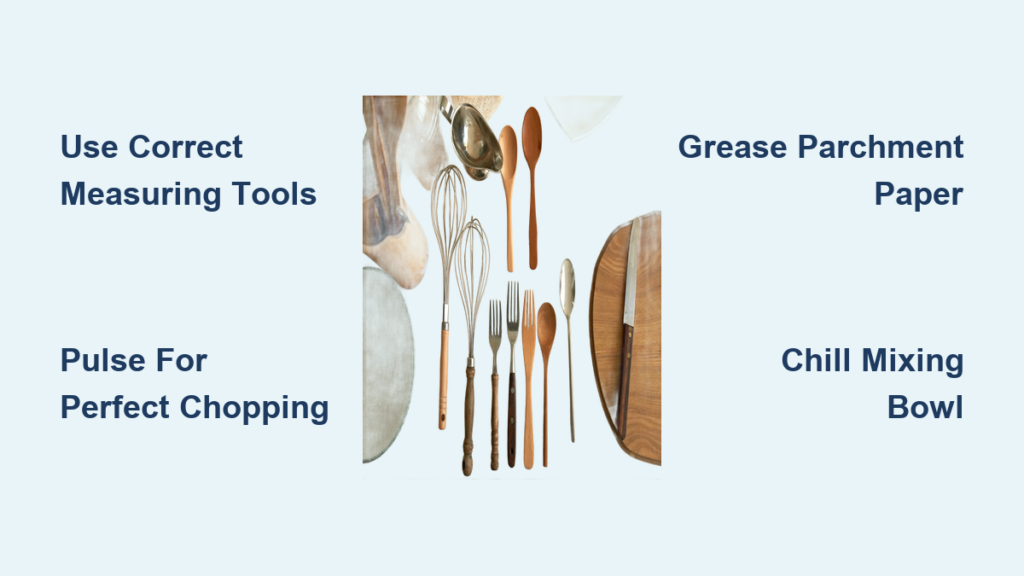
When using a 15x10x1-inch jelly-roll pan for thin cakes, grease the pan thoroughly or line with parchment paper. Critical tip: Grease the parchment paper on the side facing up to prevent your cake from sticking during removal. If substituting a 13×9-inch pan, check for doneness at half the original time since the batter will be thicker.
Bread Pan Fill Levels That Prevent Overflow Disasters
Fill standard 8½x4¼-inch bread pans no more than two-thirds full to allow proper rising room. For mini loaf pans, fill only halfway and reduce baking time by approximately 50%. Warning: Overfilling causes messy oven spills and uneven baking—always match your pan size to the recipe’s specified capacity.
How to Use Cutting Boards Safely Without Slipping or Cross-Contamination
Your cutting board should never slide during vigorous chopping. Place a damp kitchen towel underneath any board to create instant traction. For plastic boards, run your thumb along the edge—if it catches slightly, it’s time to replace the board as deep grooves harbor bacteria.
Flexible Cutting Boards That Transfer Food Without Mess
Modern flexible silicone boards solve the annoying transfer problem. After chopping, simply fold the edges toward the center to create a funnel, then slide ingredients directly into your bowl or pan. This technique works perfectly for onions, herbs, and finely diced vegetables.
Carving Board Grooves That Keep Countertops Clean
When carving roasts or poultry, use a board with a juice groove around the perimeter. Position the meat in the center so all juices collect in the channel rather than spreading across your counter. Pro tip: Place a paper towel in the groove before carving—it absorbs juices and makes cleanup effortless.
How to Use Measuring Tools for Baking Accuracy (Dry vs. Liquid)

Using the wrong measuring tool ruins chemical reactions in baking. Dry ingredients require nested cups you fill to the brim then level with a straight edge. Liquid ingredients need pitchers with side markings viewed at eye level—never substitute one for the other.
How to Measure Sticky Ingredients Without Wasted Product
For honey, molasses, or peanut butter, lightly coat your measuring cup with cooking spray first. The ingredient slides out completely, saving both product and cleanup time. This technique works for both liquid and dry measuring tools depending on your sticky ingredient’s consistency.
Whipping Cream Successfully in 5 Minutes or Less
Chill your mixing bowl and beaters for 15 minutes before whipping cream. Start on low speed, gradually increasing to medium-high once the cream begins to thicken. Stop immediately when stiff peaks form—over-whipping turns cream into butter within seconds.
How to Use Food Processors Without Over-Chopping Your Ingredients
Food processors excel at consistent chopping but easily turn ingredients to mush if misused. Always use the pulse function for controlled results—never let the machine run continuously. For even chopping, add ingredients in uniform sizes and avoid overfilling the bowl.
Pulse Technique That Creates Perfect Salsa Consistency
For restaurant-style salsa, pulse tomatoes 3-4 times total—just enough to break them down while maintaining texture. Add onions and peppers separately, pulsing 2 times each. Common mistake: Adding everything at once creates uneven results with some ingredients pureed while others remain chunky.
How to Use Immersion Blenders for Smooth Soups in the Same Pot
Submerging the entire blade before turning on your immersion blender prevents dangerous splattering. Start at the bottom of the pot, then move in gentle circular motions upward through the soup. For chunky soups, blend only half the mixture then stir to combine.
How to Whip Egg Whites Without a Stand Mixer
Place your immersion blender in a tall, narrow container with egg whites. Start on low speed at the bottom, gradually moving upward as foam forms. This method incorporates air efficiently, creating stiff peaks in under 3 minutes with no additional equipment.
How to Use Cheese Graters and Slicers for Professional Results
For hard cheeses like Parmesan, use the cylindrical rotary grater rather than box graters. The rotating motion creates finer, more consistent shreds with less effort. Safety tip: Always grate away from your body and use the food holder—never risk fingers near sharp blades.
Egg Slicers That Also Perfectly Cut Mushrooms
Place hard-boiled eggs on the oval platform with the pointed end facing the wire side. Press down firmly for even slices. Surprisingly, this same tool creates uniform mushroom slices—just position mushrooms stem-side down for best results.
How to Use Dutch Ovens for Perfect Braises and One-Pot Meals
Brown meat properly by ensuring your Dutch oven is hot before adding oil. Wait until the oil shimmers but doesn’t smoke—this prevents sticking and creates the fond necessary for rich sauces. After browning, deglaze with wine or broth, scraping the bottom to incorporate all flavorful bits.
Temperature Control That Prevents Burnt Stews
When transferring your Dutch oven to the oven, reduce the temperature by 25°F from stovetop settings. This compensates for the more even heat distribution in ovens versus direct stovetop heat. Check liquid levels halfway through cooking—add more broth if evaporating too quickly.
How to Use Candy Thermometers for Perfect Fudge and Caramel
Test your thermometer’s accuracy before making candy by placing it in rapidly boiling water—it should read 212°F. If off by more than 2 degrees, adjust your target temperatures accordingly during cooking.
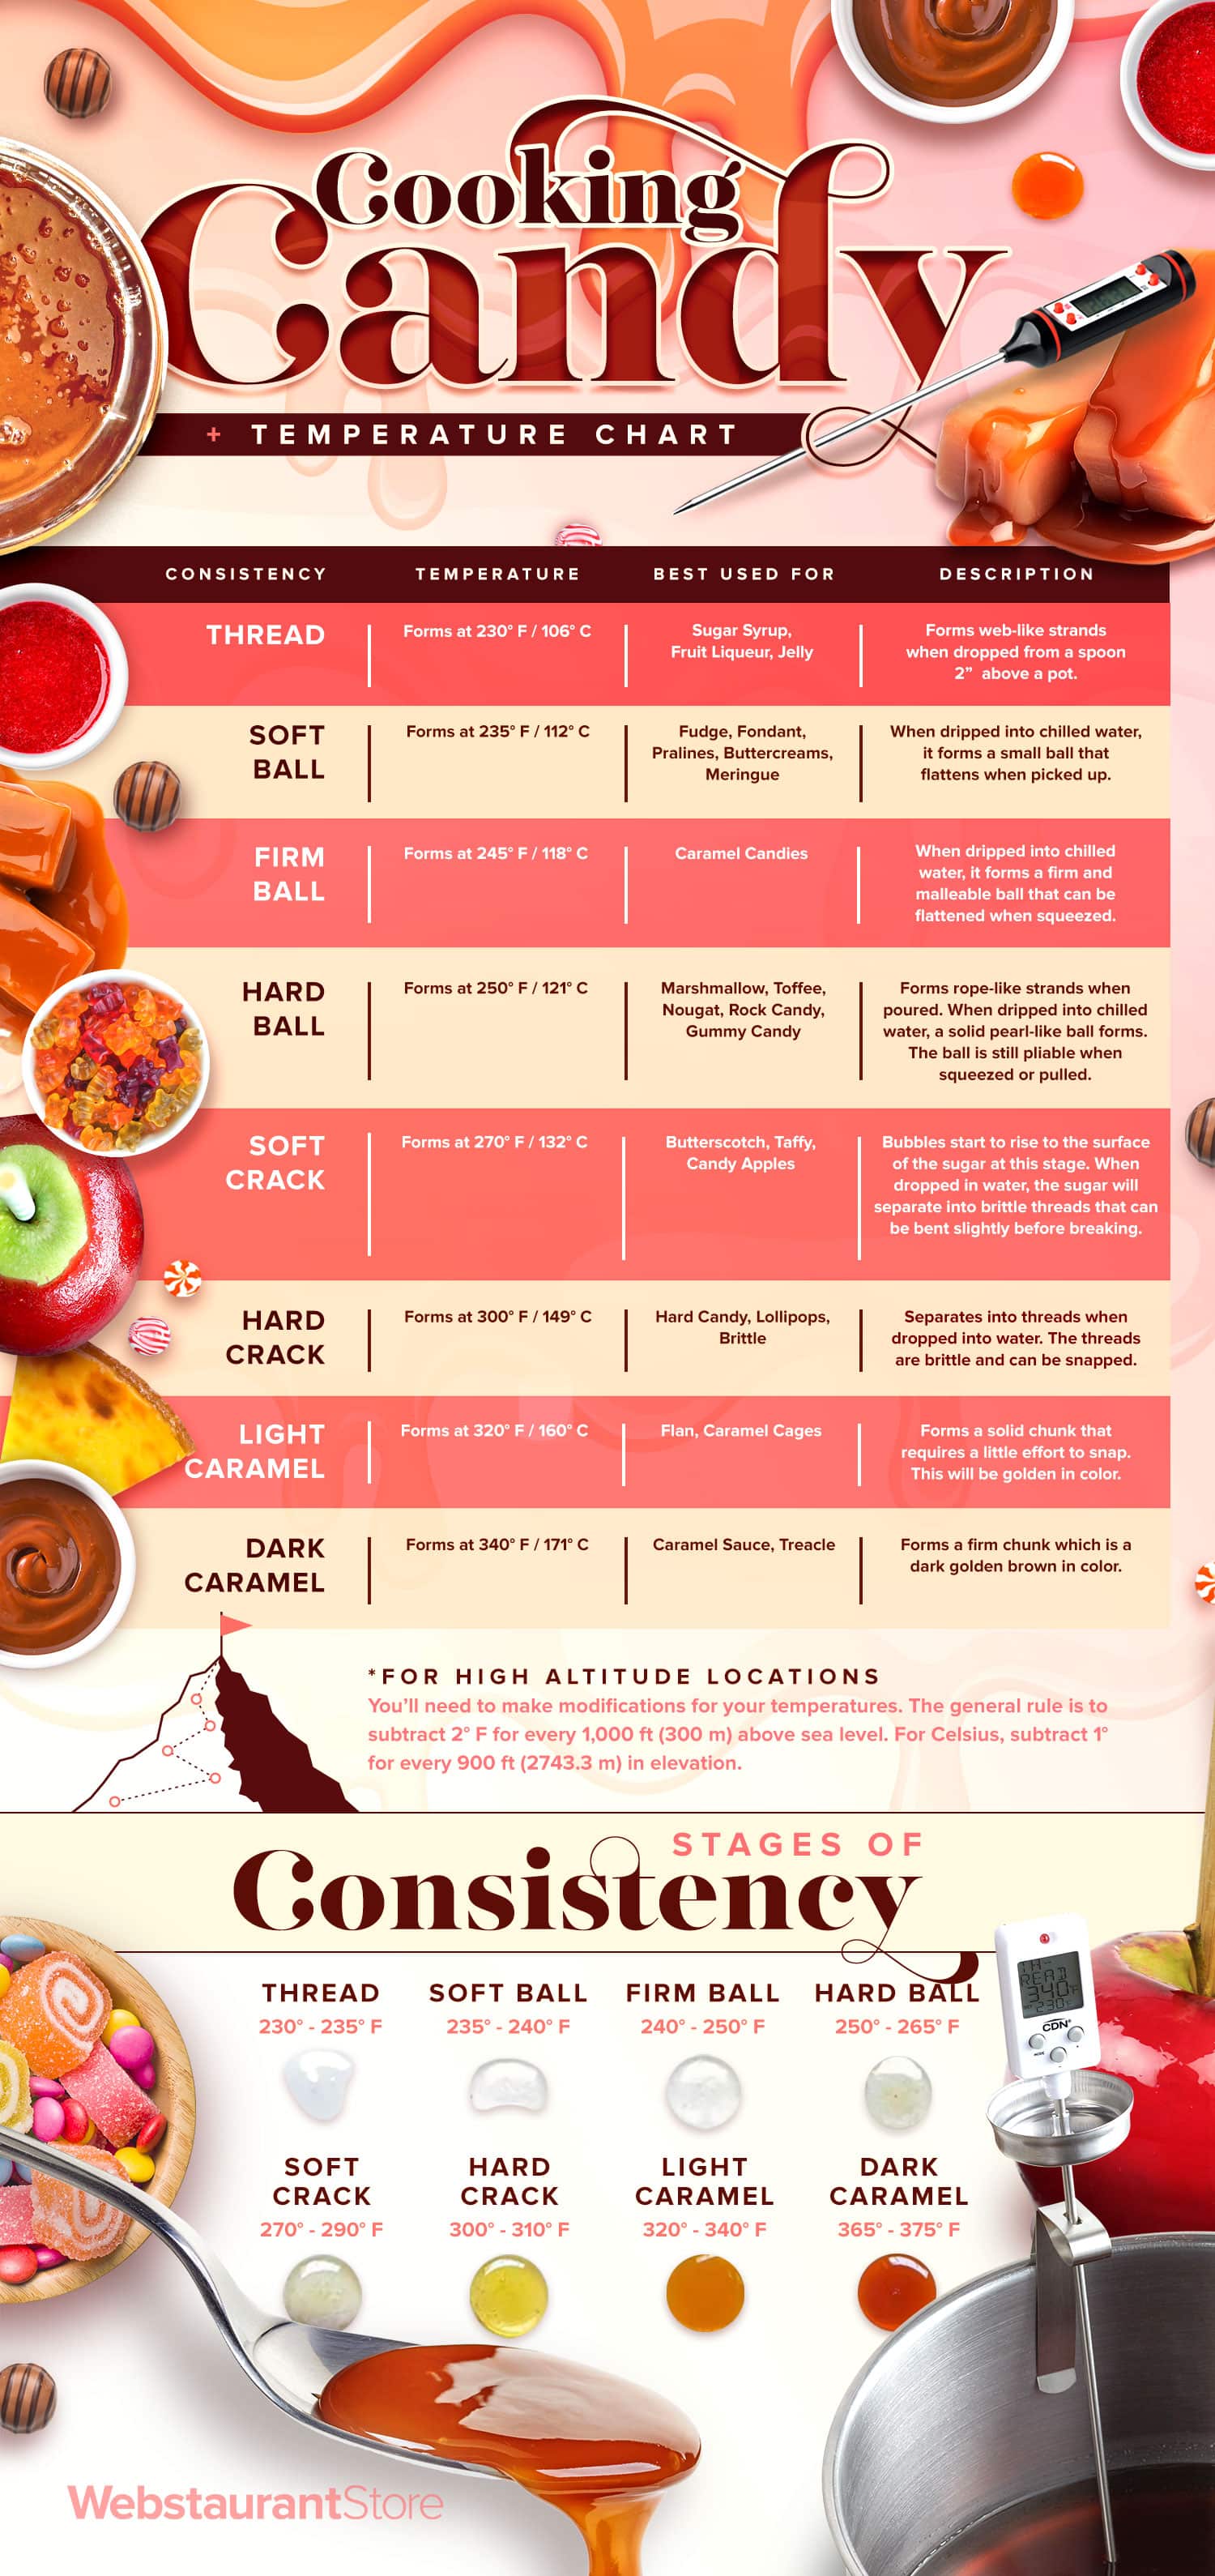
Cold Water Test That Works Without a Thermometer
When candy thermometers fail, use the cold water test: drop a small amount of cooking mixture into ice water, then test the cooled sample against these stages:
– Soft ball (234-240°F): Forms soft ball that flattens when removed (perfect for fudge)
– Firm ball (242-248°F): Creates balls holding shape (ideal for soft caramels)
– Hard crack (300-310°F): Produces hard, brittle threads (required for toffee)
How to Use Cookie Cutters Without Sticking Dough Problems
Dip cutters in flour before each use—this creates a non-stick barrier without adding excess flour to your dough. For intricate shapes, chill the dough for 10 minutes before cutting to maintain definition during baking.
How to Create Custom Shapes Without Special Cutters
Trace desired shapes on cardboard, cut out templates, and place over rolled dough. Carefully cut around the template with a sharp paring knife for perfect custom cookies. Pro tip: Dip the knife in flour between cuts to prevent sticking.
How to Use Kitchen Tools When Your Favorite Equipment Is Missing
Don’t let missing tools stop your cooking plans. A large glass measuring cup doubles as a mixing bowl for batters. Flexible silicone spatulas work as pastry brushes for egg washes. And your standard skillet makes an excellent substitute for a grill pan—just create diagonal sear marks by rotating food 90 degrees halfway through cooking.
Emergency Substitutions That Save Dinner
When your food processor breaks mid-recipe:
– Use a box grater for shredding cheese or vegetables
– Chop herbs finely with a rocking knife motion
– Mash potatoes with a fork for rustic texture
– Cut butter into flour using two knives in a scissoring motion
Mastering how to use kitchen tools properly transforms your cooking experience from hit-or-miss to consistently excellent. By implementing these specific techniques for common equipment, you’ll save time, reduce frustration, and create dishes that impress. Key takeaway: Proper tool usage matters more than owning expensive equipment—understand what each tool does best and master its correct application. Start with one technique from this guide at your next cooking session, and notice the immediate improvement in your results.


