

Installing or removing a kitchen sink faucet ranks among the most frustrating DIY plumbing tasks you’ll encounter. The reason is simple: the bolts securing your faucet sit in impossibly tight spaces behind the basin, often flush against walls or surrounding countertops. Standard wrenches simply can’t reach these fasteners, which is why plumbing professionals reach for a basin wrench the moment faucet work is required. Learning how to use a basin wrench for kitchen sink projects transforms what could be a multi-hour struggle into a straightforward thirty-minute task. This guide walks you through everything you need to know—from selecting the right wrench to executing flawless faucet installations and removals.
Why Your Standard Wrench Fails at Sink Faucet Jobs
Kitchen sink mounting nuts and supply line connections live in cramped spaces where conventional tools can’t operate effectively. The space between your sink basin and the cabinet wall typically measures less than three inches deep, with pipes and other obstructions further limiting your working area. When you attempt to use a standard adjustable wrench, you find yourself turning it a quarter-turn at most before needing to reposition it—a tedious process that often results in stripped fasteners from improper engagement.
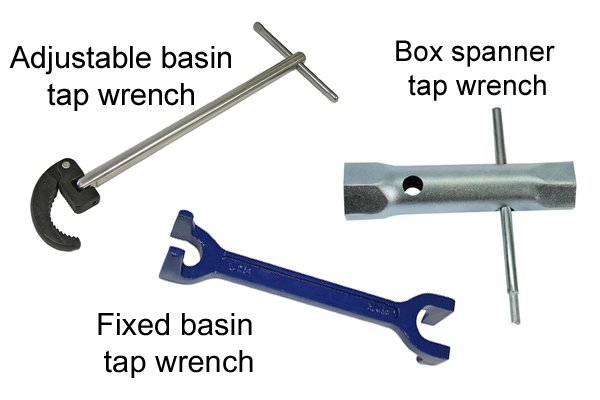
The basin wrench solves this specific problem with its unique design: a long handle connected to a pivoting jaw mechanism that grips from the top rather than the sides. This allows you to position your hand well outside the cabinet while the jaw works in the tight space behind the sink. Unlike pipe wrenches that require clearance for multiple turns, the basin wrench’s ratcheting action lets you tighten or loosen nuts with continuous motion in confined spaces.
Selecting the Perfect Basin Wrench for Kitchen Faucets
Telescoping vs. Fixed-Length Models
Telescoping basin wrenches feature handles that extend from 8 to 16 inches, providing crucial reach when mounting bolts sit deep within cabinet recesses. This adjustable design proves invaluable when working with farmhouse sinks or deep cabinets where fasteners nestle against back walls. When fully collapsed, telescoping models fit neatly in your toolbox, but extended, they give you the leverage needed for stubborn connections.
Fixed-length basin wrenches typically offer superior rigidity and torque transmission, making them better choices when dealing with corroded or overtightened nuts. Their solid construction transfers more of your turning force directly to the fastener without the slight flex that occurs in telescoping models. If your kitchen sink has standard depth (less than 12 inches from basin to wall), a 10-12 inch fixed wrench usually provides the ideal balance of reach and power.
Jaw Width and Material Considerations
Kitchen faucet mounting nuts typically range from 7/16″ to 1/2″ in size, so ensure your basin wrench accommodates this range. Some models feature adjustable jaws that lock at specific widths, while others self-adjust automatically as you position them on the nut. For chrome-plated fixtures common in kitchens, consider a wrench with coated jaws that prevent scratching the finish during use.
Handle material significantly impacts comfort during extended projects. Fiberglass-reinforced handles reduce weight without sacrificing strength, while padded grips prevent hand slippage when working with damp hands—a common occurrence under sinks where condensation forms on pipes. Avoid wrenches with sharp edges on the handle that could dig into your palm during forceful turning.
Prepare Your Workspace Before Grabbing the Basin Wrench
Essential Pre-Work Steps
Clear everything from under your kitchen sink at least 30 minutes before starting your project. Remove cleaning supplies, trash bags, and stored items to give yourself maximum movement space. Place a thick towel on the cabinet floor to protect your knees and catch any dropped bolts. Position a headlamp or clamp-mounted work light to illuminate the work area—trying to operate a basin wrench in darkness guarantees stripped fasteners and frustration.
Shut off both hot and cold water supply valves completely, then open the faucet handles to verify water stops flowing. Place a small bucket beneath the supply line connections and have several towels ready to catch residual water. If your shutoff valves haven’t been operated in years, they may drip when turned—keep replacement valves and plumber’s tape nearby just in case.
Document Your Current Configuration
Take clear photographs of your supply line connections before disconnecting anything. Note which line connects to hot versus cold, and how the supply lines attach to both the faucet and shutoff valves. These reference images become invaluable during reassembly when you’re working from awkward angles and can’t easily see your connections. Consider labeling supply lines with small pieces of tape marked “H” for hot and “C” for cold to avoid confusion later.
Execute Proper Basin Wrench Technique for Faucet Removal
Positioning and Engagement
Hold the basin wrench handle firmly in your dominant hand with your thumb along the length of the handle for maximum control. Slide your other hand along the handle to guide the head into position. Approach the mounting nut slowly, allowing the jaws to settle fully onto the nut before applying turning force. The self-adjusting mechanism requires positive contact on all jaw surfaces—rushing this step causes slippage that rounds nut corners.
When the jaws engage properly, you’ll feel subtle resistance as they clamp onto the nut. Apply gentle forward pressure to maintain this engagement while beginning your turning motion. For stubborn nuts, apply penetrating oil and wait five minutes before attempting to turn—this patience prevents the stripped threads that plague rushed DIYers.
Turning Motion and Troubleshooting Slippage
Use smooth, controlled quarter-turn motions rather than jerking the handle. After each turn, release pressure briefly to allow the jaws to re-grip if they’ve shifted position. If the wrench slips off the nut, don’t simply apply more force—reposition the head carefully and ensure full jaw engagement before continuing. Stripped fasteners result almost exclusively from improper engagement combined with excessive force.
When working in extremely tight spaces, extend your basin wrench handle fully and approach the fastener from the most direct line available—often this means working through the sink bowl after removing the faucet handle. For fasteners flush against walls, rotate the wrench head to its most compact orientation before sliding it into position.
Achieve Proper Tightness Without Damaging Fixtures
Mounting Bolt Tightening Guidelines
Faucet mounting bolts require snugness without excessive force. Hand-tight plus one-quarter to one-half turn with your basin wrench typically achieves the ideal tightness—enough to prevent faucet movement but not so tight that it cracks the mounting bracket or damages the sink surface. Over-tightening serves no purpose and creates problems that may not appear immediately but develop over time.
If reinstalling the same faucet, note the original tightness level and match it during reassembly. The previous installation established the correct compression and seal levels—reinventing these values rarely improves performance and frequently introduces leaks.
Supply Line Connection Best Practices
Supply line nuts require similar restraint during tightening. Hand-tight followed by one-quarter turn with your basin wrench provides a reliable seal for compression-style fittings used with braided supply lines. Over-tightened supply connections can crack the fitting or strip threads in the shutoff valve, creating leaks that may not appear immediately but develop over subsequent weeks.
When connecting new supply lines, wrap plumber’s tape clockwise around the shutoff valve threads (2-3 wraps) before attaching the supply line. This creates a better seal and reduces the torque needed to achieve a leak-free connection.
Prevent Common Basin Wrench Mistakes

Lighting and Visibility Errors
Working without adequate lighting causes more failed projects than any other factor. Never begin work without confirming you can clearly see the fastener you’re targeting. Shadows cast by your body or tools obscure critical details—position your light source to eliminate these shadows completely. Consider using a headlamp with an adjustable beam that you can point directly at your work area.
Engagement Mistakes That Damage Fixtures
Rushing the engagement phase causes more stripped fasteners than excessive force applied to properly positioned wrenches. Take the extra second to confirm full jaw contact before turning. Forcing the wrench into position damages both the tool and your fixtures—if the wrench head doesn’t fit into the available space, you need a different approach, not more force.
Neglecting to close shutoff valves completely results in unexpected water spraying when you disconnect supply lines. Always verify valve closure by opening the faucet after closing the valves—if water flows, close the valve fully before proceeding. Similarly, failing to support the faucet during removal allows it to fall once mounting bolts are loosened, potentially cracking the sink.
Maintain Your Basin Wrench for Longevity
After each use, wipe the wrench handle and head clean of any moisture, oil, or debris. Apply a light machine oil to the pivot points and jaw mechanism, working the oil through by opening and closing the jaws several times. Store the wrench in a dry location—moisture accumulating in the mechanism causes corrosion that destroys the precision fit essential for positive fastener engagement.
Periodically inspect the jaw teeth for wear or damage. Worn or broken teeth compromise grip strength, causing slippage that rounds fastener corners. Replace the wrench if jaw damage is evident—the cost of a new tool pales compared to the expense of damaged fixtures resulting from tool failure during critical work.
Mastering basin wrench usage transforms intimidating faucet projects into manageable weekend tasks completed with professional-quality results. The specialized design addresses a specific challenge that standard equipment cannot match, building your confidence for future plumbing projects while saving significant expense compared to professional service. With proper technique and preparation, you’ll complete your kitchen sink work efficiently without the frustration that typically accompanies these projects.


