
Your oak kitchen cabinets look tired, dated, or overwhelmed by that distinctive wood grain—but replacing them costs thousands and triggers a full kitchen remodel. The good news? You can transform them for a fraction of the price with DIY-friendly techniques that preserve structural integrity while modernizing your space. Over 68% of homeowners choose cabinet updates over replacement to avoid plumbing/electrical disruptions, and oak’s dense grain actually provides an excellent canvas for creative makeovers. Whether you’re battling orange undertones, water stains, or just want a contemporary look, this guide delivers actionable strategies using tools you likely own. You’ll learn precisely how to prepare surfaces, select finishes that combat oak’s porosity, and implement professional tricks that prevent peeling—no contractor required.
Sand Oak Cabinets to Eliminate Visible Grain Patterns

Oak’s prominent grain often fights paint adhesion and creates uneven finishes if not properly prepped. Skipping this step guarantees visible wood texture bleeding through your new finish. Start by removing all hardware and doors—label hinges with painter’s tape to simplify reinstallation. Use 120-grit sandpaper on a palm sander for flat surfaces, switching to 220-grit for detailed molding. Focus on “feathering” edges where paint tends to chip. You’ll know you’re done when surfaces feel uniformly smooth and appear matte—not shiny—under angled light. Never skip degreasing: mix 1 cup vinegar with 2 cups warm water, wipe all surfaces, then dry completely. Residual grease causes primer failure within months.
How to Handle Stubborn Oak Grain in Corners
Hand-sand intricate details with folded 220-grit sandpaper wrapped around a popsicle stick. For deep grooves, use a nylon brush dipped in mineral spirits to lift trapped debris. Test your prep work by applying masking tape—if fibers pull up when removed, sand again. This critical step takes 2-3 hours for average kitchens but prevents costly rework.
Why Skipping Primer Causes Orange Undertones
Oak’s tannins bleed through standard paints within weeks, creating splotchy orange patches. Apply two coats of oil-based or shellac primer like BIN or Zinsser Cover Stain—water-based alternatives fail here. Use a 2-inch angled brush for corners and a microfiber roller for flat panels. Let dry 24 hours; rushing causes adhesion failure. Pro tip: Add 10% Floetrol to primer for smoother application on vertical surfaces.
Paint Oak Cabinets with Zero Brush Marks
Chalk paint requires no priming but hides oak’s natural texture—ideal for shaker-style cabinets. For painted finishes, choose satin or semi-gloss latex like Benjamin Moore Advance. Start with cabinet interiors using a 1.5-inch brush, then move to doors. Apply paint in thin, even strokes following the wood grain. Maintain a wet edge to prevent lap marks. If brush strokes appear, lightly sand with 320-grit paper between coats. Always apply three thin coats rather than two thick ones—this builds durability without obscuring details.
Choosing Between Spray Painting and Brushing
Spray painting delivers flawless results but requires $200+ equipment and perfect ventilation. For DIYers, the Wagner Flexio 590 handheld sprayer ($150) works well after thinning paint 10% with water. Brushing is cheaper but demands technique: load brushes lightly, tap off excess, and use “X” patterns on flat surfaces. Budget 4-6 hours for painting a standard 10-door kitchen.
Replace Hardware for Instant Modern Appeal
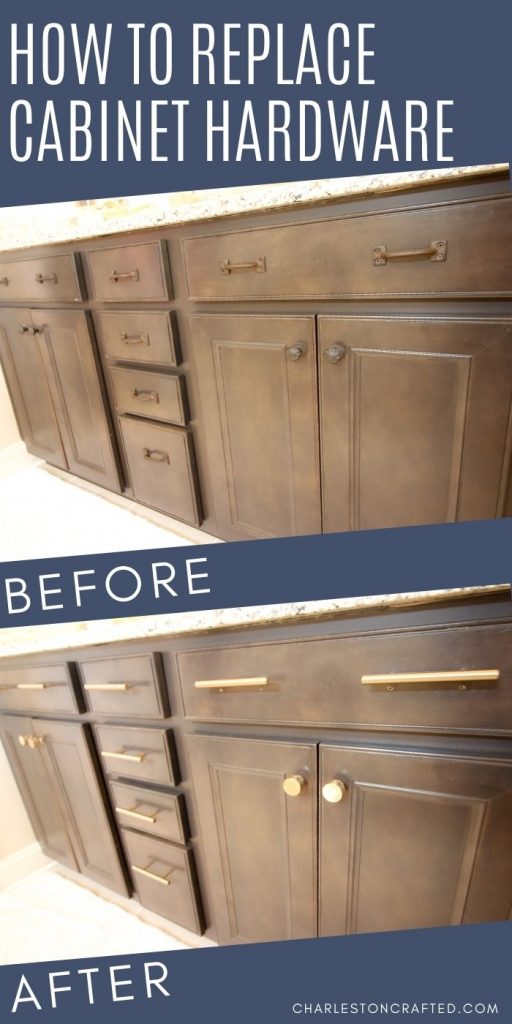
Outdated brass knobs scream 1990s. Swap them for matte black, brass, or ceramic pulls in under an hour. Measure existing hole spacing with a tape measure—standard sizes are 3″, 4″, or 96mm. For mismatched holes, use decorative backplates or fill old holes with wood putty. Install new hardware using a template: tape cardboard to a cabinet door, mark hole positions, then transfer to all doors. Tighten screws just until snug—overtightening strips oak.
Creative Hardware Alternatives Beyond Knobs
Install leather straps on shaker cabinets for farmhouse charm. Use oversized bin pulls on pantry doors for visual weight. For floating shelf conversions, mount hidden brackets inside upper cabinets before painting. Always buy 20% extra hardware for mistakes.
Glaze Oak Cabinets for Customized Character
Glazing creates depth on painted cabinets by accentuating grooves. After your final paint coat dries 48 hours, apply water-based glaze like General Finishes with a lint-free cloth. Work on one cabinet section at a time: rub glaze into recessed areas, then wipe excess toward the center with a crumpled paper towel. Stop when 30% of the base color shows through. For weathered looks, use dark brown glaze over white paint; for elegance, try metallic bronze over gray.
Fixing Glaze Mistakes Before They Harden
Glaze dries fast—have mineral spirits and clean rags ready. If too much glaze remains, wipe immediately with a damp rag. If areas look patchy, reapply within 15 minutes. Always test glaze on a hidden cabinet interior first.
Repair Water-Damaged Oak Without Replacement
White rings from hot pans or coffee cups penetrate oak’s porous surface. For light stains, rub mayonnaise into the spot for 10 minutes—oil offsets moisture rings. For deeper damage, mix equal parts baking soda and non-gel toothpaste, rub gently with a soft cloth, then wipe clean. Severe water damage requires spot-sanding: sand only the affected area to bare wood, prime, and touch up paint. Never sand the entire cabinet for one spot—this creates visible seams.
Prevent Future Damage with Strategic Sealants
Unsealed oak absorbs spills within seconds. After your final finish dries 72 hours, apply two coats of wipe-on polyurethane like Minwax Wipe-On Poly. Use a clean cotton rag in circular motions, focusing on high-touch areas like door fronts. Reapply every 2 years in busy kitchens. For quick touch-ups, keep a small container of your cabinet paint mixed with 10% polyurethane.
Cost Breakdown for Professional-Looking Results
Avoid contractor quotes of $5,000+ by doing it yourself. Here’s what you’ll actually spend:
| Item | DIY Cost | Professional Cost |
|---|---|---|
| Paint & Primer | $80-$120 | $300-$500 |
| Sandpaper/Supplies | $35 | $150 |
| New Hardware | $75-$200 | $400+ |
| Total | $190-$355 | $850+ |
Time investment: 16-24 hours over 3 days. Most homeowners finish in a weekend.
When to Call a Professional Instead
Some situations require experts:
– Structural damage: Sagging shelves or broken joints need carpentry skills
– Lead paint: Pre-1978 cabinets require certified abatement ($500+)
– Full refacing: If doors are warped beyond repair, replacement may be cheaper long-term
Test for lead with a $20 home kit from hardware stores. If positive, hire EPA-certified contractors—never sand lead paint yourself.
Maintain Your Updated Cabinets for Years
Dust weekly with microfiber cloths—never feather dusters that scratch surfaces. Clean spills immediately with pH-neutral cleaners; vinegar solutions degrade finishes over time. Every 6 months, tighten hinge screws to prevent door sagging. Reapply topcoat to high-wear zones like sink base cabinets annually. With proper care, your updated oak cabinets will last 10+ years.
Final Note: Transforming oak cabinets isn’t about hiding the wood—it’s about working with its character. By mastering grain control through strategic sanding and priming, you turn oak’s biggest drawback into an asset. The most successful updates balance modern aesthetics with subtle texture, proving dated cabinets don’t dictate your kitchen’s destiny. Start with one cabinet as a test run, and within a weekend, you’ll reclaim your space without the chaos of demolition. For ongoing inspiration, explore finish combinations on Pinterest using #OakCabinetMakeover—real homeowners share weekly maintenance hacks that keep budgets under $400.


