
That persistent drip under your sink or a handle that won’t turn properly signals it’s time to learn how to take apart a kitchen faucet. Whether you’re replacing worn parts, fixing a leak, or installing a new fixture, understanding the disassembly process saves you costly plumber visits and gives you control over your kitchen’s most-used fixture. This guide walks you through taking apart any kitchen faucet type safely and effectively—most homeowners can complete this repair in under an hour with basic tools.
Gather Essential Tools Before Starting
Before removing any components, prepare your toolkit to avoid frustrating interruptions mid-project. Kitchen faucet repair requires specific tools designed for tight spaces beneath sinks and delicate finish protection.
Critical tools include: an adjustable wrench (10-12 inch crescent wrench) for supply lines and mounting nuts, Phillips and flathead screwdrivers for handle screws, needle-nose pliers for small clips and washers, and a basin wrench for hard-to-reach mounting hardware. Add a flashlight to illuminate dark cabinet spaces, small containers to organize removed parts, and microfiber cloths to protect fixture finishes during disassembly.
Pro Tip: For stubborn handle assemblies, keep a faucet handle puller and metric Allen wrench set handy—many modern fixtures use hidden set screws requiring hex keys. Wrap screwdriver tips with electrical tape to prevent scratching chrome or brushed nickel finishes when prying off decorative caps.
Shut Off Water Supply Correctly

Skipping this step risks significant water damage. Locate and close both shutoff valves under the sink—typically labeled blue for cold and red for hot—turning them clockwise until fully closed. If valves resist turning, use adjustable pliers wrapped with cloth to prevent damage.
Critical verification step: Turn on the faucet handles to drain remaining water and confirm supply is off. Place a small container beneath supply line connections to catch residual drips. Homes without under-sink shutoffs require closing the main house water supply—usually found in the basement or near your water meter.
Warning: Never begin disassembly without confirming water is completely off. Test by slightly loosening a supply line connection—if water flows, immediately retighten and recheck shutoff valves.
Remove Handle Assembly Based on Faucet Type
Handle removal varies by design, requiring different approaches for each common faucet style.
Single-Lever Faucet Handle Removal
Most single-handle faucets hide mounting hardware beneath a decorative cap. Use a flathead screwdriver wrapped in cloth to gently pry off the cap on the handle’s top or side. Once exposed, loosen the Phillips or hex screw and lift the handle straight up. Some models require lowering the handle to access an underside set screw.
Double-Handle Faucet Handle Removal
Cross-handle designs typically have visible mounting screws beneath the hot/cold indicators. Pry off these indicators carefully, then unscrew the Phillips mounting screw. Lever-style handles often expose the screw directly on top—remove it and lift the handle straight off. If handles resist removal after screw removal, tap gently with a rubber mallet to break mineral deposits.
Common Mistake: Forcing stuck handles can crack porcelain or damage internal components. Apply penetrating oil to the handle base and wait 15 minutes before trying again.
Disassemble Spout and Spray Components
With handles removed, access the spout assembly that controls water direction and flow.
Rotating Spout Disassembly
Locate the retaining clip beneath the spout base using a flashlight. Compress the C-clip with needle-nose pliers and lift the spout straight up. The bearing assembly may fall out—note its orientation for reassembly. Some models use a threaded retaining ring that requires an adjustable wrench to loosen.
Pull-Down Spray Disassembly
Unscrew the spray head by hand (use pliers wrapped in cloth if stuck), then pull the hose through the spout from below. Guide the counterweight up through the cabinet while feeding the hose out. Disconnect the hose from the supply line using an adjustable wrench on the coupling nut.
Visual Cue: Look for mineral buildup around the swivel joint—that white crusty residue causes stiff movement and should be cleaned during reassembly.
Access and Remove Internal Valve Components

The heart of your faucet lies beneath the handle mounting area where cartridges or valve stems control water flow.
Cartridge-Style Faucet Disassembly
Remove the retaining nut with a basin wrench—these often have special shapes requiring cartridge puller tools if stuck. Once loose, lift the cartridge straight out, noting any keyways or alignment tabs. Take photos before removal to ensure correct reinstallation.
Compression Faucet Disassembly
Unscrew the stem assembly from the valve body using adjustable pliers. The rubber washer attaches to the stem bottom with a brass screw—inspect for wear and note thickness for replacement matching.
Time Saver: Place removed parts in labeled containers (e.g., “left hot side”) to prevent mix-ups during reassembly.
Remove Mounting Hardware Completely
The faucet base attaches to your sink through mounting hardware that often fuses with mineral deposits over time.
Locate mounting nuts beneath the sink—typically large hexagonal nuts with rubber gaskets. Use your basin wrench to loosen them, working diagonally if multiple bolts exist. If nuts resist movement, apply penetrating oil and wait 10 minutes before retrying.
For Stuck Mounting Nuts
Spray penetrating oil generously and allow 15 minutes for absorption. Tap the nut’s corners with a hammer and punch to break the corrosion seal. As a last resort, carefully cut through the nut with a hacksaw blade fed through from below, then remove pieces with pliers.
Warning: Always support the faucet from above when loosening mounting hardware—unsecured fixtures can fall and crack your sink.
Clean and Inspect All Components Thoroughly
With the faucet disassembled, clean and inspect each part to identify necessary replacements.
Metal Component Cleaning
Soak brass and stainless steel parts in warm, soapy water for 30 minutes. Scrub with an old toothbrush to remove mineral deposits. For stubborn buildup, use a baking soda paste—its mild abrasion cleans without damaging finishes. Rinse thoroughly and dry completely.
Rubber Component Inspection
Check washers, O-rings, and seals for cracks, hardening, or deterioration. Flexible rubber should bounce back when pinched—if it stays indented, replacement is needed. Measure thickness of critical washers for exact replacement matching.
Pro Tip: Photograph worn components with a ruler next to them—this helps match sizes at the hardware store.
Replace Worn Parts Correctly
Successful repairs depend on using exact replacement parts matched to your faucet model.
Identifying Correct Parts
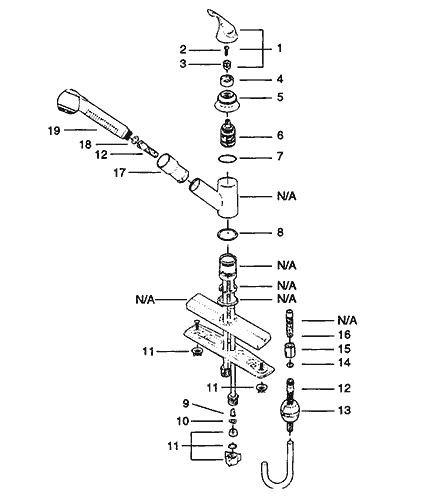
Find your faucet’s brand and model number—typically stamped on the underside of handles or base. Take this information to a plumbing supply store or search the manufacturer’s website for exploded diagrams. Major brands (Moen, Delta, Kohler) offer online parts lookup tools.
Installation Best Practices
Lubricate new O-rings with plumber’s grease before installation to prevent damage and extend seal life. Install parts in the same orientation as removed—refer to your disassembly photos. Hand-tighten first, then use tools for final quarter-turn to avoid over-tightening.
Warning: Generic “fits most” parts often fail to create proper seals. Always match original part dimensions exactly.
Reassemble in Reverse Order
Reassembly follows the exact reverse of disassembly—systematic organization prevents mistakes.
Begin by applying fresh plumber’s putty around the faucet base if reinstalling the same fixture. Roll putty into a 1/4-inch rope and press it around the base circumference. Set the faucet into position and press firmly to create an even seal.
Secure mounting hardware from below, tightening nuts alternately to prevent shifting. Hand-tighten supply lines first, then use an adjustable wrench for a final quarter-turn—over-tightening crushes washers and causes leaks.
Test for Leaks and Proper Function
Final testing validates your repair and catches issues before they cause damage.
Turn shutoff valves on slowly to prevent water hammer. Check all connections beneath the sink for drips—tighten slightly if moisture appears. Test hot and cold operation for full flow and proper mixing.
Operate spray functions through their full range. Pull-down heads should retract smoothly—if sluggish, check for hose kinks. Place dry paper towels beneath connections and run water for several minutes to detect hidden leaks.
Critical Check: Leave a dry container under the faucet overnight—any collected water indicates a developing leak requiring attention.
Maintain Your Faucet to Prevent Future Issues
Regular maintenance extends faucet lifespan and prevents problems requiring disassembly.
Clean aerators monthly by unscrewing from the spout tip and rinsing to clear mineral deposits. Wipe around the base where water accumulates to prevent mold growth. Check for drips by placing dry paper towels beneath connections.
Inspect supply lines quarterly for corrosion or moisture. Test shutoff valves by closing and reopening them to prevent seizing. Remove handles annually to clean mineral buildup around stems and lubricate O-rings with plumber’s grease.
Time-Saving Tip: Keep replacement cartridges and washers on hand for your specific faucet model—this avoids emergency trips to the hardware store when leaks develop.
Taking apart a kitchen faucet seems intimidating at first, but following this systematic approach makes the process straightforward. The key to success lies in proper preparation, careful disassembly with part organization, and thorough testing upon reassembly. Most common faucet problems—from drips to stiff handles—can be resolved with basic tools and attention to detail. If you encounter components that resist removal or discover damage beyond your repair capability, don’t hesitate to call a licensed plumber—preventing water damage is always worth the professional service cost. With these skills, you’ll keep your kitchen faucet functioning smoothly for years while avoiding unnecessary service calls.


