
Replacing your kitchen floor can dramatically transform your space, but without proper guidance, it’s easy to make costly mistakes. If you’ve ever stared at cracked tiles or worn vinyl wondering where to begin, you’re not alone—kitchen floor replacement ranks among the most common home improvement projects homeowners tackle. This guide cuts through the confusion by walking you through each critical phase of replacing your kitchen floor, helping you avoid common pitfalls that lead to uneven surfaces, moisture damage, or having to rip everything up and start over.
Before picking up a single tool, understanding the scope of your project is essential. Kitchen floors endure more traffic and moisture exposure than nearly any other room in your home, making proper installation crucial for longevity. Whether your current flooring has seen better days or you’re updating your kitchen’s style, replacing your floor requires careful planning, the right materials, and attention to detail. In the following sections, you’ll learn exactly what to consider before starting, how to prepare your space properly, and which installation methods work best for different flooring types—saving you time, money, and frustration in the process.
Essential Preparation Before Removing Old Flooring
Assess Your Current Floor Structure and Subfloor Condition
Before removing a single piece of flooring, examine what lies beneath. The subfloor—the structural layer supporting your finished floor—must be solid, level, and dry. Locate floor joists using a stud finder, then check for soft spots by applying pressure across the surface. Any spongy areas indicate potential water damage requiring repair before proceeding. Measure subfloor thickness; most modern homes use 3/4-inch plywood, while older homes might have planks. Note any height differences between your kitchen and adjacent rooms, as your new flooring must transition smoothly without tripping hazards.
Gather All Necessary Tools and Materials Before Starting
Having everything ready prevents mid-project delays that compromise results. For most kitchen floor replacements, you’ll need:
- Pry bars and hammer for removing existing flooring
- Utility knife and straightedge for cutting new materials
- Circular saw (for hardwood/laminate) or tile cutter
- Floor scraper for adhesive removal
- Moisture barrier if installing over concrete
- Underlayment appropriate for your chosen flooring
- Spacers for expansion gaps
- Knee pads and safety glasses
Rent specialty tools like floor nailers if installing hardwood. Purchase 10% more material than your measurements to account for cuts and mistakes—running out of matching planks mid-installation creates unnecessary stress.
Removing Existing Kitchen Flooring Safely and Completely

Proper Technique for Pulling Up Different Flooring Types
Each flooring material requires specific removal approaches. For vinyl sheet flooring, score it into strips with a utility knife, then peel back sections starting at a corner. When removing vinyl tiles, heat stubborn areas with a hair dryer to soften adhesive. Laminate flooring typically clicks apart—start along one wall, lifting planks at a 45-degree angle. For ceramic tile, use a hammer and cold chisel to break tiles into manageable pieces, working systematically across the floor. Always wear heavy-duty gloves and eye protection during removal to prevent injury from sharp fragments.
Critical Mistake: Skipping Subfloor Cleaning and Inspection
After removing old flooring, many DIYers make the costly error of proceeding without thorough subfloor preparation. Residual adhesive, staples, or uneven surfaces will telegraph through new flooring, creating visible imperfections. Use a floor scraper to remove all debris, then vacuum thoroughly. Inspect for nails or screws protruding through the subfloor—tap them below the surface or remove and replace with shorter fasteners. Check moisture levels with a meter; wood subfloors should read below 12% moisture content. Address any squeaks by securing loose subfloor sections to joists with ring-shank nails.
Installing Your New Kitchen Floor: Material-Specific Guidance
Laminate and Vinyl Plank Installation Best Practices
For DIY-friendly options like laminate or luxury vinyl plank (LVP), proper underlayment and expansion gaps make the difference between a professional finish and premature failure. Begin by laying foam underlayment perpendicular to your planned plank direction, overlapping seams by 6 inches and taping them closed. Start installation along the longest wall, leaving a 1/4-inch gap between planks and walls using spacers. Stagger end joints by at least 6 inches between rows to prevent pattern repetition. When cutting planks, measure twice and cut with the finished side facing up to minimize chipping. Check level frequently as you progress—kitchen floors must slope slightly toward drains in wet areas.
Tile Installation: Achieving Professional Results
Ceramic or porcelain tile offers durability but requires precision. Begin by finding the room’s center point and snapping chalk lines to create quadrants. Dry-layout tiles along these lines without adhesive to identify problematic cuts near walls. When ready to install, spread thinset mortar with the flat side of a notched trowel, then comb with the notched edge at a consistent 45-degree angle. Press tiles firmly into place, twisting slightly to ensure full contact. Use spacers to maintain consistent grout lines. For kitchens, choose tiles with a slip-resistant finish (COF rating of 0.6 or higher) near sinks and cooking areas. Allow mortar to cure 24 hours before grouting, and wait another 72 hours before heavy use.
Avoiding Costly Mistakes That Require Starting Over
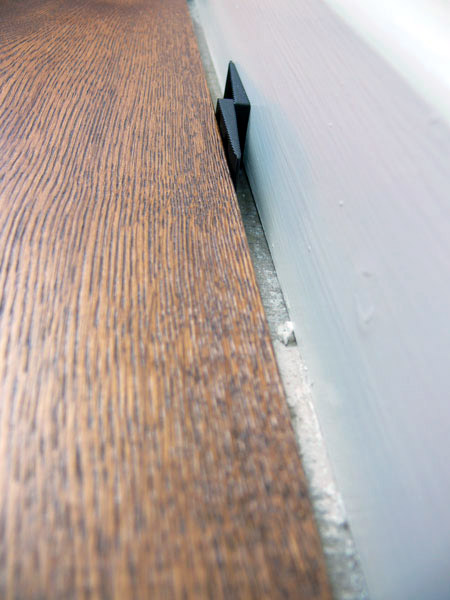
Ignoring Expansion Gaps Causes Buckling Floors
One of the most common DIY flooring failures occurs when installers neglect proper expansion gaps. All flooring materials expand and contract with temperature and humidity changes. Without adequate space (typically 1/4 inch per 8 feet of flooring), your new kitchen floor will buckle as it expands. This mistake often appears weeks or months after installation when seasonal changes occur. To prevent this, maintain consistent gaps around all perimeter walls and between rooms. Use quarter-round molding or baseboard shoe to cover these gaps while allowing necessary movement.
Improper Moisture Barrier Leads to Mold and Warping
Kitchens generate significant moisture from cooking, cleaning, and potential leaks. Installing flooring directly over concrete without a vapor barrier causes moisture wicking that warps wood and swells laminate. Even over wood subfloors, use moisture-resistant underlayment in kitchens. For concrete subfloors, install a 6-mil polyethylene sheeting barrier with seams taped and edges extending up walls before adding underlayment. Test concrete moisture levels with a calcium chloride test kit before installation—levels exceeding 3 lbs/1,000 sq ft/24 hours require additional mitigation.
Maintaining Your New Kitchen Floor for Longevity
Daily and Weekly Care Routines by Material Type
Protect your investment with appropriate cleaning methods. For vinyl and laminate, use manufacturer-approved cleaners that won’t strip finishes—avoid steam mops which can damage seams. Sweep daily and damp mop with a nearly dry cloth. With ceramic tile, clean grout lines weekly with a soft brush and pH-neutral cleaner to prevent buildup. Never use abrasive cleaners on any kitchen floor, as scratches accumulate and make surfaces harder to clean. Place mats at entry points and under chairs to minimize dirt transfer and prevent chair leg scratches.
Addressing Minor Damage Before It Becomes Major
Catches small issues immediately to avoid larger repairs. For laminate, replace individual planks by disassembling the floor back to the damaged piece—keep leftover planks for this purpose. Repair minor tile chips with epoxy-based touch-up kits matching your tile color. When vinyl develops bubbles, carefully slit with an X-Acto knife, inject adhesive, and weight down until dry. Refinish hardwood floors every 3-5 years by screening and reapplying finish rather than waiting for complete wear-through. Regular maintenance extends your kitchen floor’s life by years, preserving both appearance and functionality.
Replacing your kitchen floor successfully requires careful preparation, material-specific techniques, and attention to details many DIYers overlook. By properly assessing your subfloor, selecting appropriate materials for kitchen conditions, and following installation best practices for your chosen flooring type, you’ll create a beautiful, durable surface that withstands daily kitchen demands. Remember that taking extra time for proper moisture protection and expansion gaps prevents costly callbacks months later. Whether you choose the affordability of vinyl plank, warmth of hardwood, or durability of tile, your new kitchen floor will serve as both functional surface and style statement for years to come—just be sure to maintain it according to manufacturer recommendations to maximize its lifespan.


