
Your kitchen faucet has transformed from a reliable workhorse into a frustrating obstacle. Instead of a smooth, steady stream, water sputters erratically, spraying sideways across your sink basin. Filling a simple pot takes twice as long as it used to, and that persistent gurgling sound every time you turn on the water suggests something’s wrong. Before you reach for your phone to call a plumber, there’s a good chance the solution is simpler and cheaper than you think: replacing your faucet aerator. This small, inexpensive component takes less than 30 minutes to swap out and costs under $15, yet it dramatically improves water flow and restores proper function to one of your kitchen’s most essential fixtures.
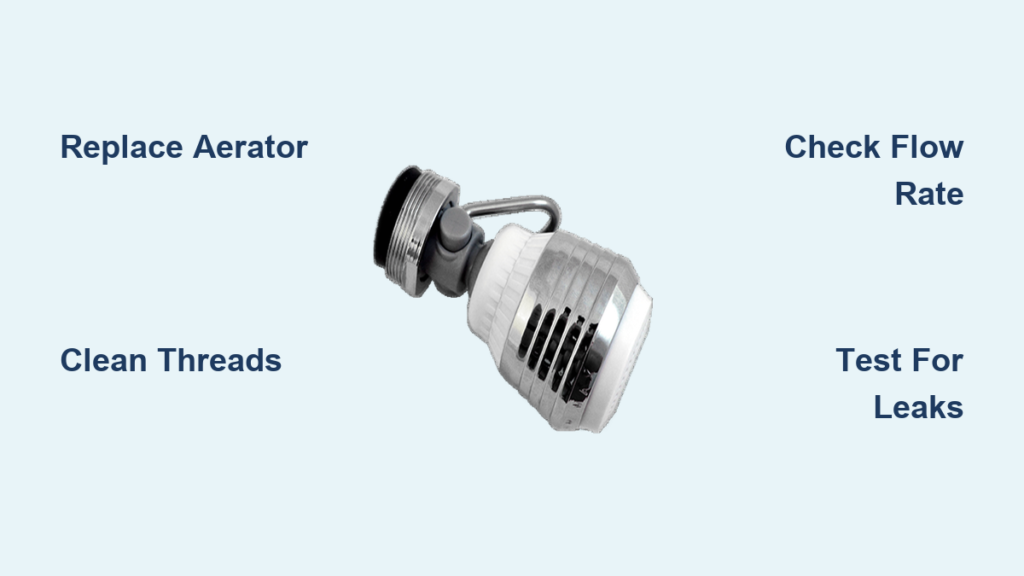
A faucet aerator is the unsung hero of your kitchen plumbing, sitting at the very tip of your faucet spout. This tiny device mixes air with water to create a steady, splash-free stream while significantly reducing water consumption. Over time, mineral deposits and sediment accumulate in the aerator’s fine mesh screen, restricting water flow and disrupting the carefully engineered air-water mixture. The good news is that replacing your aerator requires no specialized plumbing skills, minimal tools, and typically takes less time than your morning coffee break. By following this guide on how to replace aerator on kitchen faucet, you’ll restore optimal water flow while gaining valuable DIY confidence for future home maintenance tasks.
Recognize When Your Aerator Needs Replacement
Several clear symptoms indicate your aerator requires immediate attention, preventing minor issues from escalating into major frustrations.
Water Flow Reduced to a Trickle: When filling a pot takes significantly longer than usual, mineral deposits have likely clogged the aerator’s mesh screen. This restriction diminishes water pressure for all kitchen tasks. If other fixtures flow normally, the problem is isolated to this specific faucet.
Erratic Water Spraying Sideways: A properly functioning aerator creates a consistent, directional stream. If water sprays in multiple directions, splatters excessively on your countertops, or appears “chunky” with visible particles, the internal components have degraded and need replacement.
Visible Mineral Buildup Around the Tip: White, green, or rust-colored deposits on the aerator’s exterior signal significant mineral accumulation. These deposits almost certainly extend inside the device, compromising functionality. If you can see buildup externally, the internal condition is likely worse.
Gather Essential Tools Before Starting

Assemble these critical items before beginning to ensure a smooth replacement process without frustrating interruptions:
- Adjustable pliers or pipe wrench (with protective tape for jaws)
- Plumber’s tape (Teflon tape) for watertight seals
- Bucket and old towels to catch water and protect surfaces
- White vinegar for cleaning mineral deposits
- Replacement aerator matching your faucet specifications
- Small Allen wrench set for certain aerator types
Pro Tip: Wrap the jaws of your pliers with electrical tape or use rubber grip pads to protect your faucet’s finish from tool marks during removal and installation.
Prepare Your Workspace Properly
Thorough preparation prevents water damage and makes the replacement process efficient and stress-free.
Shut off both hot and cold water supply valves beneath your sink by turning them clockwise until they stop completely. Open your faucet to release residual pressure and drain remaining water. Clear the cabinet beneath your sink to create ample working space. Place a bucket directly under the faucet tip and lay old towels around the work area to catch inevitable splashes. Having everything ready prevents mid-project trips to the hardware store.
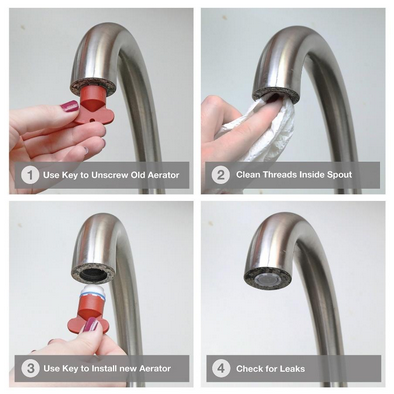
Remove the Old Aerator Safely
Extracting the old aerator requires patience and proper technique to avoid damaging your faucet.
Examine your aerator to determine its attachment type—most screw directly onto the faucet tip, while others feature push-button or twist-lock mechanisms. For standard screw-on aerators, wrap rubber grip pads around the exterior to protect the finish. Grip firmly with adjustable pliers, turning counterclockwise to loosen. Apply steady, even pressure—excessive force can damage the faucet or cause the aerator to break apart inside the threads.
If stubborn mineral deposits prevent removal, apply penetrating oil around the connection point and wait 15 minutes before attempting again. A hair dryer’s heat can also expand metal slightly, breaking mineral bonds. For aerators with internal hex screws, locate the small set screw and loosen it with an appropriate Allen wrench first.
Clean Faucet Threads Thoroughly
After removing the old aerator, inspect the threaded area for mineral deposits and debris.
Clean threads using an old toothbrush dipped in white vinegar, scrubbing thoroughly around and inside the threaded area. For stubborn buildup, soak a vinegar-soaked cloth around the faucet tip for 30 minutes before scrubbing again. Rinse thoroughly with clean water to flush loosened debris, then dry the threads completely with a lint-free cloth. This ensures a proper seal with your new aerator.
Install New Aerator Correctly
Proper installation guarantees optimal performance and prevents future leaks.
Examine your new aerator’s components—most include an outer housing, mesh screens, and a washer. If using Teflon tape, wrap 2-3 turns around the faucet threads in a clockwise direction. Avoid overwrapping, which prevents proper seating. Align the new aerator with the faucet tip, ensuring proper orientation according to manufacturer instructions.
Hand-tighten first, then use pliers with protective padding for final snugness—turn only a quarter to half turn beyond hand-tight. Excessive force can crack the aerator housing or damage faucet threads. The goal is a secure, leak-free connection, not maximum tightness.
Test for Leaks and Proper Function
Verification after installation confirms successful replacement.
Restore water supply slowly by opening valves beneath your sink. Turn on the faucet gradually, checking for leaks around the aerator connection. Evaluate the water stream for proper aeration—it should produce a steady, voluminous flow without excessive splashing. Test both hot and cold water separately, then mixed.
Run water for 2-3 minutes to flush any manufacturing residue from the new aerator. Check beneath the sink for hidden leaks that might travel along the faucet body into your cabinet.
Choose the Right Replacement Aerator

Selecting the correct replacement ensures compatibility and optimal performance.
Thread size matters: Most kitchen faucets use 55/64 inch threads, but some require 15/16 inch or 13/16 inch. Examine your old aerator or consult manufacturer specifications. Flow rate considerations: Current regulations require kitchen faucets to flow at no more than 1.8 gallons per minute. Finish matching: Select a matching finish (chrome, brushed nickel, etc.) for aesthetic consistency. Special features: Hard water areas benefit from anti-scale designs with silicone nozzles that resist mineral buildup.
Maintain Aerator Long-Term
Prolong your aerator’s lifespan with regular care.
Implement a monthly cleaning routine by removing the aerator and rinsing the mesh screen under running water. For hard water areas, increase frequency to bi-weekly inspection with monthly deep cleaning using vinegar soaks. Address mineral deposits promptly before they cause significant blockages.
Fix Common Installation Problems
Troubleshoot these frequent issues:
Connection leaks: Typically stem from damaged washers or improper Teflon tape application. Turn off water, remove aerator, inspect washer, and reapply fresh tape before reinstalling.
Persistent low pressure: If new aerator doesn’t resolve the issue, check supply valves for partial closure and inspect supply lines for kinks or blockages.
Aerator difficult to remove: Apply penetrating oil generously with extended dwell time (several hours if necessary). Use heat from a hair dryer to expand metal and break mineral bonds.
When Professional Help Is Necessary
Call a licensed plumber if you encounter damaged faucet threads, persistent leaks after proper installation, or specialized faucet designs requiring proprietary tools.
Replacing a kitchen faucet aerator represents one of the most cost-effective DIY plumbing repairs available. The entire process typically requires 30 minutes or less, uses basic tools found in most households, and costs significantly less than professional service calls. By understanding the signs of aerator failure, selecting the correct replacement, and following proper installation techniques, you restore your faucet’s performance while gaining confidence for future maintenance tasks. Regular attention to your aerator’s condition ensures continued efficient operation and optimal kitchen faucet performance for years to come.


