
Upgrading your kitchen cabinet hardware is one of the most cost-effective transformations you can make to refresh your kitchen’s appearance without a full remodel. Knowing how to put hardware on kitchen cabinets properly ensures your new knobs, pulls, and hinges function smoothly while enhancing your kitchen’s overall aesthetic. The right hardware installation creates a cohesive look that ties together your entire kitchen design while improving daily functionality. This guide provides the specific steps and insider tips you need to achieve professional-quality results, whether you’re updating existing cabinets or finishing a complete renovation project.
Many homeowners underestimate the impact of properly installed cabinet hardware—it serves as both the functional interface you interact with daily and a critical design element that defines your kitchen’s character. With the right approach, you can complete this project in a single weekend while avoiding common pitfalls that lead to misaligned pulls, stripped holes, or hardware that loosens prematurely. Let’s dive into the exact process for achieving flawless cabinet hardware installation.
Essential Tools for Perfect Cabinet Hardware Installation
Before drilling a single hole, gather these specialized tools that make how to put hardware on kitchen cabinets significantly easier and more precise.
Your drilling kit must include a variable-speed drill/driver with adjustable clutch settings to prevent overdriving screws into delicate cabinet surfaces. Use sharp brad-point drill bits specifically designed for woodworking—they create clean entry points with minimal tear-out. For consistent hole depth, consider a drill stop collar that attaches to your bit and prevents drilling too deep into cabinet doors.
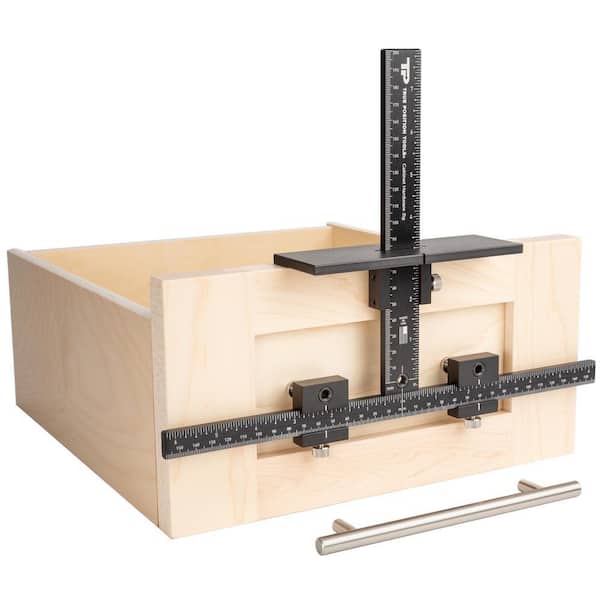
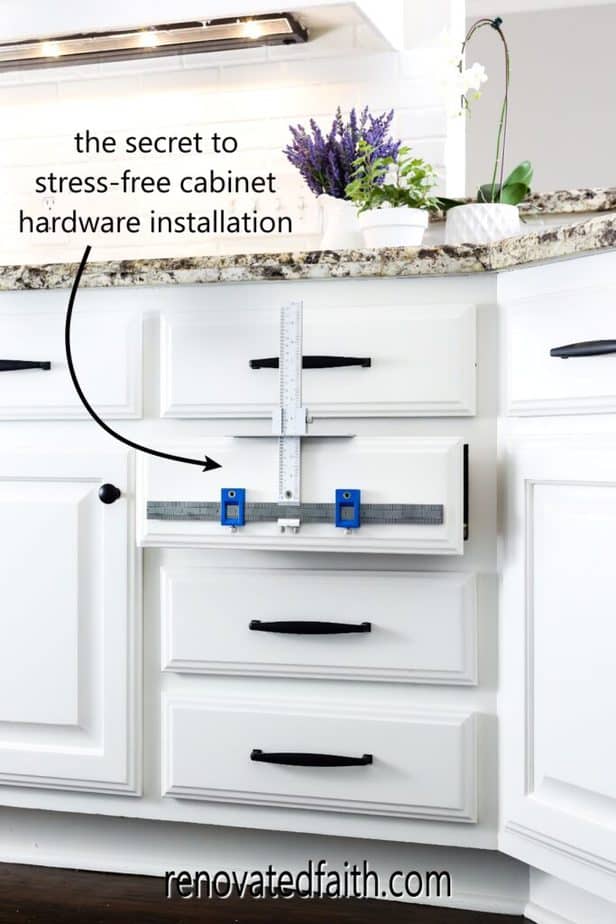
The cabinet hardware installation jig is your secret weapon for perfectly aligned pulls across multiple cabinets. This simple positioning template ensures consistent spacing without measuring each hole individually. Most jigs accommodate standard pull lengths (3″, 4″, 5″) and automatically position holes at the industry-standard 3″ or 128mm centers.
Don’t forget these precision measurement tools:
– Digital calipers for verifying exact hole spacing on your new hardware
– Laser level for maintaining consistent height across long cabinet runs
– 6-inch torpedo level for checking pull alignment on individual cabinets
– Magnetic screwdriver with interchangeable tips for handling small hardware screws
Plan Your Hardware Layout for Visual Harmony
Skipping proper planning causes the most common installation mistakes that make DIY projects look amateurish. Follow these specific layout techniques to ensure your hardware creates visual cohesion throughout your kitchen.
Measure Existing Holes Before Purchasing New Hardware
Examine your current hardware mounting holes with a digital caliper to determine the exact center-to-center measurement. Standard pull configurations typically feature 3″, 4″, or 96mm spacing, but older cabinets may have non-standard measurements. If your existing holes don’t match your new hardware, you have three options:
- Fill existing holes completely with wood filler, let dry, then sand smooth before redrilling
- Use hardware with adjustable backplates that accommodate multiple hole patterns
- Select new hardware specifically matching your existing hole spacing
Create a Physical Template for Consistent Placement
For perfect alignment across all cabinets, make a cardboard template from your first perfectly installed pull:
1. Cut a 1″x6″ strip of cardboard
2. Mark exact hole positions from your first successful installation
3. Use this template to transfer positions to all remaining cabinets
4. Verify alignment with your laser level before drilling
This template method eliminates cumulative measurement errors that become visually apparent across multiple cabinets. For drawers, position pulls at consistent heights relative to drawer tops—typically 1.5″ down from the top edge for standard 3″ pulls.
Drill Perfectly Aligned Mounting Holes
The difference between professional and amateur hardware installation comes down to hole precision. Follow these specific drilling techniques to avoid common mistakes.
Use the Right Drill Bit Size for Your Cabinet Material
Cabinet material determines proper pilot hole sizing:
– Solid wood doors: 7/64″ for #8 screws
– Particleboard/MDF: 1/8″ for #8 screws
– Plywood edges: 3/32″ for #8 screws
Drill bits that are too small cause wood to split; bits that are too large create loose fittings that lead to wobbly hardware. Test your drill bit size on a scrap piece of your cabinet material before drilling visible surfaces.
Prevent Tear-Out on Finished Surfaces
Place blue painter’s tape over drilling locations to prevent finish chipping. For through-holes where the bit exits the back surface, back your workpiece with a scrap wood block to catch the drill bit cleanly. Drill at 500-700 RPM with light pressure—too fast burns the finish, too slow causes tear-out.
Install Cabinet Pulls with Professional Precision
Pull installation requires more precision than knobs due to dual mounting points. Follow these exact steps for perfect results.
Mounting Sequence for Flawless Alignment
- Insert one screw partially into the top mounting hole
- Verify alignment using your torpedo level across the pull’s top surface
- Adjust position as needed before inserting the bottom screw
- Tighten top screw completely, then bottom screw
- Recheck level before final tightening
For heavy drawers or frequent-use cabinets, add flat washers beneath screw heads to distribute clamping force and prevent hardware from sinking into softer cabinet materials over time.
Positioning Guidelines for Different Cabinet Types
- Base cabinets: Pulls centered 2.5″ up from drawer bottom
- Wall cabinets: Pulls centered 1.5″ down from drawer top
- Tall pantry cabinets: Pulls centered vertically on doors
- Corner cabinets: Pulls positioned for natural hand path when opening
Avoid the common mistake of placing all pulls at identical heights regardless of cabinet type—this creates visual imbalance that trained eyes immediately notice.
Correctly Install Cabinet Knobs for Maximum Functionality
Knob installation seems simpler than pulls but requires precise centering for professional results. Follow these specific techniques for flawless knob placement.
Find True Vertical Center on Cabinet Doors
- Measure door height and divide by 2 to find center point
- Subtract 1.5″ for standard knob placement on upper cabinets
- Add 1.5″ for standard placement on base cabinets
- Mark this point with a light pencil dot
Use a center-finding ruler for perfectly centered measurements on irregularly shaped doors. For glass cabinet doors, position knobs slightly lower (add 2″) to accommodate the visual weight of glass.
Secure Knob Mounting Without Damaging Finishes
Insert the mounting bolt through the door from the inside, then thread the knob onto the bolt from the outside. Tighten until snug, then give exactly one-quarter additional turn—any more risks cracking delicate knob materials or stripping threads. For ceramic or glass knobs, place a thin rubber washer between the mounting plate and cabinet surface to prevent stress cracks.
Fix Common Hardware Installation Problems
Even experienced installers encounter these issues—know exactly how to resolve them without starting over.
Repair Stripped Screw Holes in Particleboard
- Remove hardware and clean out hole
- Dip 3-4 wooden toothpicks in wood glue
- Insert toothpicks flush with surface
- Let dry 2 hours, then trim excess
- Redrill pilot hole and reinstall hardware
For severe stripping, use threaded inserts designed for particleboard—they provide permanent thread restoration that withstands repeated removals.
Correct Misaligned Hardware Without Visible Damage
If you discover misalignment after installation:
1. Loosen but don’t remove screws completely
2. Gently tap hardware into correct position with rubber mallet
3. Retighten while holding in proper alignment
4. For stubborn misalignment, fill original holes and redrill 1/8″ away
Never force hardware into position—this cracks surrounding material and creates more visible problems.
Maintain Your Hardware for Long-Term Performance
Proper maintenance extends hardware life and preserves your kitchen’s appearance for years.
Monthly Cleaning Routine for Different Finishes
- Brass hardware: Wipe with soft cloth dampened with vinegar-water solution (1:1), then dry immediately
- Stainless steel: Clean with glass cleaner and microfiber cloth to prevent water spots
- Painted hardware: Use mild soap solution and soft toothbrush for crevices
- Matte black: Avoid abrasive cleaners—damp microfiber cloth only
Never use steel wool, abrasive pads, or harsh chemicals that strip protective coatings. For stubborn grease buildup around pulls, use a cotton swab dipped in rubbing alcohol.
Semi-Annual Lubrication for Moving Parts
Apply a tiny drop of silicone-based lubricant to hinge pivot points and drawer slide mechanisms twice yearly. Wipe away excess to prevent dust accumulation. Avoid oil-based lubricants—they attract grime and create sticky residues that worsen over time.
Final Verification Before Project Completion
Before declaring your hardware installation complete, perform these professional verification steps:
- Open and close every door/drawer 10 times to test for smooth operation
- Check alignment from standing, seated, and floor-level viewing positions
- Verify all screws are tightened to consistent torque (snug + quarter-turn)
- Clean fingerprints and installation residue from all hardware surfaces
- Photograph your work for future reference when replacing individual pieces
Pay special attention to hardware on frequently used cabinets—pantry doors and sink base drawers receive the most wear and show installation flaws first. Address any minor issues now before daily use makes them more noticeable.
Achieve Professional Results with These Key Principles
The secret to knowing how to put hardware on kitchen cabinets like a pro comes down to three fundamentals: precise measurement, appropriate tool selection, and understanding material-specific installation requirements. By following these specific techniques, you’ll transform your kitchen with hardware that looks professionally installed and functions flawlessly for years. Remember that consistent attention to detail throughout the process—not perfection in any single step—creates the cohesive, high-quality results that elevate your entire kitchen’s appearance. Whether you’re installing sleek modern pulls or classic cabinet knobs, proper installation ensures your hardware serves as both functional interface and design focal point that enhances your daily kitchen experience.


