
Is your kitchen stuck in the past with dated metal cabinets that have seen better days? Before you consider a costly full renovation, know that painting your old metal kitchen cabinets offers one of the most budget-friendly transformations you can make. Whether your cabinets have yellowed with age, developed rust spots, or simply show decades of wear, a professional-looking paint job can breathe new life into your entire kitchen space. Unlike wood cabinets, metal surfaces demand specific preparation techniques to ensure your new paint adheres properly and withstands the humidity, heat, and daily use that kitchen cabinets endure.
This comprehensive guide walks you through every critical step of the process from assessment through final curing. You’ll learn exactly which materials deliver professional-quality results, how to properly clean and prep metal surfaces that have accumulated decades of kitchen grime, what primers and paints work best for high-moisture environments, and how to avoid the common pitfalls that lead to peeling, bubbling, or uneven finishes. By following these proven methods, you can achieve a factory-like appearance that resists chipping and moisture damage for years to come.
Identify Rust and Surface Damage Before Starting
Before purchasing supplies, conduct a thorough inspection of each cabinet door and drawer front. Metal kitchen cabinets, particularly those from mid-20th century homes, typically feature steel construction with baked-on enamel finishes that can last decades with proper maintenance. Pay special attention to areas where moisture accumulates—look for rust around hardware holes, along bottom edges, and inside corners. Light surface rust can be successfully treated and painted over, but severe corrosion that has compromised the metal’s structural integrity may require cabinet replacement rather than refinishing.
Check for existing paint damage including peeling, bubbling, or alligatoring patterns, which indicate serious adhesion problems that must be addressed before repainting. Determine whether your cabinets have a glossy or matte finish, as glossier surfaces require more aggressive preparation to ensure new paint bonds properly. Count your cabinet doors and drawer fronts, measure their total square footage, and assess whether you’ll need to remove and reinstall hardware or replace it entirely. This assessment phase typically takes thirty minutes to an hour but prevents mid-project trips to the hardware store and ensures you purchase sufficient materials for the entire job.
How to Test for Rust Severity
Gently scratch suspected rust areas with a coin or screwdriver. If the metal flakes off easily or feels soft underneath, the corrosion has likely penetrated too deeply for a successful paint job. Surface rust that only affects the top layer can be treated with proper preparation.
What to Do With Minor Rust Spots
For light surface rust, use naval jelly or a rust converter product before sanding. Apply according to manufacturer instructions, allow to dry completely, then proceed with your standard sanding protocol. This chemical treatment prevents rust from spreading beneath your new paint.
Gather High-Quality Materials Specifically for Metal Surfaces

Successful cabinet painting requires proper preparation materials, quality primers designed for metal surfaces, and appropriate topcoat paints that withstand kitchen conditions. For cleaning and degreasing, you’ll need trisodium phosphate (TSP) or a comparable degreaser, clean microfiber rags, and a stiff-bristled nylon brush for removing stubborn grime from grooves and details. Sandpaper in multiple grits—ranging from 80-grit for rust removal and heavy oxidation to 220-grit for final smoothing—proves essential for creating the mechanical adhesion that paint requires on metal surfaces.
Your primer selection significantly impacts final results. Choose a bonding primer specifically formulated for slick or non-porous surfaces, or a rust-inhibiting metal primer if any corrosion exists. For the topcoat, oil-based alkyd paints or high-quality water-based acrylic paints rated for cabinets and trim provide the durability kitchen cabinets demand. Avoid standard wall paints, which lack the hard finish and adhesion properties necessary for high-use surfaces. Additional supplies include blue painter’s tape with low tack, canvas drop cloths (not plastic, which can create condensation), screwdrivers for hardware removal, a high-quality angled brush or HVLP sprayer for application, and either metal-specific body filler for repairing dents or holes before painting.
Essential Paint and Primer Brands
Look for products specifically labeled for metal surfaces such as Zinsser Bulls Eye 1-2-3 for priming or Benjamin Moore Advance for topcoats. These products contain additives that enhance adhesion to metal and provide superior durability in kitchen environments.
Remove Hardware and Execute Deep Cleaning
Begin the actual work by removing all cabinet hardware including hinges, handles, knobs, and any decorative elements. Place hardware in labeled bags or containers so reinstallation proceeds smoothly, and consider replacing outdated hardware with new pieces that complement your desired aesthetic. This step typically requires a screwdriver and takes thirty minutes to two hours depending on cabinet count. With hardware removed, you’ll have full access to all surfaces that require painting and can identify hidden damage or problem areas previously obscured.
Cleaning metal cabinets demands more effort than many DIYers anticipate. Kitchen cabinets accumulate years of grease, cooking residue, and hand oils that interfere with paint adhesion if not completely removed. Mix TSP or degreaser according to package directions, apply to all surfaces with a sponge or spray bottle, and scrub thoroughly, paying extra attention to areas around handles and upper cabinets where grease accumulates most heavily. Rinse with clean water and allow surfaces to dry completely, which typically requires several hours. For stubborn grease deposits that resist standard cleaning, consider using a citrus-based degreaser or diluted vinegar solution for a second cleaning cycle before proceeding.
Sand and Repair Metal Surfaces Thoroughly
Sanding creates the microscopic texture that allows primer and paint to bond effectively with smooth metal surfaces. Begin with 120 to 150-grit sandpaper to remove any existing gloss, loose paint, or surface oxidation. Work in consistent strokes following the grain direction if visible, applying even pressure across all surfaces including edges and profiles. Progress through finer grits—180-grit followed by 220-grit—until the surface feels slightly rough to the touch and appears uniformly matte. This process generates significant dust, so wear a respirator and protect surrounding areas with drop cloths.
After sanding, inspect all surfaces for dents, scratches, or holes that require filling before painting. Metal-safe body filler or Bondo works well for repairing damaged areas on steel cabinets, while auto-body filler serves the same purpose on aluminum surfaces. Apply filler with a putty knife, slightly overfilling the damaged area, and allow it to cure according to product instructions. Once cured, sand the filled areas flush with surrounding surfaces using 220-grit sandpaper, feathering edges to blend seamlessly with the surrounding metal. Wipe all surfaces with a tack cloth to remove sanding dust before applying primer—this final cleaning step ensures no particles interfere with your primer application.
Apply Primer with Precision for Maximum Adhesion
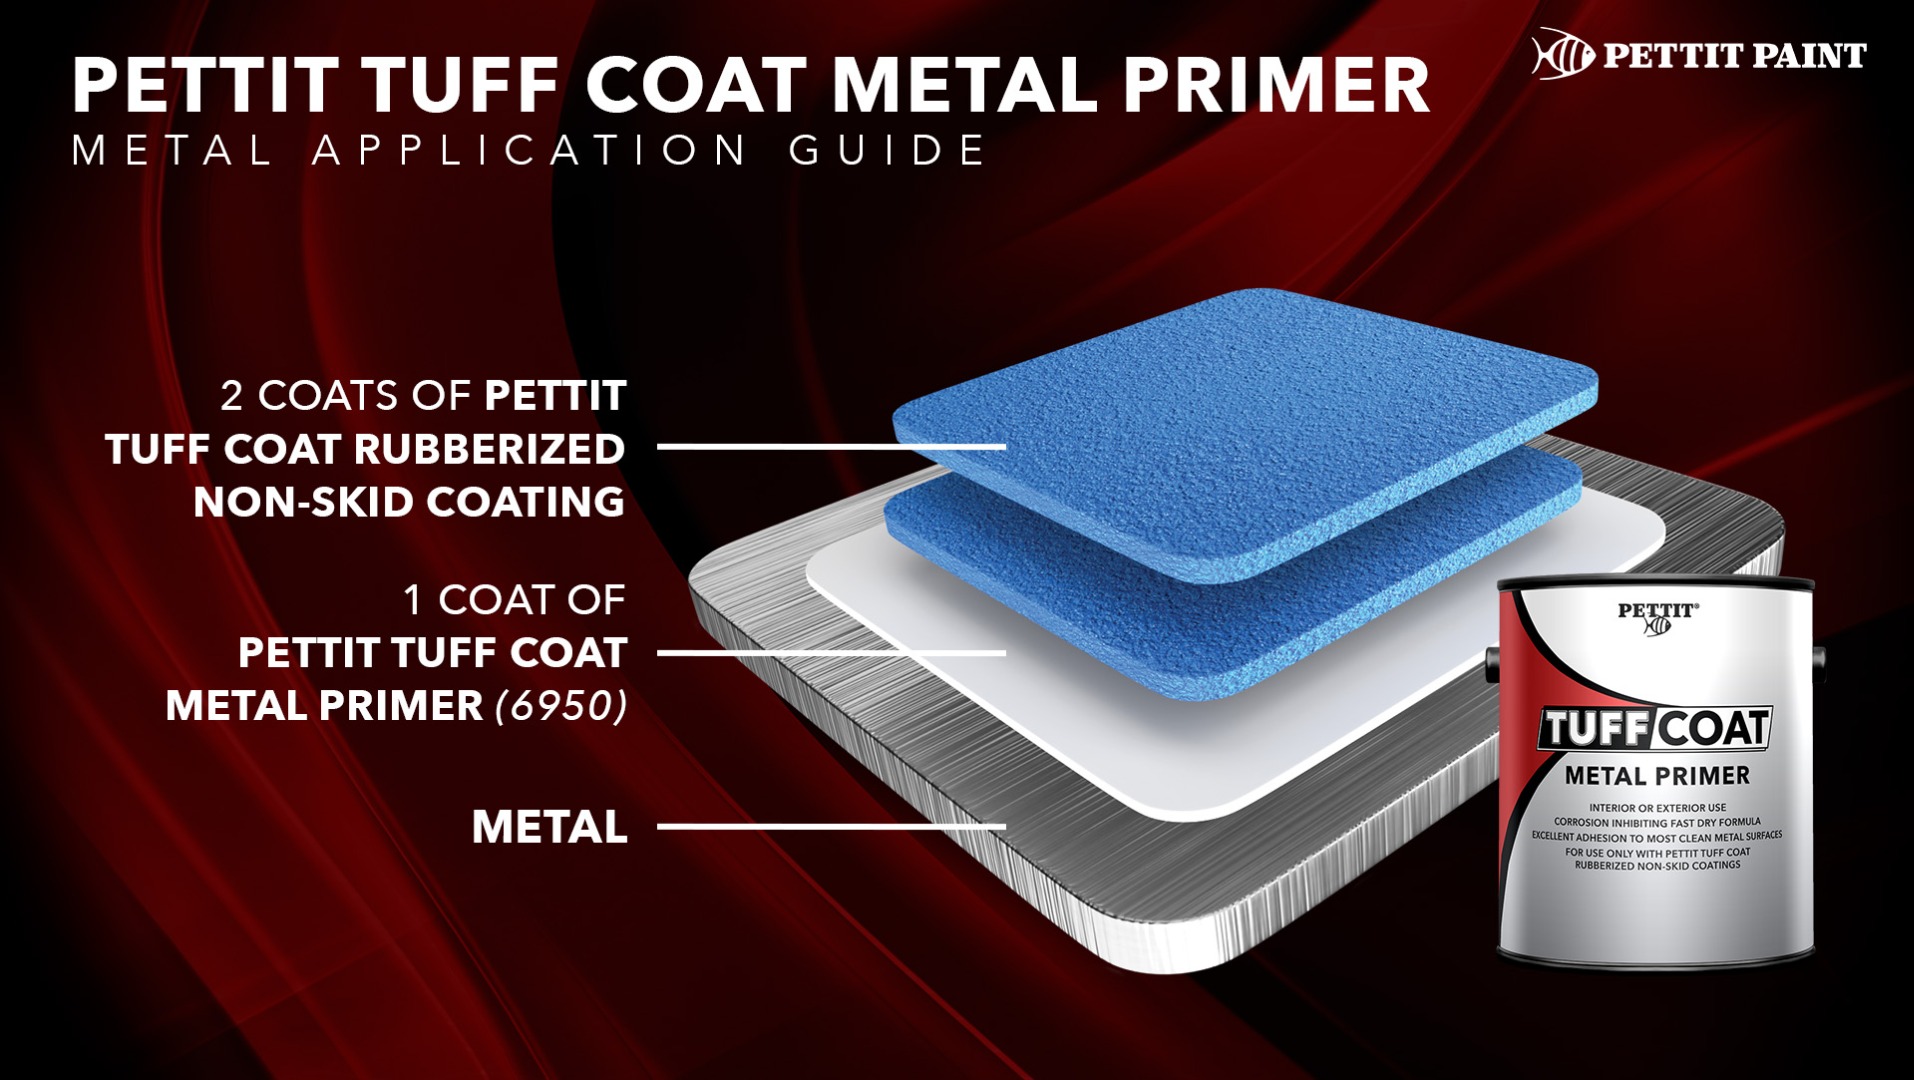
Primer serves as the critical foundation that determines whether your painted cabinets will maintain their appearance for years or begin failing within months. For metal surfaces, choose either a rust-preventive metal primer or a bonding primer specifically designed for slick, non-porous substrates. Apply primer in thin, even coats using a high-quality brush designed for your chosen primer type or a sprayer for smoother results on flat surfaces. Most primers require only one coat for adequate coverage on properly sanded metal, though a second coat provides added protection on heavily repaired surfaces or areas with remaining minor imperfections.
Allow primer to cure fully before sanding or topcoating—typically twenty-four hours for oil-based primers and two to four hours for water-based products. Lightly scuff sand cured primer with 320-grit sandpaper to remove any brush marks or texture inconsistencies, then wipe clean with tack cloth. This intermediate sanding step isn’t always necessary but significantly improves the final finish quality, particularly when using high-gloss paints that show every imperfection. The primer stage typically requires one day from application through curing, though planning for additional drying time ensures you don’t rush the process and compromise results.
Apply Topcoat Using Professional Techniques
Topcoat application determines your cabinets’ final appearance and durability. For kitchen environments, semi-gloss or high-gloss finishes provide the best combination of durability, moisture resistance, and easy cleaning—matte and satin finishes show wear more readily and prove more difficult to keep clean. Whether using oil-based or water-based paint, apply thin coats rather than attempting full coverage in a single application. Thick coats lead to drips, extended drying times, and soft finishes that dent and scratch easily during use.
Load your brush or roller carefully, removing excess paint to prevent drips and uneven application. Work in consistent strokes, maintaining a wet edge to avoid lap marks and visible brush transitions. For spray application, thin paint according to manufacturer recommendations and apply in steady, overlapping passes. Most cabinets require two to three topcoat layers for complete, uniform coverage, with light sanding between coats using 400-grit or finer sandpaper to remove any texture and ensure smooth results. Allow each coat to dry completely before applying the next—typically overnight for oil-based paints and several hours for quality water-based formulations. Pro Tip: Paint cabinet doors flat on sawhorses rather than hanging to achieve the smoothest possible finish with minimal drips.
Complete Reinstallation and Final Touch-Ups
Once final paint coats have cured for at least forty-eight to seventy-two hours, you can reinstall hardware and return cabinets to functional use. Curing time matters significantly—paint that feels dry to the touch may still be soft underneath, and premature use can result in permanent impressions, scratches, or hardware damage. Inspect each cabinet door and drawer for any paint drips, runs, or uneven areas that require touch-up before completing the project. Light sanding with fine-grit paper followed by careful spot-priming and painting addresses these issues without requiring full repainting.
Reinstall hinges and hardware using your labeled system, adjusting hinges as needed to ensure doors hang properly and close evenly. New hardware often provides an instant aesthetic upgrade—consider brushed nickel, matte black, or vintage-inspired pulls that complement your newly painted cabinets. Apply a thin bead of clear silicone caulk where cabinet frames meet walls or countertops to create a moisture seal that protects edges from water damage.
Maintain Your Painted Cabinets for Longevity
Proper maintenance extends the life of your painted cabinets significantly. Allow paint to fully cure for two to three weeks before cleaning surfaces with water or mild cleaners—aggressive cleaning during the curing period can damage the finish. Use soft cloths or sponges for cleaning, avoiding abrasive pads or harsh chemicals that scratch or dull painted surfaces. Immediately wipe water splashes and cooking residue from cabinet surfaces, particularly around the stove and sink where moisture and grease accumulate most heavily.
Inspect cabinets periodically for any signs of paint failure including peeling edges, chips, or moisture damage near sinks and dishwashers. Address minor chips promptly with touch-up paint to prevent moisture from reaching bare metal and causing rust. With proper care and maintenance, your professionally painted metal cabinets should maintain their appearance for eight to fifteen years before requiring attention again.
Quick Reference: Project Timeline
| Phase | Time Required |
|---|---|
| Assessment and Planning | 1-2 hours |
| Material Gathering | 1-2 hours |
| Hardware Removal and Cleaning | 2-4 hours |
| Sanding and Repairs | 4-6 hours |
| Priming | 1-2 hours + overnight dry |
| Topcoat Application | 3-4 hours + dry time between coats |
| Hardware Reinstallation | 1-2 hours |
Total Project Duration: 5-7 days (accounting for drying time between stages)


