
Tired of outdated tile countertops but not ready for a full kitchen renovation? Painting your existing tile surfaces offers an affordable transformation that can breathe new life into your kitchen without the mess, expense, and disruption of replacement. Many homeowners discover their ceramic or porcelain tile counters remain structurally sound despite showing their age through dated colors, worn finishes, or mismatched aesthetics. Rather than investing thousands in new countertops, you can achieve professional-looking results with a carefully executed painting project that typically costs under $150 and fits within a weekend timeframe.
This guide provides the essential steps for successfully painting tile countertops, ensuring your DIY project delivers beautiful, durable results that withstand daily kitchen demands. Whether you’re dealing with 1990s-era tile that no longer complements your updated kitchen or simply want a temporary refresh before selling your home, properly painted tile countertops offer remarkable visual impact with minimal investment. By following these detailed instructions for surface preparation, product selection, and application techniques, you’ll create a refreshed kitchen surface that looks anything but temporary.
Essential Materials and Tools You Must Have

Gathering all necessary supplies before starting prevents frustrating interruptions and ensures your project progresses smoothly from preparation through final sealing. Successful tile countertop painting requires specialized materials designed specifically for non-porous surfaces that will endure kitchen use.
Your painting supplies must include a high-quality tile refinishing kit or specialty tile paint—standard wall paint lacks the necessary adhesion and durability for countertop surfaces. Epoxy-based paints and two-part tile refinishing systems offer superior adhesion and wear resistance but require precise application and longer curing times. Acrylic enamel paints formulated for tile provide a more user-friendly alternative with good durability. Choose your paint color carefully, understanding that darker shades effectively conceal minor imperfections while lighter colors create an illusion of spaciousness in your kitchen.
Thorough preparation materials prove equally critical to your project’s success. Trisodium phosphate (TSP) or comparable degreasing cleaner removes years of accumulated cooking residue and kitchen oils that would prevent proper paint adhesion. Fine-grit sandpaper (220-320 grit) creates the necessary surface texture for primer to bond effectively. A high-adhesion bonding primer specifically designed for slick surfaces forms the essential foundation for your finish coat. Painter’s tape protects surrounding surfaces including walls, cabinets, and any tile you don’t intend to paint.
Your application toolkit should include a quality mini foam roller for smooth, professional-looking coverage on large surfaces, plus angled sash brushes for precise corner and edge work. A paint tray maintains consistent roller loading, while a putty knife helps apply painter’s tape cleanly along irregular surfaces. Drop cloths protect your floors from accidental spills, and a small detail sander or sanding block handles edge preparation efficiently.
Step-by-Step Surface Preparation Process
Surface preparation determines whether your painted countertop looks professional or fails prematurely under kitchen use. Tile’s non-porous glaze naturally resists paint adhesion, making thorough mechanical and chemical preparation absolutely essential for long-lasting results.
Begin by clearing all items from your countertop surface, including small appliances, utensils, and decorative objects. Clean the entire surface thoroughly using TSP mixed according to package directions, scrubbing vigorously with a stiff brush to remove grease, food residue, and years of accumulated grime. Focus special attention on areas near cooking surfaces and sinks where buildup concentrates most heavily. Rinse completely with clean water and allow the surface to dry fully—this typically requires several hours or overnight drying in humid conditions.
Inspect grout lines carefully for cracks or deterioration that needs repair before painting. Remove loose grout with a utility knife or grout saw, then apply fresh grout and allow it to cure completely according to manufacturer instructions. While paint can cover minor grout discoloration, deeply stained or moldy grout should be replaced to ensure a stable base.
Lightly sand the entire tile surface using fine-grit sandpaper, creating subtle texture that primer can grip. Apply even pressure to avoid visible scratch patterns—you’re micro-etching the surface, not removing the glaze entirely. Wipe away all sanding dust with a tack cloth or slightly damp rag to ensure no residue remains. Any dust left behind creates weak points in the paint bond that will eventually fail.
Apply painter’s tape along all edges where the countertop meets walls, cabinets, or backsplash. Press the tape edges firmly to prevent paint bleed, using a putty knife to seal the tape line along irregular surfaces. Protect surrounding areas with drop cloths, extending well beyond the immediate work zone to catch any drips or splatter.
Proper Priming Techniques for Long-Lasting Results
Primer serves as the critical bridge between your tile surface and paint layers, providing the adhesion necessary for a durable finish. Standard primers designed for drywall won’t bond effectively to glazed tile—you need a specialty bonding primer formulated specifically for slick, non-porous substrates.
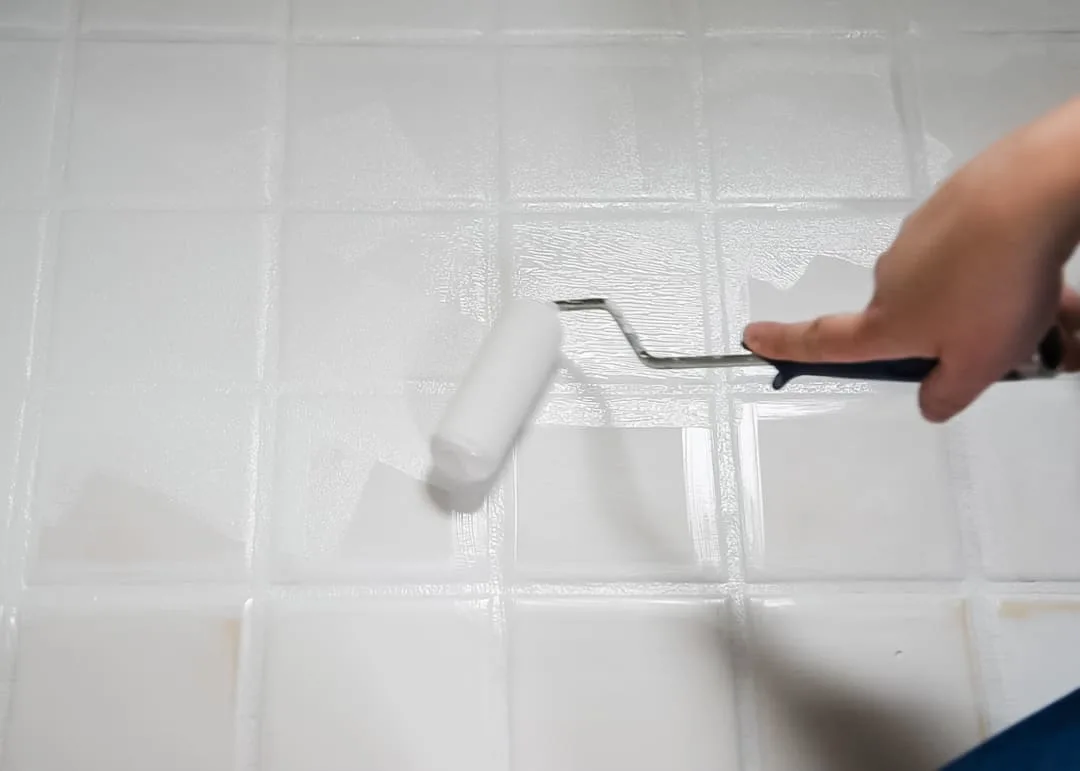
Apply the bonding primer using your foam roller with smooth, overlapping strokes that maintain a wet edge to prevent roller marks. Start in one corner and work systematically across the surface, maintaining consistent pressure for uniform coverage. For corners and edges inaccessible to the roller, switch to your angled brush with minimal paint loading, feathering strokes to blend seamlessly with the rolled areas.
Most bonding primers require only one coat for adequate coverage on tile surfaces, though a thin second coat provides additional insurance against peeling and extends finish longevity. Allow the primer to dry completely before proceeding—drying times vary by product but typically range from one to four hours. Resist rushing this phase; inadequate primer drying creates weak bonds that fail under normal kitchen use.
After drying, inspect the primed surface for thin spots, bubbles, or imperfections. Lightly sand any raised nibs with fine-grit sandpaper, then wipe clean before applying your first finish coat. A properly primed surface should appear uniformly opaque with a slight texture—smooth enough to look attractive but textured enough for your finish paint to grip effectively.
Professional Paint Application Methods
The finish coat transforms your outdated tile into a fresh, updated surface, and proper application technique distinguishes between professional-quality results and amateurish appearance. Whether using a two-part epoxy system, specialty tile paint, or high-quality acrylic enamel, the application principles remain consistent: thin coats build better coverage than thick ones, and patience produces superior results.
Stir your paint thoroughly before application to mix any settled pigments completely. Two-part epoxy systems require careful mixing according to package directions—combining resin and hardener in exact proportions for specified durations. Once mixed, these products have limited working time before curing begins, so prepare only what you can apply within that window.
Apply your first coat using systematic technique, maintaining a wet edge and working in controlled sections. Load your roller lightly—excess paint creates drips, runs, and uneven texture difficult to correct once dried. The first coat will likely appear thin and somewhat translucent, especially when covering dark tile with lighter paint. This is normal; attempting thicker application to achieve opacity in one coat creates problems requiring extensive correction.
Allow the first coat to dry completely according to manufacturer recommendations—drying times vary significantly between product types. Epoxy paints may require overnight drying between coats, while some specialty tile paints allow recoating within hours. Check specific product instructions and plan your timeline accordingly. Lightly sand between coats using very fine-grit sandpaper (400+ grit) to remove minor imperfections and create mechanical adhesion for subsequent layers.
Apply a second coat using identical technique, maintaining consistent coverage without heavy application. This coat should provide complete opacity, though dramatic color transformations may require a third thin coat. Allow the final coat to dry fully before proceeding to sealing, which may require anywhere from 24 hours to several days depending on the product.
Sealing for Maximum Durability and Protection
Sealant application transforms your painted surface from cosmetic upgrade to durable, food-safe countertop that resists moisture, stains, and daily wear. Even the highest-quality paint will fail prematurely without proper sealing, as kitchen use exposes surfaces to water, acidic foods, cleaning products, and physical abrasion.
Select sealant appropriate for your paint type and intended use. Water-based polyurethane sealants work well with latex and acrylic paints, offering good protection with easy cleanup. Two-part epoxy sealants provide maximum durability and moisture resistance but require careful application. Food-safe sealants are essential for surfaces contacting food directly—verify manufacturer certifications.
Apply thin, even sealant coats using a high-quality foam brush or roller, working in the same systematic pattern used for paint application. Most sealants require at least two coats for adequate protection, with light sanding between coats to ensure proper adhesion. Allow each coat to dry completely before applying the next—the curing process often takes longer than paint drying.
Curing time varies significantly between sealant types, with some products reaching full cure within 24 hours while others require up to a week. During this curing period, treat your newly painted surface gently—avoid placing heavy objects, delay regular cleaning, and use caution with hot items. Full cure means the sealant has reached maximum hardness and chemical resistance; using the surface before this point compromises durability.
Maintaining Your Painted Tile Countertops
Proper maintenance extends the life of your painted tile countertops significantly. While painted surfaces require more careful treatment than natural stone or solid-surface materials, reasonable precautions keep them looking attractive without imposing unreasonable restrictions.
Use cutting boards and trivets consistently to protect the painted surface from scratches, heat damage, and moisture exposure. These simple habits prevent the most common causes of painted countertop damage. Clean up spills promptly, particularly acidic substances like tomato sauce, citrus juices, and wine, which can degrade sealant and affect paint color over time.
Clean painted surfaces using mild soap and water rather than harsh chemical cleaners. Abrasive scrubbers, steel wool, and aggressive cleaning products damage the sealant layer and may scratch or dull the painted surface. Microfiber cloths and soft sponges provide effective cleaning without causing harm. For stubborn stains, apply a mild cleaner and allow it to sit briefly before wiping away—avoid aggressive scrubbing.
Expect some gradual wear over time, particularly in high-use areas near the sink and stove. When you notice the finish beginning to thin or show wear patterns, applying a fresh coat of sealant extends the life of your countertops significantly without requiring complete repainting. This maintenance approach costs considerably less than original installation and keeps your countertops looking fresh indefinitely.


