

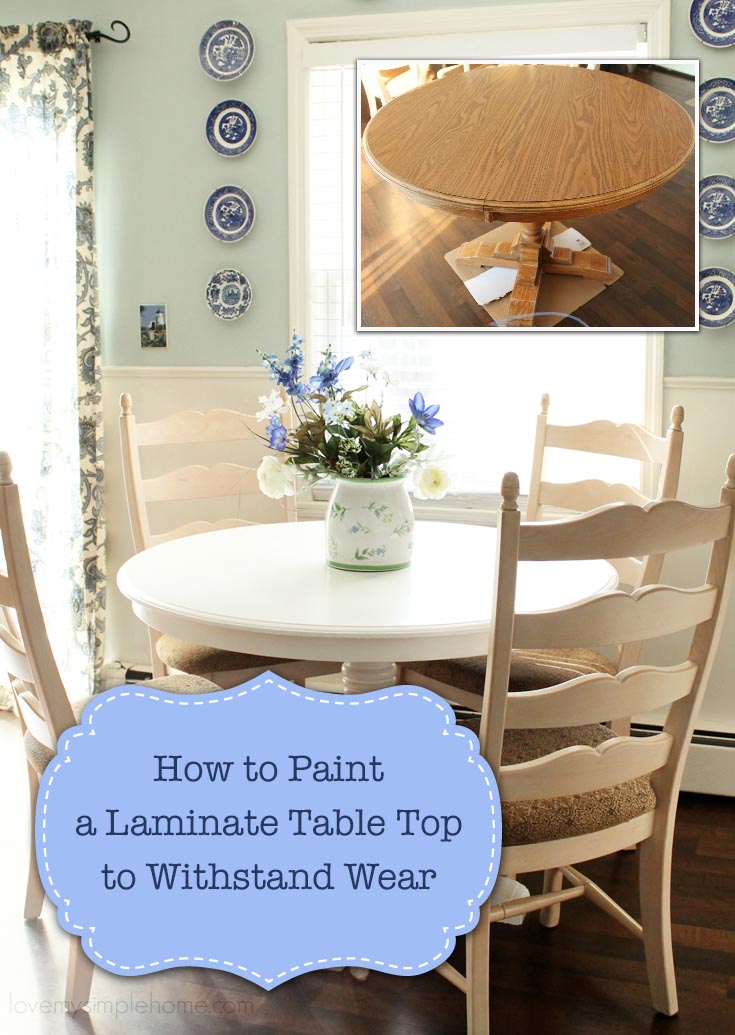
Your laminate kitchen table has seen better days—scratches mar its surface, the color feels dated, and you’re tired of masking imperfections with tablecloths. What if you could transform it with paint instead of replacing it? The reality is that painting laminate presents unique challenges that trip up even experienced DIYers—the slick, non-porous surface resists paint adhesion like a shield, causing peeling, chipping, and frustration within weeks if you skip critical preparation steps. The good news? With the right technique, materials, and patience, you can transform a tired laminate table into a stunning focal point that withstands years of use. This guide walks you through every step, from initial cleaning through final sealing, ensuring professional-quality results without professional prices.
Before diving in, understand that success hinges on three pillars: thorough surface preparation, the correct primer formulation, and durable topcoat protection. Skipping or skimping on any of these elements virtually guarantees premature failure. The process spans three to five days total, accounting for drying times between steps, so plan accordingly and resist the urge to rush. Your patience will reward you with a finish that looks factory-made and holds up to real-world demands.
Gather Materials and Tools for Laminate Table Painting
Proper preparation prevents poor performance, and gathering everything before starting keeps your project moving smoothly without frustrating interruptions mid-process. You’ll need cleaning supplies including mild dish soap, trisodium phosphate (TSP) alternative for degreasing, soft cloths, and a small soft-bristled brush for reaching crevices where grime accumulates. Surface preparation tools encompass fine-grit sandpaper in the 220 to 320 range, a sanding block or electric sander, tack cloth for dust removal, wood filler for any damage repairs, and a putty knife for application.
Primer selection proves critical—standard latex primer simply won’t adhere to laminate’s slick surface. Stock up on a bonding primer specifically designed for glossy or difficult surfaces, preferably oil-based or shellac-based formulas that offer superior adhesion despite requiring longer drying times and proper ventilation. For painting, acquire acrylic latex paint or cabinet-specific paint in your chosen finish, quality brushes and foam rollers designed for smooth surfaces, and painter’s tape for protecting areas you don’t want painted. Finally, seal your work with a polyurethane topcoat in either water-based or oil-based formulations, depending on your durability needs and drying time preferences.
Clean and Degrease Thoroughly Before Painting Laminate
Laminate tables in kitchen settings accumulate grease around eating areas, and this invisible film sabotages paint adhesion more than any other factor. Begin by removing all items from the table—decor centerpieces, trivets, tablecloths, and any hardware you can disassemble like removable leaves or adjustable mechanisms. Wash the entire surface with warm water mixed with mild dish soap, scrubbing deliberately around edges and corners where grease concentrates most heavily. For stubborn buildup that soap alone won’t shift, prepare a solution using water with a small amount of trisodium phosphate substitute or a commercial degreasing cleaner, applying it with a soft brush and rinsing thoroughly with clean water afterward.
After cleaning, allow the table to dry completely—several hours or overnight provides peace of mind that no moisture remains trapped beneath your paint layers. This drying period also gives you time to inspect the surface closely for chips, peeling laminate edges, or damage that requires repair before proceeding. Any loose or damaged areas must be addressed first, as painting over compromised laminate merely accelerates deterioration and creates weak points in your finish.
Sand for Proper Adhesion on Laminate Surfaces
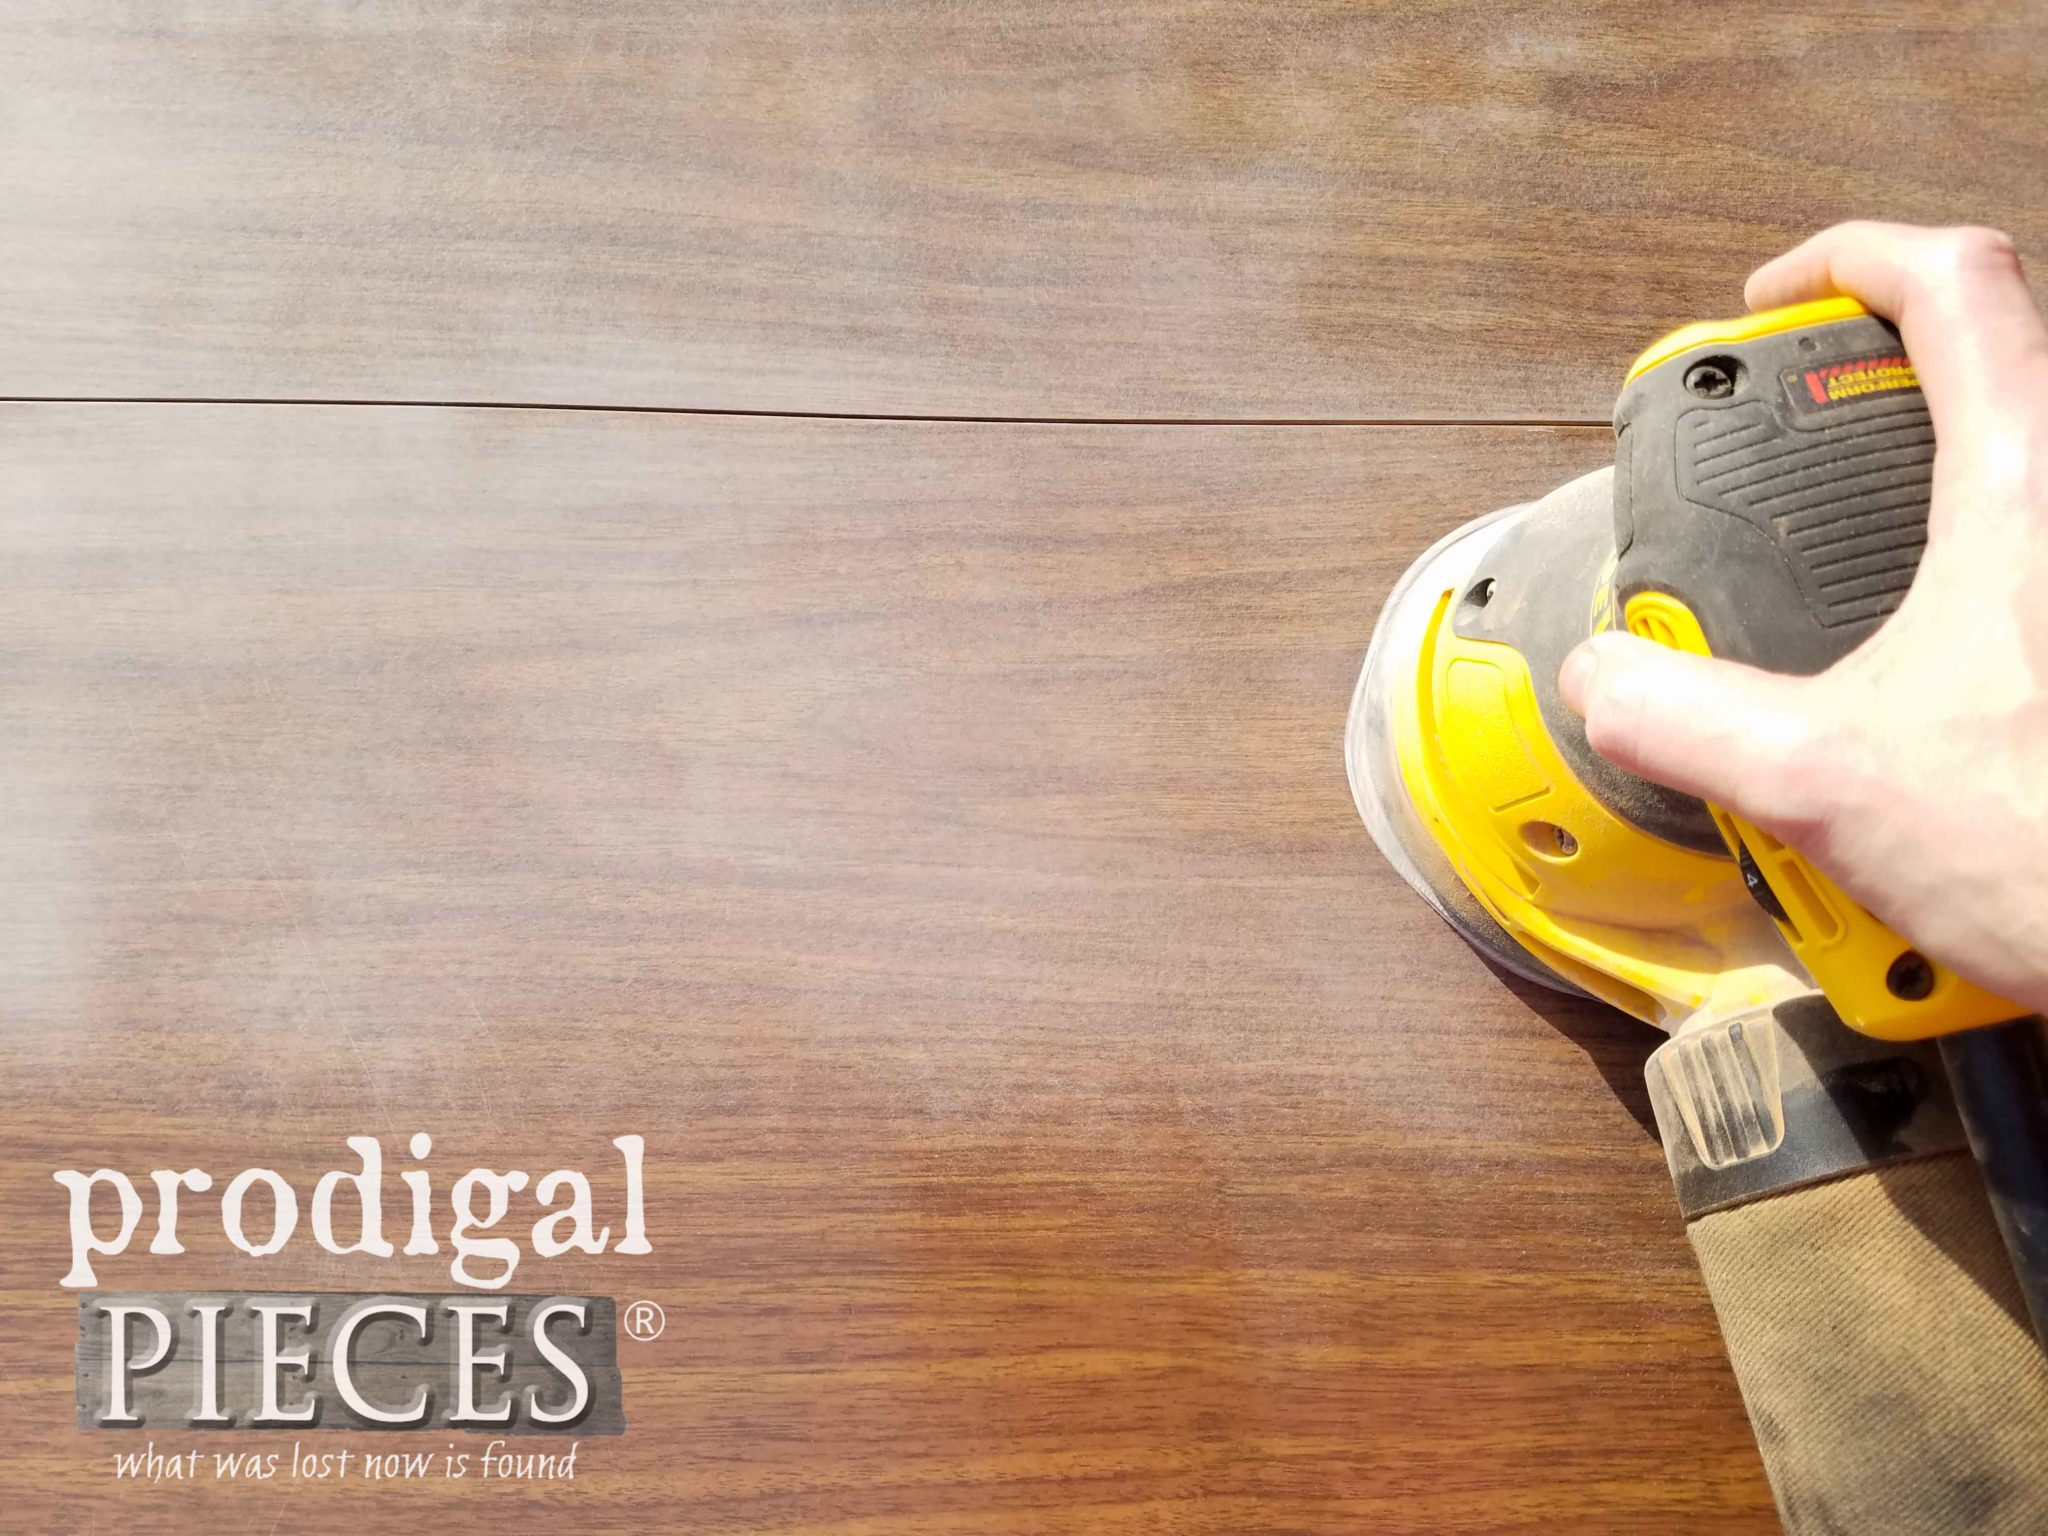
Light sanding creates the microscopic “tooth” that paint needs to grip laminate’s inherently slick surface, transforming it from an unwelcoming barrier into a receptive canvas. Select 220-grit sandpaper for general sanding or 320-grit if you prefer an ultra-smooth finish, and work in long, even strokes following the direction of any existing grain or pattern on the laminate surface. Apply consistent pressure without pressing so aggressively that you risk damaging or removing the laminate entirely—the goal involves creating subtle scratches, not stripping the material.
Pay particular attention to edges and corners, where paint failure most commonly occurs because these areas experience the most stress and contact during use. Once sanding is complete, remove every trace of dust using a tack cloth, working methodically around edges, joints, legs, and any detailed areas where dust settles invisibly. Any remaining particles compromise primer adhesion, so take your time with this step and inspect the surface from multiple angles under good lighting before proceeding.
Apply Bonding Primer Correctly on Laminate Tables
Primer serves as the foundation for your entire paint job, and choosing the right product determines whether your finish lasts years or weeks. Never skip primer on laminate or attempt using standard latex primer alone—these approaches virtually guarantee peeling and chipping. Instead, select a bonding primer specifically formulated for slick surfaces, glossy finishes, or difficult-to-paint materials, as these products contain specialized adhesives designed to create an unbreakable bond between the laminate and your paint layers.
Oil-based and shellac-based primers deliver the strongest adhesion to laminate surfaces, though they demand patience and proper ventilation during application and drying. Apply primer in thin, even coats using a quality brush or foam roller, working carefully to avoid drips, brush marks, or uneven coverage that will telegraph through your finish paint. Allow the primer to dry completely according to manufacturer instructions—typically 24 hours for oil-based products—then lightly sand with 320-grit sandpaper to smooth any imperfections before painting. This curing period is non-negotiable; rushing leads to soft, tacky finishes that never fully harden.
Select the Right Paint and Finish for Your Laminate Table
Durability matters immensely for kitchen tables that face daily use, spills, cleaning, and heat exposure. Cabinet-specific paints are formulated with these demands in mind, containing hardeners that create exceptional durability while maintaining flexibility to resist chipping from regular use. Acrylic latex paints with satin or semi-gloss finishes provide excellent alternatives, offering easy cleanup, quick drying, and good durability when sealed properly with a quality topcoat. Chalk paint delivers beautiful matte finishes with outstanding adhesion but requires wax or polyurethane sealing and may not withstand heavy use without proper protection.
For finish selection, satin provides the ideal balance of durability and aesthetics for kitchen tables, hiding minor imperfections while remaining easy to clean. Semi-gloss offers maximum durability and easier cleaning but shows imperfections more readily, demanding meticulous surface preparation for a flawless result. Matte finishes showcase color beautifully but require the most careful maintenance and are generally not recommended for heavily used kitchen tables where spills and cleaning are frequent.
Paint Your Laminate Table Like a Pro in Three Steps
Application technique distinguishes amateur results from professional-looking finishes, and the secrets lie in thin coats, patient drying, and consistent technique. Load your brush or roller lightly—overloading creates drips, extends drying times, and increases cracking and peeling risks. Apply paint in long, even strokes following the direction of your sanding strokes, maintaining a wet edge to avoid visible lap marks or lines where sections overlap. Two to three thin coats typically provide adequate coverage, though light colors covering darker laminate may require additional coats for complete opacity.
Allow each coat to dry completely before applying the next—typically two to four hours depending on humidity and temperature—testing dryness by touch before proceeding. Lightly sand between coats with fine-grit sandpaper to ensure proper adhesion and remove any bubbles, brush marks, or imperfections that formed during application. This intermediate sanding step feels tedious but delivers the smooth, professional finish that makes your project indistinguishable from store-bought furniture.
Prevent Brush Marks on Your Painted Table Surface
Use high-quality foam brushes or microfiber rollers designed for smooth surfaces to minimize visible brush strokes. Work in sections no larger than 2×2 feet, maintaining a wet edge as you move to adjacent areas. If using a roller, use light pressure and avoid going back over areas that have started to dry. For best results, apply paint in the direction of the table’s grain pattern, even if it’s not wood—this creates visual continuity that hides application lines.
Seal and Protect Your Painted Laminate Table Finish
A quality topcoat transforms your painted table from a fragile surface into a durable, washable finish that withstands real-world demands. Polyurethane topcoats provide excellent protection against water, heat, and everyday wear, with water-based options offering faster drying times and oil-based versions delivering maximum durability for heavily used pieces. Apply sealant using the same thin-coat technique employed for painting, working carefully to avoid bubbles or brush marks that mar the final appearance.
Allow adequate drying time between coats—typically two to four hours for water-based products—and lightly sand with 400-grit sandpaper between each layer to ensure proper adhesion and remove any imperfections. Apply at least two to three topcoat layers, with three to four coats providing maximum durability for kitchen tables that see daily use. Allow the final coat to cure fully for two to four weeks before heavy use, as paint reaches maximum hardness during this period and premature stress compromises the finish.
Avoid Common Laminate Table Painting Mistakes
Understanding pitfalls before you encounter them prevents costly errors that require starting over. Skipping proper cleaning and degreasing causes premature paint failure, as residue creates invisible barriers that prevent adequate adhesion and generate weak spots throughout the finish. Failing to sand or sanding too aggressively damages the laminate surface—too little sanding provides insufficient tooth for adhesion, while too much can remove the laminate entirely or create visible damage. Using standard latex primer without proper bonding agents results in peeling and chipping within weeks, negating all your hard work.
Applying thick coats of paint or primer causes drips, extends drying times dramatically, and increases cracking and peeling risks significantly. Rushing the process by not allowing adequate drying time between steps compromises the entire finish and reduces durability substantially. Maintain realistic expectations about drying times, resist the temptation to accelerate with fans or heaters that can cause uneven drying, and accept that the three to five day timeline exists for good reasons tied to material science.
Maintain Your Newly Painted Laminate Table for Longevity
Proper care extends the beauty and lifespan of your painted laminate table considerably, protecting your investment of time and materials. Allow the full cure time of two to four weeks before heavy use, placing items carefully and avoiding sharp impacts that can chip the finish. Clean with mild soap and water only, avoiding harsh chemicals, abrasive cleaners, or scrubbing pads that damage the protective topcoat layer. Use coasters, placemats, and trivets consistently to protect the surface from heat, moisture, and scratches during daily meals and activities.
Address any chips or scratches promptly by lightly sanding the affected area, touching up with paint, and resealing to prevent moisture from reaching the underlying material and causing further damage. Regular inspection catches problems early when they’re easily repairable rather than allowing deterioration to spread. With proper maintenance, your painted laminate table maintains its beauty for years, justifying the effort you invested in doing the job right the first time.


