
Nothing derails a backsplash project faster than inaccurate measurements. Whether you’re installing subway tile behind your stove or creating a statement piece with intricate mosaics, precise measurements ensure you order exactly what you need—no costly mid-project trips to the store or leftover tiles gathering dust in your garage. A backsplash that doesn’t align properly with your countertops or cabinets instantly looks amateurish, while tiles that don’t account for outlets and windows create frustrating gaps. This guide cuts through the guesswork with a systematic approach to measuring your kitchen wall that professional installers use but rarely share. You’ll learn not just how to take basic measurements, but how to calculate for real-world variables like waste factors, pattern layouts, and those pesky electrical outlets that always seem to land in the worst possible spot.
Gather Essential Measuring Tools
Having the right tools before you begin measuring ensures accuracy and efficiency throughout the process. A standard steel tape measure with a locking mechanism provides the most reliable readings, as its rigidity helps maintain consistent measurements across longer runs. Look for a tape measure with clear, easy-to-read markings in both inches and centimeters, as some calculations may feel more intuitive in one unit system. A magnetic tip on the tape measure proves invaluable when working alone, allowing you to anchor the measure against metal surfaces while you position yourself for readings.
Beyond the tape measure, keep a notebook or smartphone app ready to record measurements immediately. Sketching a rough diagram of your backsplash area while measuring helps visualize the layout and serves as a reference when calculations become complex. A pencil and eraser allow you to annotate your diagram with measurements, notes about obstacles, and tile layout considerations. Some homeowners find a laser measuring tool useful for larger areas or hard-to-reach spots, though these tools require batteries and occasional calibration checks to maintain accuracy.
A level helps verify whether your walls are plumb and even, which impacts both measurement accuracy and installation success. If you discover significant unevenness during this stage, you’ll need to account for it during installation rather than assuming tiles will hide the problem. Finally, keep a calculator nearby for running square footage calculations and waste factor adjustments. Writing down all measurements before performing calculations reduces the risk of transcription errors that could lead to material shortages.
How to Check Wall Straightness Before Measuring
Before recording any measurements, verify your wall’s straightness using your level. Place the level vertically at multiple points along the wall to check for plumb, and horizontally to check for level. If you notice more than 1/8 inch deviation over 4 feet, you’ll need to account for this during installation. Mark these uneven areas on your sketch with notes about the degree of deviation. This information helps you plan your tile layout to minimize visible imperfections—starting your tile row at the most visible point (like above the sink) and working toward less noticeable areas.
Map Out Your Backsplash Area
Defining the exact boundaries of your backsplash installation establishes the framework for all subsequent measurements. The standard backsplash extends from the countertop to the bottom of upper cabinets, though this can vary based on your kitchen’s configuration and personal preference. Some homeowners choose a full-wall installation that extends higher, while others prefer a more modest 4-inch backsplash common in older homes. Determining your desired height before measuring prevents the need to re-measure if you change your plans mid-project.
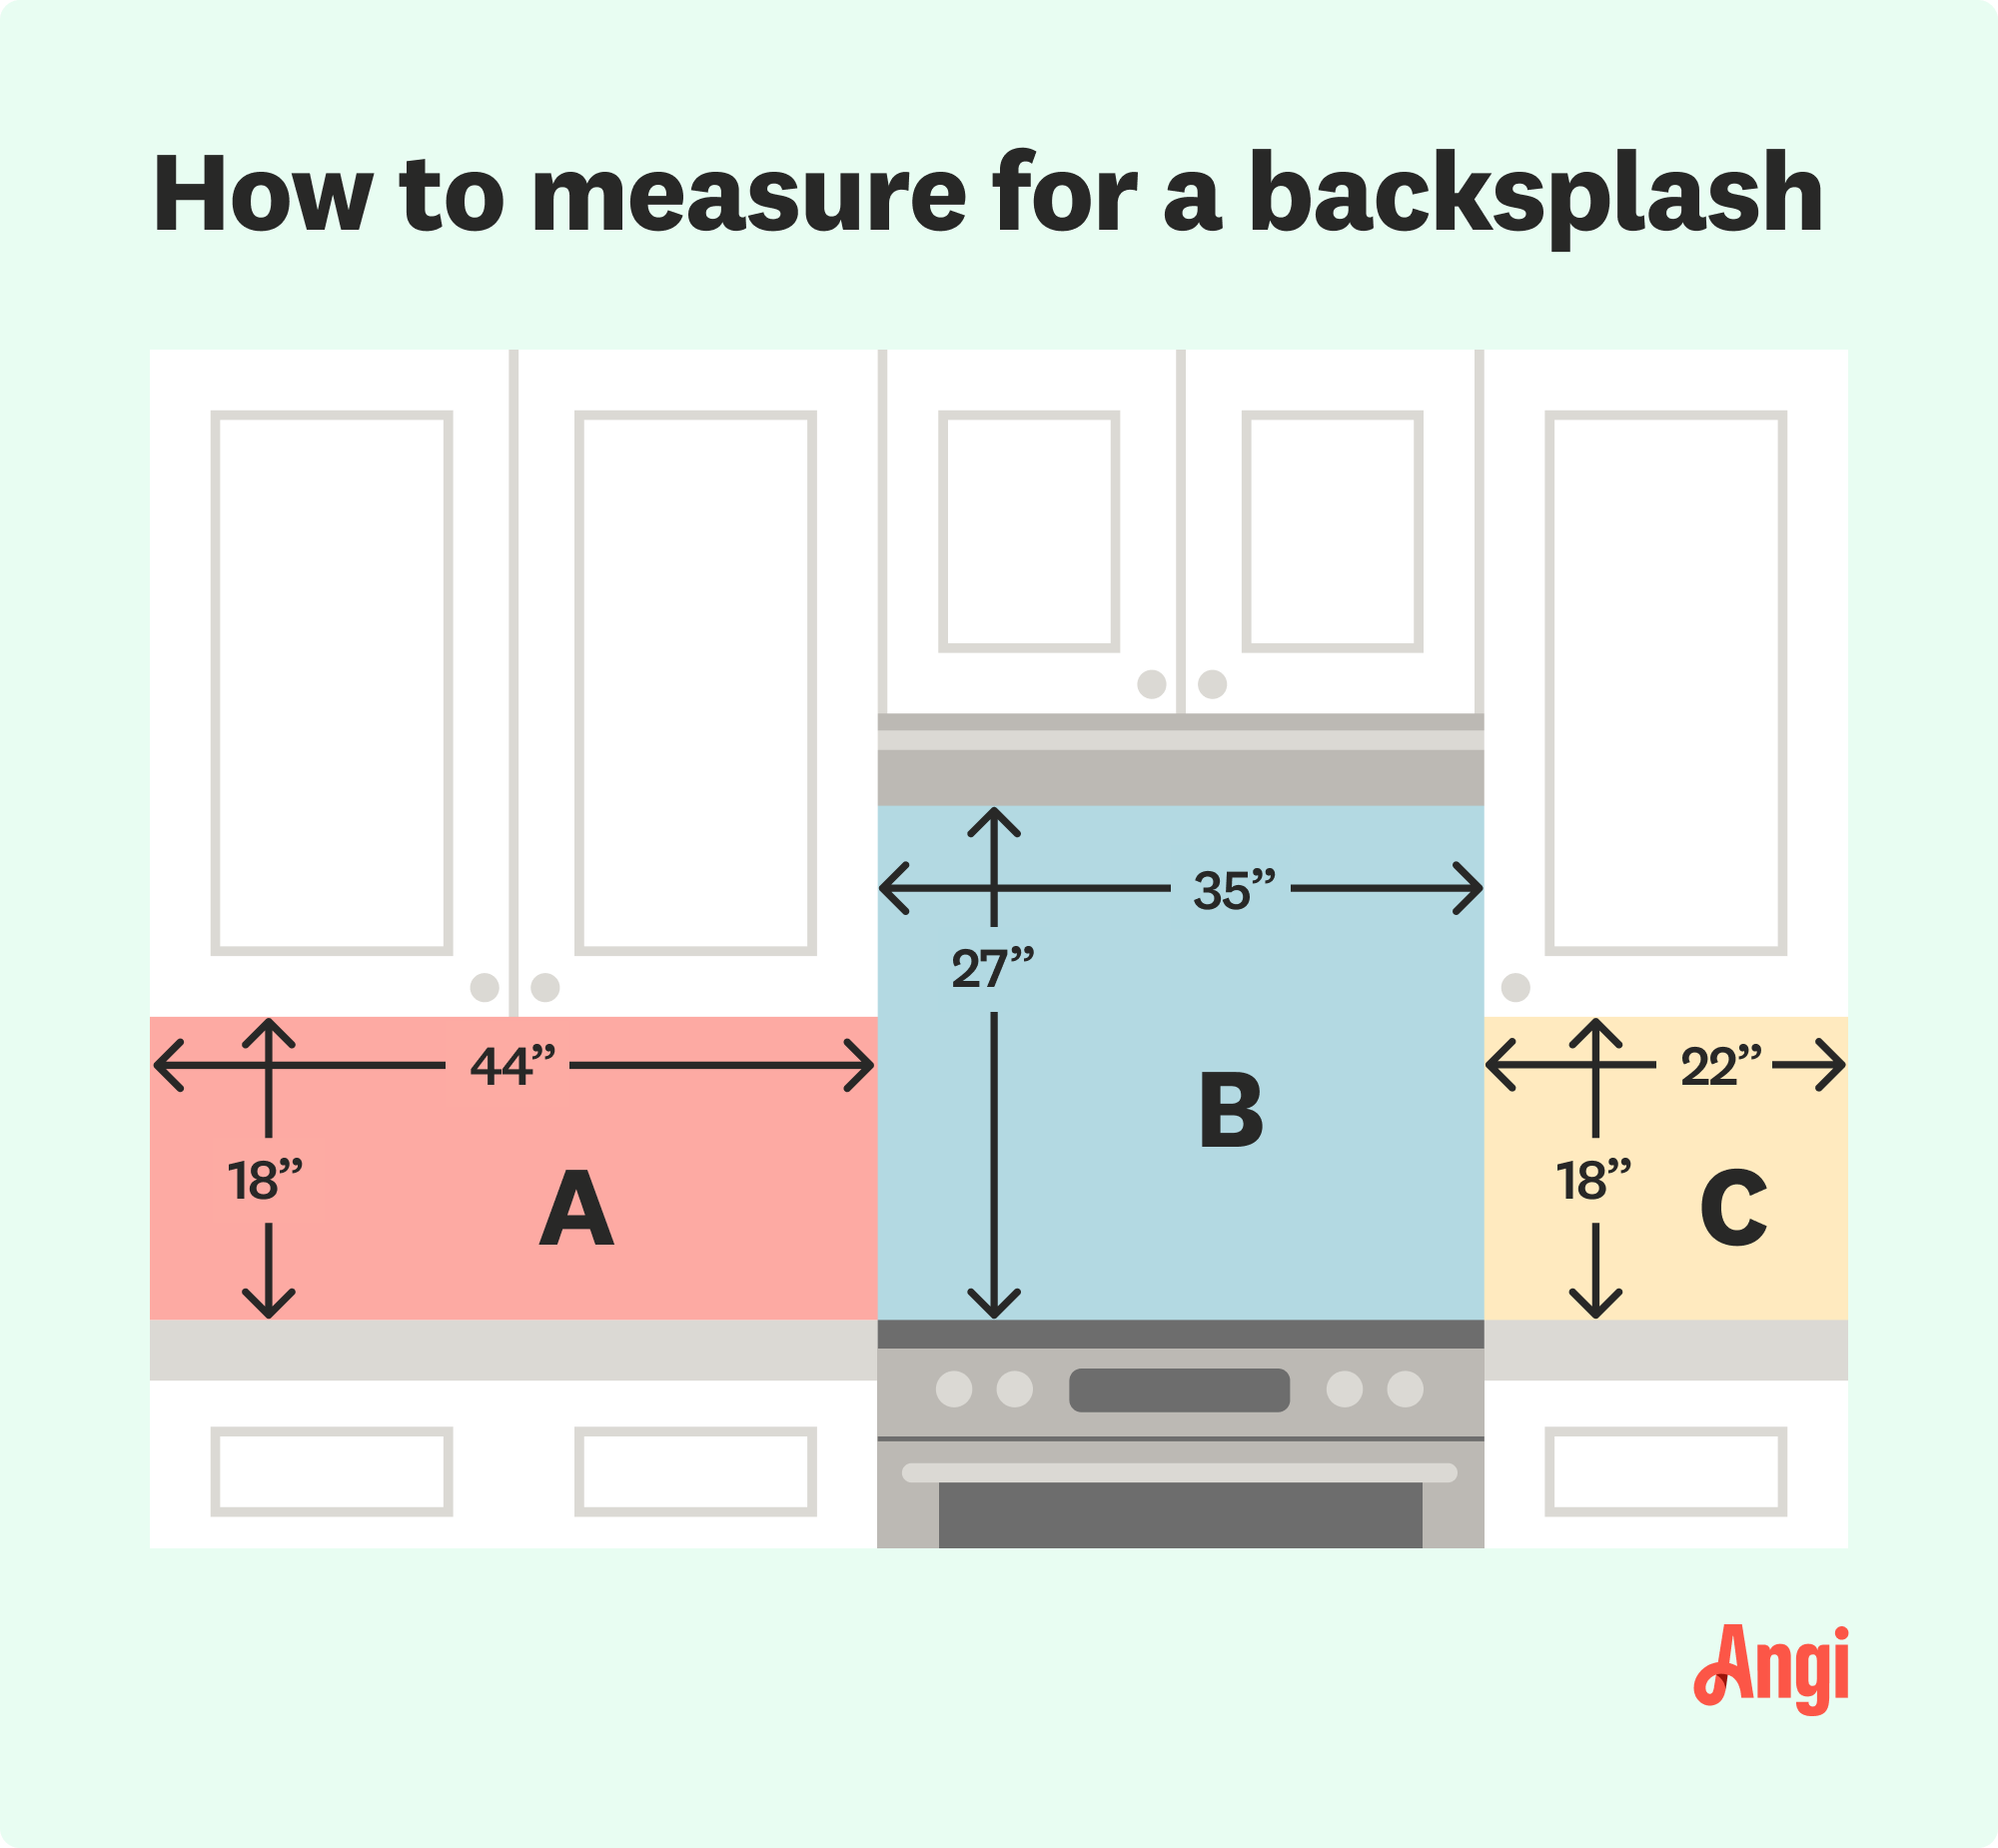
Measure the total length of the area where tiles will be installed, running your tape measure along the wall from one end to the other. For L-shaped kitchens or kitchens with peninsulas, you’ll need to measure each section separately and then combine the totals. Record the length at the countertop level, as this typically represents the longest continuous run. If your cabinets have trim or molding that touches the countertop, measure from the highest point of the countertop surface to ensure your tiles will adequately cover the transition zone.
Why Height Measurements Vary Across Your Kitchen
The height of your backsplash varies based on several factors. Standard installations measure 18 inches from countertop to cabinet bottom, though full-wall installations can extend 18-24 inches or more. Measure the height at multiple points along the run, as ceiling heights and cabinet positions can vary slightly across older homes. Take your height measurement at the center point of the backsplash area, then verify at the ends to ensure consistency. If you notice significant height variations, note these areas specifically as they’ll require special attention during installation.
Calculate Total Square Footage

With your length and height measurements recorded, calculating total square footage requires simple multiplication followed by adjustments for your specific layout. Multiply the total length of your backsplash area by the height to obtain the raw square footage. For example, a backsplash measuring 10 feet long and 18 inches high yields 15 square feet (10 × 1.5 = 15). Most tile purchases are calculated by the square foot, making this your baseline figure for material ordering.
However, most installations require purchasing additional material to account for cuts, breakages, and pattern matching. Industry standard recommends adding 10-15% to your total square footage to accommodate waste. A 15-square-foot backsplash would therefore require approximately 17-18 square feet of tile when accounting for this buffer. If you’re working with intricate patterns, diagonal layouts, or tiles that require significant cutting, lean toward the higher end of this range. Mosaic tiles and small-format tiles often generate more waste due to their size and the complexity of achieving consistent spacing.
When to Increase Your Waste Factor Beyond 15%
Round up your final calculation to the nearest whole square foot when ordering, as most suppliers don’t sell partial boxes. If your calculation yields 16.7 square feet, plan to purchase enough for 17-18 square feet to ensure adequate coverage. Keeping this buffer also provides replacement tiles for future repairs if individual tiles become damaged. Some homeowners order slightly more than their waste-adjusted calculation if they particularly love the tile and want insurance against discontinued styles, though this represents an upfront cost that may not be necessary for standard projects.
Account for Obstacles and Irregularities

Kitchen walls rarely present perfectly rectangular surfaces, and accounting for obstacles during the measurement phase prevents surprises during installation. Outlets, switches, light fixtures, and other electrical components require tiles to be cut around rather than installed over. Measure each obstacle by recording its height, width, and distance from the nearest corner or reference point. These measurements allow you to calculate the area covered by each obstacle and subtract it from your total, though most professionals recommend keeping these subtractions minimal and simply ordering extra tile to cover the waste.
Windows present unique challenges that require careful measurement and planning. Measure the window from edge to edge, then calculate the area that would be covered if the backsplash extended behind it. Add this area to your material requirements, as you’ll need full tiles to create clean edges around the window frame. The trim pieces and bullnose tiles used to finish window edges require additional calculations—measure the perimeter of the window frame to determine how much trim material you’ll need. Some homeowners choose to tile around windows fully, while others prefer to stop the backsplash at the window frame, creating a more layered look.
Measuring Around Electrical Outlets Like a Pro
When measuring around outlets, use a template method to ensure precise cuts later. Place a piece of painter’s tape directly over the outlet cover and trace its outline. Remove the tape and measure the traced shape, noting the exact dimensions on your diagram. This creates a perfect template you can use during installation to mark tiles for cutting. Remember to measure both the outlet cover plate and the electrical box behind it, as the box often protrudes further than the cover plate.
Measure Multiple Wall Sections Separately
Kitchens with complex layouts require measuring each distinct wall section independently before combining totals. L-shaped kitchens feature two walls meeting at a corner, each potentially with different lengths, heights, and obstacle configurations. Measure each wall from corner to corner, noting the corner location as your reference point for both sections. When calculating total material needs, add the square footage of each section rather than attempting to treat the L-shape as a single rectangle, which would significantly overstate your requirements.
Peninsula kitchens present another distinct measurement scenario, as the backsplash wraps around three sides of the peninsula base. Measure each of the three exposed sides independently, accounting for the fact that the peninsula base itself doesn’t require backsplash coverage. If your peninsula includes upper cabinets on one side, measure from countertop to cabinet bottom on that section while measuring full wall height on the open sides. The corner where peninsula and main wall meet requires careful attention to ensure tile alignment and consistent grout lines.
Verify Measurements Before Purchasing
Double-checking all measurements before finalizing your material order prevents costly mistakes and project delays. Recalculate all square footage totals using a fresh calculator to catch any arithmetic errors. Have a second person verify your measurements by taking their own readings and comparing them against your records. Discrepancies between measurements often indicate recording errors or misunderstanding of measurement boundaries, both of which are easier to resolve before tiles are ordered.
Walk through your kitchen with your measurements and diagram, visualizing how each section will be tiled. Check that your recorded heights allow adequate coverage from countertop to cabinet bottom, verifying that no gaps will remain visible after installation. Confirm that your length measurements account for any endpoints where the backsplash will end against an adjacent surface or edge trim. If your design includes a tiled accent strip or decorative border, verify that these elements’ dimensions work within your overall measurements.
The Professional’s Final Measurement Checklist
Before placing your tile order, confirm the exact square footage coverage provided by each box of your chosen tile. Some tiles list coverage per box rather than per square foot, requiring division to determine how many boxes you’ll need. Round up to the nearest full box, and verify that the supplier has adequate stock to complete your order. If your chosen tile is a special order or from a limited run, order all material at once to ensure color consistency across batches. Keeping your measurement records and diagram accessible during installation provides valuable reference if questions arise about layout or material quantities.
Accurate measurement forms the foundation of a successful backsplash installation, transforming what could be a frustrating guessing game into a confident, planned project. By gathering proper tools, defining clear boundaries, calculating square footage with appropriate waste factors, and carefully accounting for obstacles, you establish the groundwork for professional-looking results. Taking the extra time to verify measurements before purchasing materials prevents the most common cause of project delays and budget overruns—running out of tile when you’re two-thirds through installation.
Remember that patience during the measurement phase pays dividends throughout the installation process. The few extra minutes spent double-checking calculations and visualizing the finished project save hours of correction work later. Keep your diagram and measurements accessible during installation, as reference points become invaluable when working through complex layout decisions. With precise measurements in hand, you can approach your backsplash project with confidence, knowing that your material quantities are correct and your installation plan accounts for every challenge your kitchen wall presents.


