
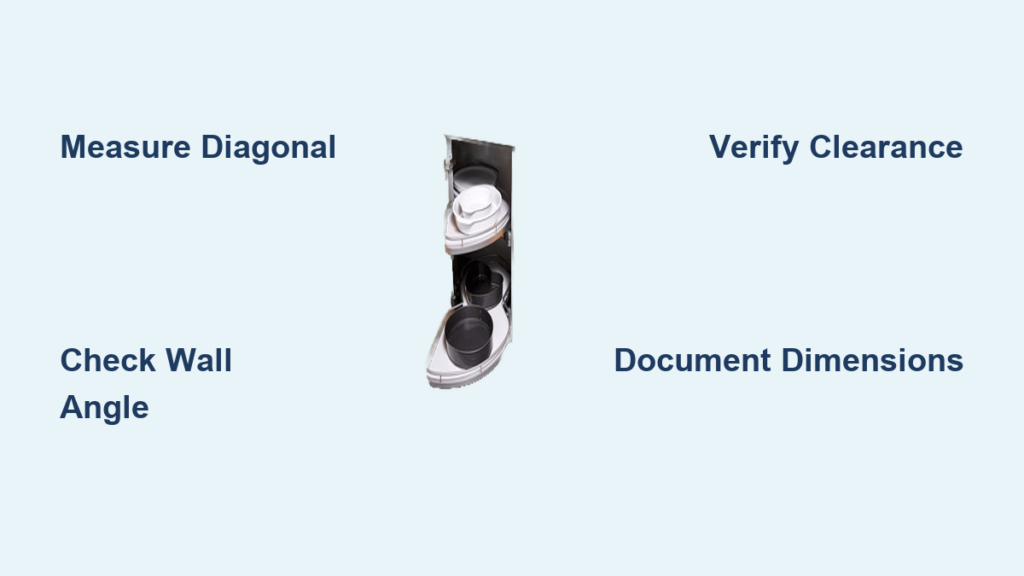
When your kitchen renovation hits the corner cabinet stage, inaccurate measurements can derail your entire project. Unlike standard cabinets, corner units demand specialized measuring techniques to accommodate their unique diagonal configurations and specialized storage solutions like lazy Susans. Getting these measurements wrong means costly delays, custom-order mistakes, and installation headaches that could have been avoided with proper planning. This guide reveals the exact methods professional installers use to measure corner kitchen cabinets accurately every time—whether you’re replacing a single unit or designing an entire kitchen layout.
Essential Tools for Accurate Corner Cabinet Measurement

Skip the flimsy retractable tape measure from your junk drawer—corner cabinets require professional-grade tools that deliver precision within 1/16th of an inch. Start with a 25-foot steel tape measure featuring bold, easy-to-read markings and a sturdy locking mechanism that won’t retract unexpectedly during diagonal measurements. The Stanley PowerLock Pro series remains the industry standard among cabinet installers for its standout blade strength and clear metric/imperial markings.
A laser distance measurer like the Bosch GLM 50C transforms corner cabinet measurement by eliminating parallax errors and allowing single-person operation for diagonal spans. These devices typically measure within 1/8 inch accuracy up to 50 feet—critical when verifying that your corner forms a true 90-degree angle. Pair your laser with a 12-inch aluminum speed square to confirm wall angles and mark reference lines that won’t smudge during extended measurement sessions.
Don’t overlook the importance of documentation tools: a water-resistant field notebook with grid pages helps organize measurements spatially, while a smartphone with measurement apps like MagicPlan creates instant digital floor plans. Professional cabinet designers always carry a set of colored pencils—blue for walls, red for obstructions, green for existing fixtures—to annotate their sketches quickly during on-site assessments.
Pre-Measurement Preparation Checklist
Clearing the measurement zone properly prevents the most common corner cabinet errors before you even pull out your tape measure. Remove all items from countertops and adjacent cabinets, then pull out drawers completely to expose mounting hardware that might interfere with depth measurements. If working in an existing kitchen, temporarily remove cabinet doors using a screwdriver—this reveals the critical face frame dimensions that determine proper corner cabinet fit.
Establish your primary reference lines before taking any measurements. Most professionals use the finished floor as their vertical baseline, but verify its levelness first by placing a 4-foot level across multiple points in the corner area. Mark a continuous horizontal reference line at 36 inches above floor level using a laser level—this becomes your consistent height benchmark for all wall cabinet measurements. For base cabinets, create a secondary reference line at 3-1/2 inches above floor level to account for standard toe kick dimensions.
Document existing conditions that affect corner cabinet fit by photographing the area from four perspectives: directly into the corner, from each adjacent wall, and an overhead shot from a step ladder. Pay special attention to plumbing vents, electrical boxes, and heating registers within 18 inches of the corner—these obstructions often require custom cabinet modifications that influence your final measurements.
Wall Corner Cabinet Measurement Protocol
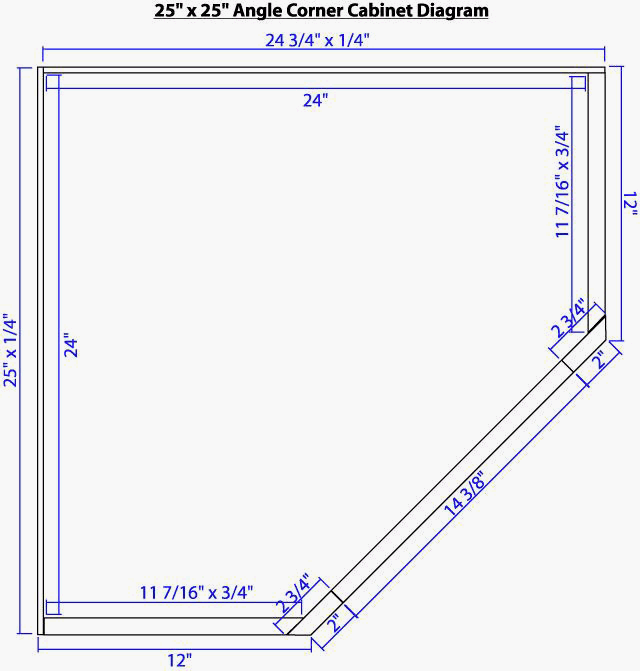
Begin wall corner cabinet measurements by verifying the actual corner angle before recording dimensions. Measure 36 inches out from the interior corner along both walls and mark these points. Then measure the diagonal distance between these marks—if it’s exactly 50-15/16 inches, your corner is perfectly square (90 degrees). Any deviation requires compensating measurements: a larger diagonal indicates an obtuse angle (>90 degrees), while a smaller measurement means an acute angle (<90 degrees).
Record three critical dimensions for wall corner cabinets:
– Horizontal run: Measure wall-to-wall at cabinet top, middle, and bottom positions
– Vertical height: From reference line to cabinet bottom at multiple points
– Diagonal span: From interior corner to outermost cabinet edge (typically 24-36 inches)
For lazy Susan installations, measure the interior cabinet opening width at three heights: 2 inches below the top, at center point, and 2 inches above the bottom shelf position. The smallest measurement determines your maximum turntable size. Verify door clearance by measuring the distance from the pivot point to the nearest obstruction—most rotating shelves require at least 1-1/2 inches of clearance per side to operate smoothly.
Base Corner Cabinet Measurement System
Base corner cabinets demand different measurement priorities than wall units due to their relationship with countertops and flooring. Start by measuring the floor-to-ceiling height at the corner location—this determines your maximum cabinet height before countertop installation. Standard base cabinets run 34-1/2 inches tall, but older homes often feature non-standard heights between 32 and 36 inches.
The critical measurement for base corner cabinets is the diagonal depth from the interior corner to the cabinet front edge. Most manufacturers offer 36-inch or 42-inch diagonal configurations, but measure your actual space at three heights: at toe kick level, mid-cabinet, and just below countertop height. Record the smallest measurement to ensure proper fit. For blind corner cabinets (those with a solid panel facing the corner), measure the blind panel extension—typically 12-18 inches from the wall—which determines how far the cabinet protrudes into the kitchen workspace.
Verify countertop clearance by measuring from the cabinet front edge to the intended countertop edge at multiple points along the run. Standard overhang is 1-1/4 inches, but corner installations often require additional overhang for mitered seams. Note any flooring transitions within 24 inches of the corner, as these affect your vertical reference points and may require scribe molding adjustments during installation.
Clearances and Operational Verification
Many corner cabinet installations fail not from measurement errors but from overlooked clearance requirements. Test door swing clearance by opening existing cabinet doors fully and marking their maximum arc on the floor with painter’s tape. Measure from these marks to adjacent obstacles—standard clearance requires at least 12 inches between the door arc and any obstruction for comfortable access.
For lazy Susans, perform a functional clearance test by inserting a cardboard circle cut to the shelf diameter into the cabinet opening. Rotate it through 360 degrees while checking for binding at four points: top, bottom, and both sides. Note any resistance points that indicate insufficient clearance. Measure the distance between the turntable’s outer edge and the cabinet door frame—this should be at least 1 inch per side for standard hinges, or 1-1/2 inches for full-overlay doors.
Countertop seam clearance requires special attention at corners. Measure the distance between the cabinet front edges where two countertops will meet—this determines your seam placement options. Most fabricators require at least 2 inches of cabinet support on both sides of a seam, so verify your corner cabinet configuration provides adequate support for the intended countertop layout.
Documentation Best Practices for Cabinet Orders
Transform raw measurements into actionable data by following professional documentation standards. Create a dedicated corner cabinet worksheet with these essential fields:
– Location identifier (e.g., “NW corner at sink”)
– Wall angle measurement (in degrees)
– Horizontal run (minimum/maximum)
– Vertical height (at three points)
– Diagonal span (primary and secondary)
– Interior opening dimensions
– Clearance notes and obstructions
Sketch a scaled diagram using 1/4 inch = 1 foot scale, marking all measurements directly on the drawing. Professional designers use color-coding: black for walls, blue for cabinet outlines, red for obstructions, and green for critical clearance zones. Include three reference photos with each documentation set: a wide shot showing the entire corner area, a close-up of the interior corner, and a diagonal perspective highlighting any irregularities.
When submitting measurements to cabinet suppliers, include your reference line methodology and verification notes. Top manufacturers prefer receiving measurements with tolerance statements like “all dimensions verified within 1/16 inch using laser measurement at three heights.” This level of documentation reduces order errors by up to 70% according to industry surveys of custom cabinet makers.
Critical Measurement Mistakes to Avoid
The most costly corner cabinet errors stem from three preventable mistakes: measuring from existing cabinets instead of walls, ignoring wall irregularities at different heights, and failing to account for flooring underlayment. Always measure wall-to-wall at multiple heights—walls often bow or taper between floor and ceiling, creating “funhouse mirror” effects that standard single-point measurements miss.
Never assume your corner is square—even newly constructed homes often have corners ranging from 89 to 91 degrees. Verify the angle at three heights corresponding to cabinet mounting points. For every degree off 90, your diagonal measurement changes by approximately 1/8 inch per foot of run—enough to cause visible gaps in finished installations.
The toe kick trap catches many DIYers: measuring base cabinet height from the raw subfloor instead of the finished floor level. Always add your planned flooring thickness (typically 3/4 to 1-1/2 inches) to subfloor measurements, or better yet, establish your reference line on the finished floor surface before demolition begins.
Final Note: Measuring corner kitchen cabinets demands systematic precision but follows logical, repeatable methods when approached correctly. Always measure diagonally at multiple heights, verify wall angles before recording dimensions, and document everything with both numerical data and visual references. The extra 15 minutes spent double-checking corner measurements can prevent thousands in custom cabinet replacement costs and weeks of project delays. When in doubt, consult your cabinet supplier’s technical team—they often provide free measurement verification services that catch errors before they become expensive problems.


