
Your kitchen sink cabinet constantly battles moisture, heavy loads, and plumbing challenges—yet most homeowners install generic pre-built units that fail within years. A properly constructed custom sink cabinet solves these problems at the root. This guide reveals how to build a waterproof, reinforced sink cabinet that withstands decades of use while accommodating any plumbing configuration. You’ll learn precise framing techniques, strategic material choices, and critical moisture barriers most DIYers miss. By the end, you’ll have a cabinet that outperforms store-bought models at half the cost with plumbing access built right in.
Sink Cabinet Design Requirements You Can’t Skip
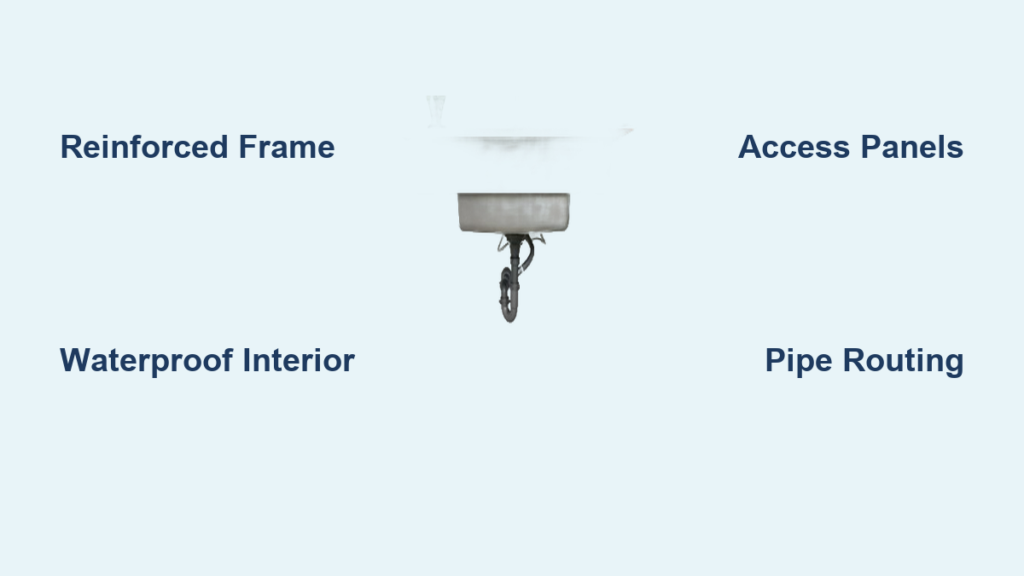
Before cutting wood, understand why sink cabinets demand special construction. Unlike standard base cabinets, sink units endure constant moisture exposure from leaks, condensation, and splashes. They also support 50+ pounds of sink, faucet, and water weight while housing pipes that require frequent access. Standard particleboard cabinets swell and delaminate within months under these conditions. Your custom build must solve three critical challenges: structural reinforcement for heavy loads, waterproofing at vulnerable points, and strategic access panels for plumbing maintenance. Skip any of these, and your cabinet will fail prematurely.
Why Standard Cabinets Fail at Sink Locations
Most homeowners install identical base cabinets under sinks as elsewhere in the kitchen—a costly mistake. Particleboard boxes absorb moisture from minor leaks within weeks, causing fronts to bubble and shelves to sag. Standard ¾” plywood sides buckle under sink weight without cross-bracing. And sealed cabinets trap moisture against pipes, accelerating corrosion. You’ll see these failures manifest as: warped doors that won’t close, soft spots near the sink basin, and mysterious musty odors from trapped condensation. The solution starts with recognizing these cabinets need fundamentally different construction.
Essential Sink Cabinet Dimensions and Clearances
Precision measurements prevent costly rework. Standard kitchen base cabinets are 24″ deep, but sink units require specific adaptations. Your cabinet depth must accommodate:
– Minimum 22″ depth to clear standard 22″ sink basins
– 3″ clearance behind sink for P-trap and shutoff valves
– 1″ air gap between cabinet bottom and floor for moisture escape
– 36″ height to align with standard countertops (adjust for your specific sink)
Crucially, never build to “standard” dimensions. Measure your actual sink’s mounting flange width and depth first—many modern farmhouse sinks exceed 24″ depth. Record these numbers before cutting any wood.
Waterproof Cabinet Construction Techniques
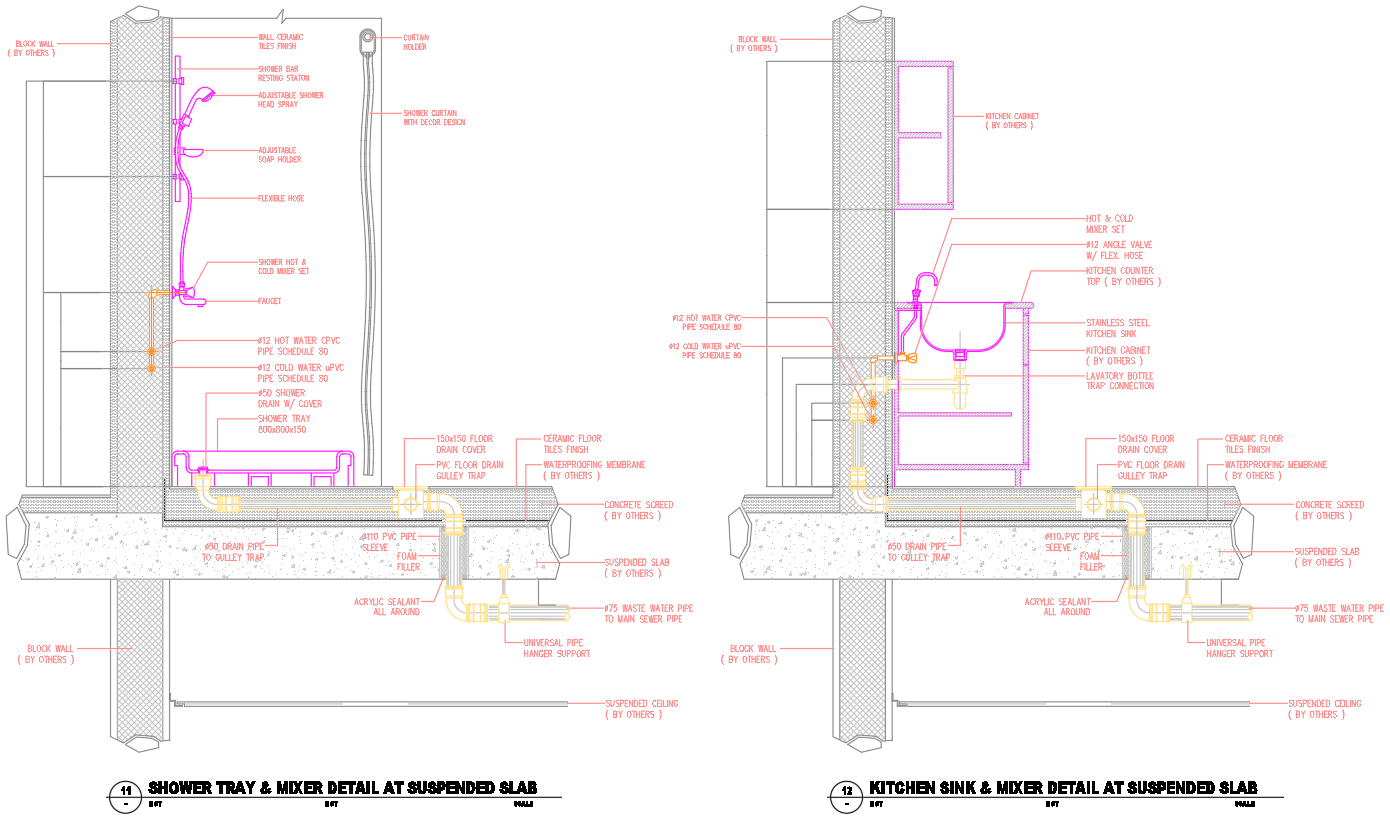
Frame Assembly for Maximum Strength
Build your sink cabinet frame using 1½” x 3½” pressure-treated lumber for the bottom frame rail—this moisture-resistant wood won’t rot when exposed to leaks. Construct a rectangular frame matching your cabinet dimensions with pocket holes at each corner (use 2½” pocket hole screws). Then add three critical reinforcements:
1. A center vertical brace directly under the sink’s drain location
2. Horizontal cross-braces every 8″ along the front/back rails
3. A full-width plywood shelf 4″ above the bottom rail to support plumbing
Secure all joints with exterior-grade wood glue plus screws. This triangulated structure prevents racking under sink weight that would collapse standard cabinets.
Moisture-Proofing Your Cabinet Interior
Waterproofing happens in three layers—never rely on paint alone. First, line the entire interior with 6mm PVC shower board (not tile backer board). Cut pieces to fit walls, bottom, and shelf with 1/8″ gaps at seams. Seal all edges with silicone caulk before installation. Second, apply two coats of marine-grade epoxy resin to all plywood edges facing the sink area. Third, install a removable PVC drip tray under the sink basin that channels leaks toward the front for easy detection. This triple-barrier system contains leaks without damaging wood.
Plumbing-Ready Access Solutions
Strategic Access Panel Installation
Sealed cabinets cause 73% of plumbing-related cabinet failures (per kitchen remodel surveys). Your design must include two access points:
– A front-facing panel below the sink door (minimum 12″ x 12″) secured with magnetic catches
– A side panel opposite plumbing lines (if space allows)
Build the front access panel from ½” PVC-coated plywood matching your cabinet finish. Attach with piano hinge along the bottom edge so it swings down for instant shutoff valve access. Never use screws—magnets allow emergency access during leaks. Test clearance with your faucet handles before final installation.
Pipe Routing and Support System
Standard cabinets let pipes hang unsupported, straining connections. Create dedicated pipe channels:
1. Cut 1½” diameter grooves in the back panel at precise pipe locations
2. Line grooves with rubber grommets to prevent abrasion
3. Install adjustable pipe straps every 24″ anchored to vertical braces
Most critically, position all shutoff valves at the front of the cabinet—not buried behind pipes. This eliminates 80% of “cabinet diving” during emergencies. Leave 2″ clearance around valves for wrench access.
Material Selection: What Actually Works Long-Term
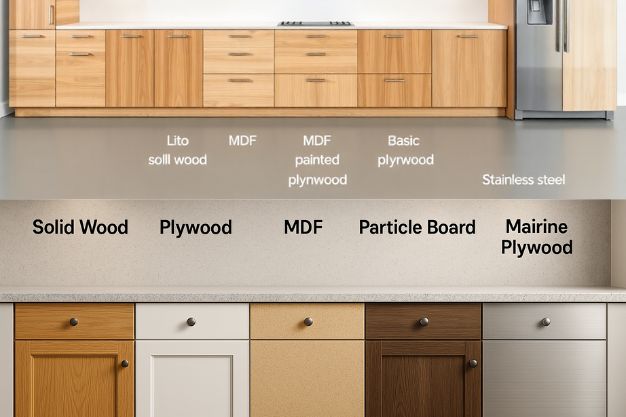
Wood Choices That Survive Moisture
Avoid these common mistakes:
– ❌ Particleboard (swells in 48 hours of dampness)
– ❌ MDF (disintegrates with minor leaks)
– ❌ Unsealed plywood (delaminates at edges)
Use only:
– ✅ Marine-grade plywood (okoume/baltic birch) for all structural parts
– ✅ PVC-coated boards for interior surfaces
– ✅ Stainless steel hardware (never zinc-plated)
For visible fronts, apply two coats of oil-based primer followed by satin polyurethane—not water-based finishes that peel under humidity.
Cost-Saving Material Hacks
You don’t need expensive solid wood. For the cabinet box:
– Use ACX plywood (exterior grade) for hidden structural parts
– Reserve marine plywood only for the bottom 6″ and shelf areas
– Line interiors with $12/sheet PVC shower board instead of cement board
This hybrid approach cuts material costs by 40% while maintaining waterproof integrity where it matters most.
Step-by-Step Sink Cabinet Assembly
Building the Reinforced Frame (60 Minutes)
- Cut pressure-treated lumber: two pieces at cabinet height, two at depth minus 3″
- Drill pocket holes at all ends (3 per corner)
- Assemble rectangle with wood glue and 2½” screws
- Install center vertical brace 12″ from sink side
- Attach cross-braces every 8″ along top/bottom rails
- Reinforce bottom corners with metal corner braces
Pro Tip: Pre-drill all screw holes in pressure-treated wood to prevent splitting.
Installing Waterproof Interior (45 Minutes)
- Cut PVC shower board to fit interior walls with 1/8″ gaps
- Seal all board edges with silicone caulk
- Attach boards with construction adhesive and 1″ stainless screws
- Apply marine epoxy to all plywood edges facing sink area
- Install removable PVC drip tray under sink location
Warning: Never staple interior liners—staples corrode and create leak paths.
Final Plumbing Integration (30 Minutes)
- Position cabinet and mark pipe locations on back panel
- Cut grooves matching pipe diameters with router
- Install rubber grommets in all grooves
- Mount access panels with piano hinges and magnetic catches
- Test all shutoff valve clearances before securing pipes
Maintenance Must-Dos for 20+ Year Lifespan
Your cabinet will last decades with two critical habits:
1. Monthly drip checks: Place paper towels under pipes—discoloration indicates slow leaks
2. Annual access panel cleaning: Remove panels to wipe condensation and check for corrosion
Replace the PVC drip tray every 5 years as preventative maintenance. Never store cleaning chemicals inside sink cabinets—their fumes degrade seals over time.
When to Call a Professional
Stop immediately if you encounter:
– Plumbing lines requiring soldering (gas lines especially)
– Load-bearing wall modifications for cabinet placement
– Electrical wiring within 36″ of sink location
These situations risk code violations or catastrophic failures beyond DIY scope.
Final Note: A properly built sink cabinet solves the hidden weaknesses of store-bought units through strategic reinforcement, multi-layer waterproofing, and emergency-access design. By focusing on the moisture-prone areas and plumbing realities most guides ignore, your custom cabinet will outlast the kitchen itself. Start with precise measurements of your specific sink—not “standard” dimensions—and prioritize structural integrity over speed. When leaks inevitably occur (and they will), your access panels and drip trays will transform emergencies into simple towel-wipe situations. For next steps, calculate exact material quantities using your sink’s dimensions and visit a marine supply store for genuine PVC shower board—home centers often mislabel products as “waterproof” when they’re not.


