
Nothing transforms a kitchen quite like a well-placed rug that combines practicality with personal style. Learning how to make a kitchen rug gives you complete control over size, color, and materials—ensuring your creation withstands daily spills, foot traffic, and frequent cleaning while reflecting your unique aesthetic. Whether you’re a beginner crafter or an experienced DIYer, creating a custom kitchen rug is more achievable than you might think. This guide reveals straightforward methods that let you craft a functional, attractive rug in a weekend without expensive tools or professional skills.
Kitchen rugs face unique challenges compared to other area rugs—they must handle constant moisture, dropped food particles, and heavy foot traffic while maintaining slip resistance and visual appeal. Commercial options often come in limited sizes that don’t fit your specific layout perfectly, forcing compromises in placement or function. By making your own kitchen rug, you solve these problems while saving money and expressing your creativity. The satisfaction of stepping onto a rug you crafted yourself, knowing it’s perfectly sized for your sink area or cooking station, makes the effort worthwhile.
Choose Materials That Withstand Kitchen Realities

Selecting appropriate fabrics separates rugs that last from those that quickly show wear. Kitchen environments demand materials that balance absorbency with quick drying, durability with comfort, and safety with style.
Cotton Canvas: The Beginner’s Best Friend
Start with medium-weight cotton canvas for your first kitchen rug project—it’s affordable, widely available, and handles machine washing with ease. Unlike thinner cottons that develop holes quickly, canvas provides the thickness needed to cushion standing while resisting wear. Purchase pre-washed canvas to prevent shrinkage after completing your rug, or wash and dry new canvas before cutting to pre-shrink the material.
For the backing layer, use a coordinating cotton fabric or repurpose an old bedsheet. Avoid slippery synthetics like polyester for the top layer, as they become hazardous when wet. Instead, reserve synthetic materials for the non-slip backing where their moisture resistance provides benefits without compromising safety.
Create Instant Non-Slip Properties
Prevent dangerous slips by incorporating non-slip elements directly into your rug construction. Cut rubberized shelf liner to match your rug dimensions and glue it to the underside using fabric adhesive. This creates thousands of tiny grip points that anchor your rug securely to tile, vinyl, or hardwood floors.
Alternatively, apply a commercial non-slip spray to the rug’s underside before use. These sprays create a slightly tacky surface that prevents sliding without affecting the rug’s appearance. Reapply every few months or after deep cleanings to maintain effectiveness. For maximum security in high-moisture zones like in front of the sink, combine both techniques—spray the rug first, then add rubberized liner cutouts at the corners.
Cut and Assemble a No-Sew Kitchen Rug in Hours
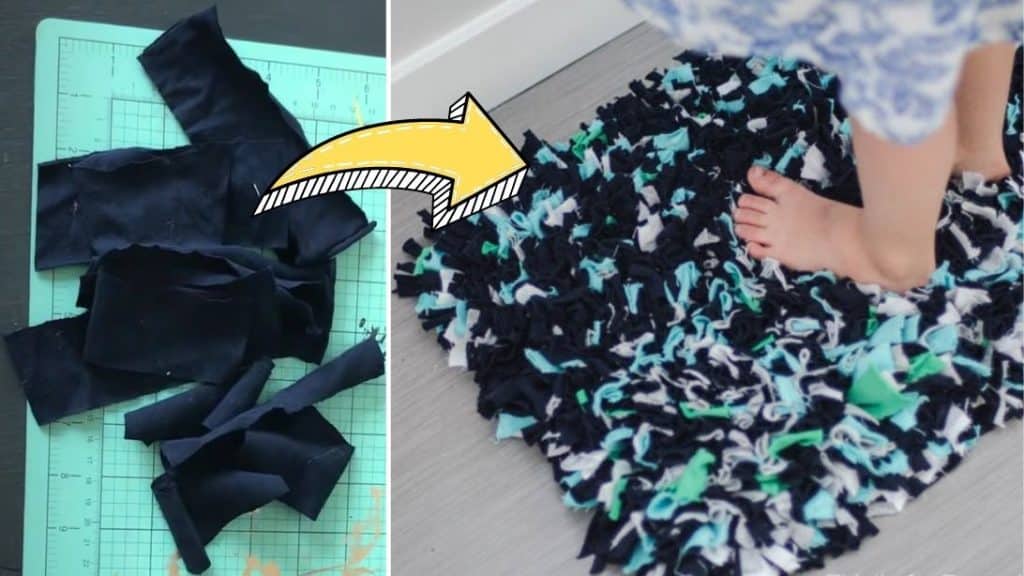
The no-sew method delivers professional results without sewing skills or equipment, making it ideal for beginners who want quick satisfaction from their first rug project.
Prepare Your Workspace and Materials
Gather two fabric layers (top and backing), fabric glue rated for textiles, sharp scissors, measuring tape, and weights like books or cans. Lay your backing fabric face-down on a protected surface, smoothing out all wrinkles. Measure and cut your top fabric with 2-3 inches extra on all sides to allow for edge finishing.
Apply fabric glue evenly across the backing surface using a putty knife or old credit card, working in manageable sections to prevent drying before assembly. Position your top fabric carefully, then smooth from center to edges with your hands to eliminate air bubbles and ensure complete adhesion.
Finish Edges for Professional Appearance
Fold the excess top fabric over the backing edges and glue in place for a clean, finished look. Work section by section, applying glue to the backing edge before folding the top fabric over it. Use clothespins or binder clips to hold edges securely while drying—most fabric glues require 24 hours for full strength.
Once dry, trim any uneven edges with sharp scissors. Your completed no-sew kitchen rug withstands regular machine washing when using quality fabric glue, making maintenance as simple as tossing it in with your regular laundry. The entire process takes about three hours of active work plus drying time—perfect for completing in a single afternoon.
Craft a Cozy Crochet Rug That Improves With Age
Crocheted kitchen rugs offer superior cushioning underfoot while providing excellent drainage for occasional spills. The textured surface naturally hides minor stains between cleanings, making maintenance easier than flat-woven alternatives.
Create a Slip-Resistant Base with Simple Stitches
Start with worsted-weight cotton yarn and a size H-8 (5mm) crochet hook. Chain enough stitches to reach your desired width plus one, then work single crochet stitches in the back loop only across each row. This technique creates raised ridges on the surface that improve grip and water absorption while feeling comfortable under bare feet.
For faster progress on larger rugs, use the half-double crochet stitch worked through both loops. This creates a slightly thinner but still durable rug that works well for smaller kitchen zones like in front of the refrigerator or microwave. A standard 2×3 foot kitchen rug requires approximately 400-600 yards of cotton yarn.
Customize Size Without Pattern Changes
Unlike sewing projects that require precise measurements, crochet rugs naturally accommodate size adjustments. Simply continue working rows until your rug reaches the desired length—no complicated math or pattern modifications needed. This flexibility makes it easy to create custom-sized rugs that fit perfectly in awkward spaces where standard sizes won’t work.
When finished, weave in all yarn ends securely using a large-eye needle. Machine wash your completed crochet rug in cold water and air dry—cotton yarn softens with each washing while maintaining structural integrity. The finished rug provides comfortable cushioning during meal prep while draining moisture quickly after accidental spills.
Finish Like a Pro With Essential Details

Professional-quality results come from attention to finishing details that enhance durability, safety, and appearance—steps many beginners skip to their regret.
Secure Edges Against Fraying
Prevent unraveling by finishing all edges properly before use. For no-sew rugs, apply a second layer of fabric glue along the folded edge after the initial glue has dried. This double-bonding technique significantly extends your rug’s lifespan in high-traffic kitchen areas.
For crocheted rugs, add a round of single crochet edging around the entire perimeter using a contrasting color for visual interest. This not only reinforces the edges but creates a clean frame that draws the eye inward to your rug’s main design.
Add Strategic Reinforcement
Identify high-wear zones based on your kitchen layout—typically in front of the sink and primary cooking area—and add extra reinforcement. Glue a second layer of canvas or rubberized mesh to these spots before adding the non-slip backing. This targeted reinforcement doubles the rug’s lifespan in problem areas without affecting the overall appearance.
Implement a Practical Cleaning Schedule
Preserve your handmade kitchen rug with a simple maintenance routine. Vacuum twice weekly to remove food particles before they grind into fibers. Address spills immediately with a mixture of one part white vinegar to two parts water—this solution cleans effectively without leaving residues that attract more dirt.
Machine wash fabric and crocheted rugs monthly using cold water and mild detergent. Never use fabric softener, as it coats fibers and reduces absorbency. Air dry completely before returning to use—damp rugs develop odors quickly in kitchen environments.
Customize for Your Specific Kitchen Layout
Transform your rug from generic floor covering to purpose-built kitchen accessory by tailoring it to your unique space and cooking habits.
Create Zone-Specific Rugs
Instead of one large rug, make multiple smaller rugs designed for specific kitchen functions. A thicker, more absorbent rug in front of the sink handles frequent water exposure, while a thinner, more durable rug in front of the stove resists heat and dropped utensils. This targeted approach extends overall rug lifespan by matching materials to actual usage patterns.
Match Your Decor Personality
Coordinate your rug colors with existing kitchen elements for cohesive design. Pull accent colors from your backsplash, cabinet hardware, or small appliances to create visual harmony. In neutral kitchens, use your rug to introduce warmth through earth tones or energize the space with bold colors. For patterned kitchens, opt for solid-color rugs that provide visual breathing room.
Creating your own kitchen rug transforms a functional necessity into a personalized design element that perfectly fits your space and lifestyle. The no-sew method delivers quick results for beginners, while crochet offers satisfying texture and cushioning for more experienced crafters. By selecting appropriate materials, finishing edges properly, and customizing for your specific kitchen layout, you’ll create a rug that withstands daily demands while expressing your unique style. Most importantly, each time you stand on your handmade creation, you’ll appreciate the practical beauty of something made with your own hands—a small but meaningful touch that makes your kitchen truly your own. Start with a simple project today, and discover how easy it is to make a kitchen rug that works as hard as you do.


