
Your restaurant’s success hinges on a commercial kitchen that meets health codes, optimizes workflow, and withstands daily wear. Yet 42% of new food businesses fail within the first year due to improper kitchen design or regulatory violations. Without proper planning, you could face $15,000+ in renovation costs to fix ventilation errors or electrical faults after failed inspections. This guide walks you through the exact steps to build a compliant, efficient commercial kitchen—from zoning permits to equipment installation—using only verified industry standards. You’ll learn critical safety protocols inspectors check, cost-saving layout strategies, and how to avoid the top 3 mistakes that delay openings by 6+ weeks.
Securing Legal Approvals Before Construction
Before touching a blueprint, navigate these non-negotiable regulatory hurdles. Skipping even one step risks shutdowns during health inspections or fire marshal reviews. Most jurisdictions require overlapping approvals that take 8-12 weeks to process.
Health Department Permit Requirements
Submit detailed floor plans showing equipment placement relative to sinks, food prep zones, and storage. Your layout must maintain:
– Minimum 5-foot separation between raw meat prep areas and ready-to-eat stations
– Dedicated handwashing sinks within 25 feet of all workstations (no shared utility sinks)
– Non-porous, seamless flooring extending 6 inches up walls in dishwashing zones
– Ventilation hoods covering all cooking equipment (minimum 1,200 CFM for fryers)
Pro Tip: Photograph existing plumbing/electrical routes during building walkthroughs. Many historic properties require costly sewer line upgrades if floor drains aren’t within 10 feet of dish pits.
Building Code Compliance Essentials
Your contractor must verify these structural elements before framing:
– Ceiling height ≥ 8 feet (10 feet under hoods)
– Electrical circuits dedicated per appliance (220V for ranges, 110V for prep tables)
– Fire suppression system pre-installed in hood ductwork
– Emergency lighting along all exit paths
Critical Mistake: Never assume residential gas lines suffice. Commercial ranges require 1.5-inch diameter piping—residential lines (0.75-inch) cause dangerous pressure drops.
Designing Your Kitchen Layout for Maximum Efficiency
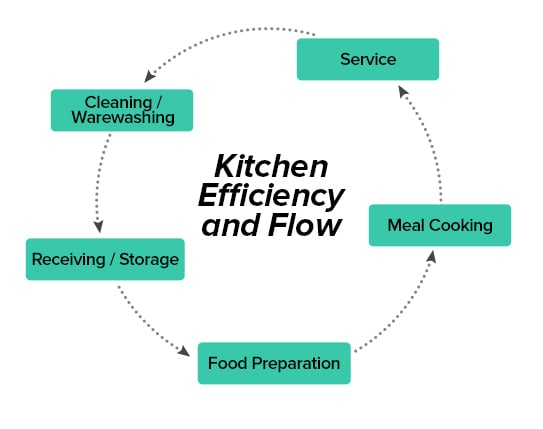
A poorly arranged kitchen adds 2.5 hours of wasted labor daily. Follow the NSF’s “assembly line” principle: raw ingredients enter at one end, finished dishes exit at the other with zero cross-traffic.
Creating Workflow Zones
Divide your space into four non-overlapping sections:
| Zone | Required Equipment | Minimum Square Footage |
|---|---|---|
| Receiving/Storage | Walk-in cooler, dry storage shelves | 15% of total space |
| Prep | Sinks, cutting tables, refrigerated prep tables | 20% of total space |
| Cooking | Ranges, fryers, ovens under ventilation hoods | 30% of total space |
| Plating/Dishwashing | Three-compartment sink, dish machine, pass-through window | 25% of total space |
Visual Cue: Mark zones with colored floor tape during mock-ups. If staff cross the “raw meat” zone while carrying clean plates, reconfigure immediately.
Avoiding Bottleneck Traps
Position high-traffic stations away from:
– Narrow corridors (maintain 48-inch clearance between workstations)
– Electrical panels (36-inch clearance required by NEC)
– Emergency exits (never block with equipment)
Time-Saver: Place dishwashers within 10 feet of cooking lines. Staff spend 18% less time bussing tables when dish stations are centrally located.
Installing Critical Infrastructure Systems
Rush these installations, and you’ll face mold outbreaks, electrical fires, or sewage backups. Always hire licensed specialists—DIY attempts void equipment warranties.
Ventilation System Specifications
Your hood must:
– Extend 6 inches beyond each side of cooking equipment
– Maintain 100 FPM airflow across the entire cooking surface
– Connect to a UL 300-rated fire suppression system
– Exhaust fumes ≥ 10 feet above roofline (never into alleys)
Warning: Aluminum ductwork costs 30% less than stainless steel but corrodes rapidly from grease. Inspectors reject it in 92% of cases for fryer/charbroiler setups.
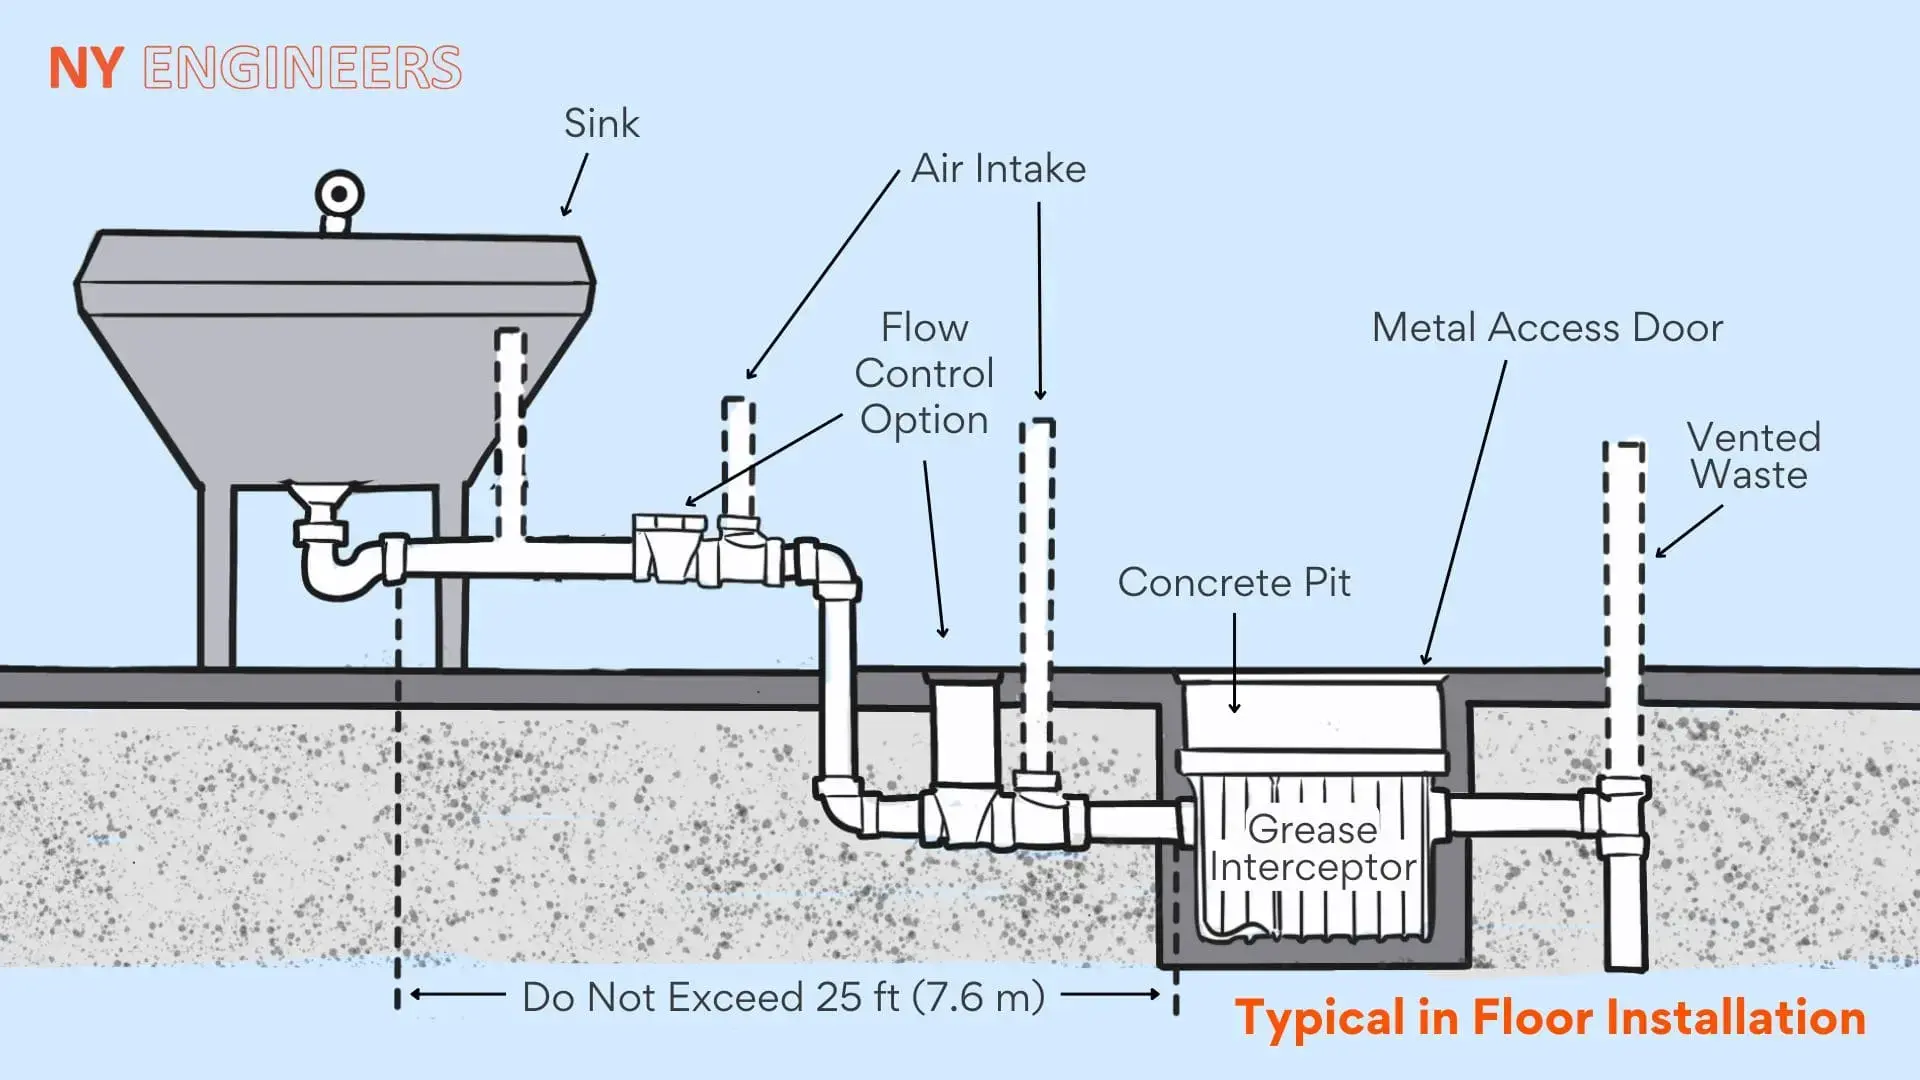
Plumbing Non-Negotiables
Install these in this sequence:
1. Grease interceptors sized for 1,000+ gallons (required for >50 seats)
2. Floor drains with 2-inch diameter pipes sloped at 1/8 inch per foot
3. Backflow preventers on all cold water lines
4. Separate hot/cold lines to three-compartment sinks
Cost Trap: Using residential P-traps under prep sinks violates health codes. Commercial versions must have 4-inch diameter traps with cleanouts every 10 feet.
Selecting & Positioning Commercial-Grade Equipment
Residential appliances fail within 3 months under restaurant use. Prioritize NSF-certified equipment with stainless steel construction—even for “dry” zones like pastry stations.
Must-Have Equipment Checklist
Refrigeration:
– Walk-in cooler (28-38°F) with 4-inch insulated panels
– Under-counter prep tables with 1/4 hp compressors
– Separate freezer for raw proteins (0°F or below)
Cooking:
– 36-inch convection oven (200,000 BTU minimum)
– Liquid propane fryer with 50-pound tank capacity
– NSF-certified griddle with 1-inch thick steel plate
Pro Tip: Order equipment with 6-inch legs. This meets health code clearance requirements and simplifies floor cleaning—no retrofitting later.
Strategic Placement Rules
- Position fryers downwind of prep tables to prevent oil mist contamination
- Keep refrigerators ≥ 3 feet from heat sources (ovens, dishwashers) to avoid compressor strain
- Align dish machine discharge racks directly under storage shelves to eliminate walking
Visual Cue: When standing at the pass, you should see no staff backs. If cooks turn their backs to servers during plating, the layout forces dangerous cross-traffic.
Final Inspection Readiness Checklist
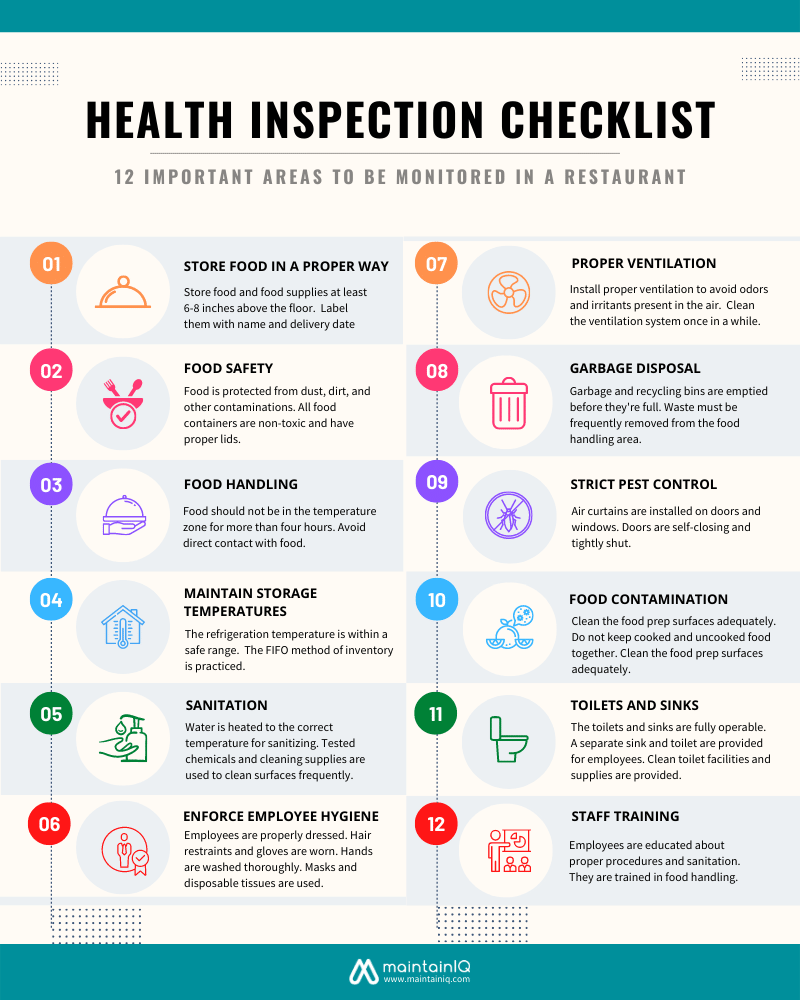
Schedule your health department walkthrough 72 hours after equipment installation. They’ll immediately check:
Top 3 Failure Points to Fix First
- Sink water temperature—must reach 110°F within 5 seconds at all handwashing stations
- Refrigerator logs—showing continuous temps below 41°F for 72 hours prior
- Grease trap access—unobstructed with 12-inch clearance around lids
Urgent Fix: If your walk-in cooler lacks an internal door release, inspectors will padlock your kitchen. Install breakaway magnetic latches before inspection day.
Documentation You Must Present
- Equipment installation certificates (hood, fire suppression, gas lines)
- NSF compliance tags for all food-contact surfaces
- Employee food handler permit copies
- Grease interceptor maintenance schedule
Time-Saver: Photograph completed zones with timestamps. During inspections, pull up digital albums instead of searching for paper records.
Preventing Costly Post-Opening Failures
Your kitchen isn’t “done” at opening night. Implement these protocols within Week 1:
Daily Maintenance Non-Negotiables
- Clean hood filters with degreaser before 10 AM (grease hardens after cooling)
- Check refrigerator door gaskets for gaps using dollar bill test ($20 bill shouldn’t slide out)
- Verify floor drain flow by pouring 5 gallons of water—must drain in <30 seconds
Warning: Ignoring minor gas line hisses risks explosion. Shut off main valve and call a licensed technician immediately—never attempt tightening yourself.
Quarterly System Upgrades
- Replace hood exhaust belts (stretched belts reduce airflow by 40%)
- Flush grease interceptors when sludge depth hits 6 inches
- Calibrate oven thermostats using NIST-traceable thermometers
Pro Tip: Photograph equipment serial numbers during installation. When ordering parts years later, suppliers often require these digits—saving 3+ days of downtime.
Final Note: Building a commercial kitchen demands precision at every phase—no shortcuts survive health inspections. By following these verified steps, you’ll create a space that passes code reviews on the first attempt while optimizing staff efficiency. Remember that ventilation and plumbing are non-negotiable foundations; never compromise here to save costs. Once operational, maintain rigorous daily logs for refrigeration and hood cleaning—these documents become your legal shield during surprise inspections. For next steps, download your local health department’s kitchen blueprint checklist and review NFPA 96 standards for fire safety compliance. Your kitchen isn’t just where food is made; it’s the engine of your business. Build it right, and it will power your success for decades.


