
That annoying wobble in your kitchen faucet isn’t just irritating—it’s a warning sign of potential plumbing issues that could lead to water damage if ignored. When your faucet handle shakes or the spout moves unexpectedly, it means the mounting hardware has gradually worked loose from daily use. This common household problem affects nearly every kitchen over time, but the good news is that keeping your faucet securely mounted requires simple maintenance you can handle yourself. In this guide, you’ll discover proven techniques to stabilize your kitchen faucet immediately and implement long-term strategies that prevent loosening before it starts.
Most homeowners don’t realize their kitchen faucet endures hundreds of pounds of force each month from regular use and water pressure changes. Every time you turn the handle, activate the spray feature, or adjust water temperature, microscopic movements accumulate at the mounting points. Without proper attention, these tiny shifts eventually create noticeable play in the fixture. By understanding why faucets loosen and establishing a simple maintenance routine, you’ll maintain a rock-solid faucet that operates smoothly for years without that frustrating wiggle.
Immediate Fixes for a Wobbly Kitchen Faucet
When you first notice your faucet developing play, addressing it right away prevents further damage to mounting hardware and surrounding surfaces. Most minor wobble issues respond well to straightforward tightening procedures that require minimal tools and no plumbing expertise.
Accessing and Tightening Mounting Hardware Under Sink
The most effective solution for a loose kitchen faucet involves securing the mounting assembly from beneath the sink cabinet. Start by shutting off both hot and cold water supply valves completely to prevent accidental water flow during your repair. Place a towel or small container under the connections to catch any residual water in the lines.
Using a basin wrench (specifically designed for tight spaces under sinks), locate the mounting nuts positioned directly below the faucet base. For standard deck-mounted faucets, these nuts secure the fixture to the countertop. Tighten each nut gradually while alternating between sides to distribute pressure evenly across the mounting surface. Apply firm but controlled pressure—overtightening can crack porcelain sinks or strip threads on plastic components. After securing all mounting points, test the faucet by applying gentle pressure in multiple directions to verify stability before restoring water supply.
Locating and Securing Concealed Mounting Mechanisms
Many modern faucets feature hidden mounting systems that require specific access procedures. Single-handle faucets with sleek designs often conceal mounting screws beneath decorative caps on the handle base. Carefully pry off these caps using a flat-head screwdriver wrapped in masking tape to avoid scratching the finish. Inside, you’ll typically find Phillips or hex-head screws that secure the faucet to the mounting plate.
Faucets with pull-down spray heads may have additional mounting points where the hose connects to the spout. Check for small access panels on the underside of the spout that reveal set screws securing the rotational mechanism. Tighten these screws incrementally while testing the spout movement until the wobble disappears. Always return decorative elements to their original positions after completing adjustments to maintain your faucet’s aesthetic appearance.
Establishing a Preventive Maintenance Schedule
Preventing faucet loosening requires consistent attention that addresses minor movement before it develops into significant play. Creating a simple quarterly maintenance routine takes just minutes but extends your faucet’s stability for years.
Comprehensive Stability Assessment Protocol
Every three months, perform a thorough stability check by first examining the junction between the faucet base and sink surface for visible gaps or separation. Run your fingers completely around the perimeter to detect subtle movement that might not be visible. Test all operational positions—fully extend pull-down sprayers, rotate the spout through its maximum range, and operate handles in both directions while noting any unusual movement or resistance.
Inspect the area under the sink for signs of water accumulation, corrosion on mounting hardware, or damp insulation that indicates slow leaks. Pay special attention to the mounting plate for rust stains or mineral deposits that suggest water infiltration around the base. Address any moisture issues immediately, as prolonged exposure accelerates hardware deterioration and creates conditions for further loosening.
Effective Base Cleaning Techniques to Prevent Loosening
Accumulated soap scum, hard water deposits, and food particles around the faucet base create uneven pressure points that contribute to loosening over time. Weekly cleaning prevents buildup that compromises the seal between the faucet and sink surface.
Create a cleaning solution using equal parts white vinegar and water in a spray bottle for tackling mineral deposits. Apply the solution around the base junction and let it sit for 5-10 minutes to dissolve hard water stains. Use an old toothbrush with soft bristles to gently scrub the seam between the faucet and sink, working the solution into crevices where debris accumulates. Rinse thoroughly with clean water and dry completely with a microfiber cloth to prevent moisture from seeping under the mounting surface.
Replacing Critical Seals and Washers Before They Fail
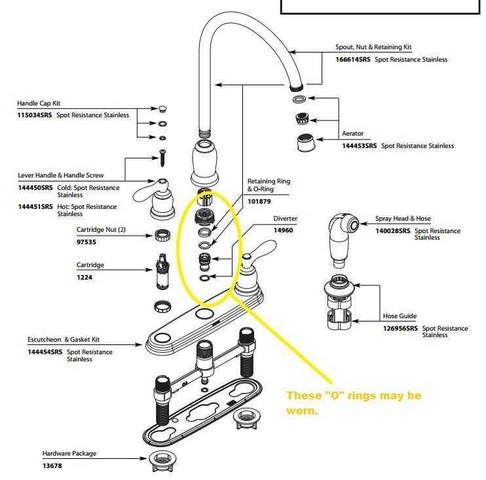
Worn rubber components throughout your faucet assembly contribute significantly to instability by allowing movement at critical connection points. Recognizing when to replace these parts prevents minor play from developing into major wobble.
Diagnosing Seal and Washer Degradation
Annual inspection of internal components catches seal deterioration before it affects faucet stability. Remove handle caps and loosen the handle set screw to access the cartridge assembly. Look for rubber washers showing signs of compression (flattened to less than half their original thickness), cracking, or hardening—these have lost their ability to maintain a tight seal against vibration.
Check the O-rings on the spout assembly for similar signs of wear. When these seals harden or develop cracks, they no longer absorb the micro-movements caused by water flow and pressure changes. Even if no visible leaks exist, compromised seals allow enough movement to gradually work mounting hardware loose over time.
Selecting and Installing Correct Replacement Components
Using manufacturer-specified replacement parts ensures proper fit and material compatibility with your faucet design. Locate your faucet’s model number (typically stamped on the underside of the spout or on the original packaging) before purchasing replacement seals. Many manufacturers offer complete rebuild kits that include all critical washers and O-rings at a lower cost than individual components.
When installing new seals, apply a small amount of plumber’s grease to rubber components to facilitate installation and extend their service life. Reassemble components in reverse order of disassembly, taking care not to overtighten set screws that could damage the new seals. Test the faucet thoroughly after reassembly, checking for both stability and proper operation before considering the job complete.
Advanced Strategies for Permanent Faucet Stability
Beyond routine maintenance, implementing these advanced techniques significantly reduces vibration transmission and creates a more secure mounting system that withstands years of regular use.
Optimizing Water Pressure for Fixture Longevity
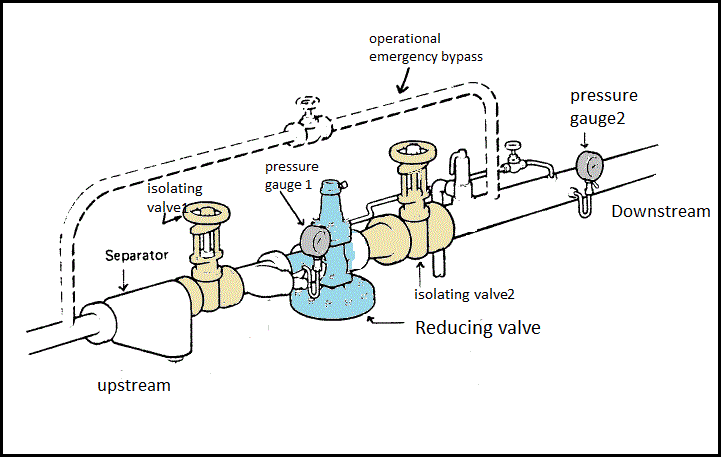
Excessive water pressure accelerates faucet loosening by transmitting stronger vibration forces through the mounting hardware. Install a pressure gauge on an outdoor faucet to check your home’s water pressure—readings consistently above 80 psi indicate a need for a pressure-reducing valve. Homes with well systems benefit particularly from water hammer arrestors that absorb pressure surges before they reach your kitchen faucet.
Consider installing a whole-house water pressure regulator if your readings exceed 100 psi. This relatively simple plumbing upgrade protects all fixtures in your home while extending the life of your kitchen faucet mounting system. The reduced vibration from properly regulated water pressure minimizes the micro-movements that gradually work mounting hardware loose over time.
Reinforcing Mounting Hardware with Modern Solutions
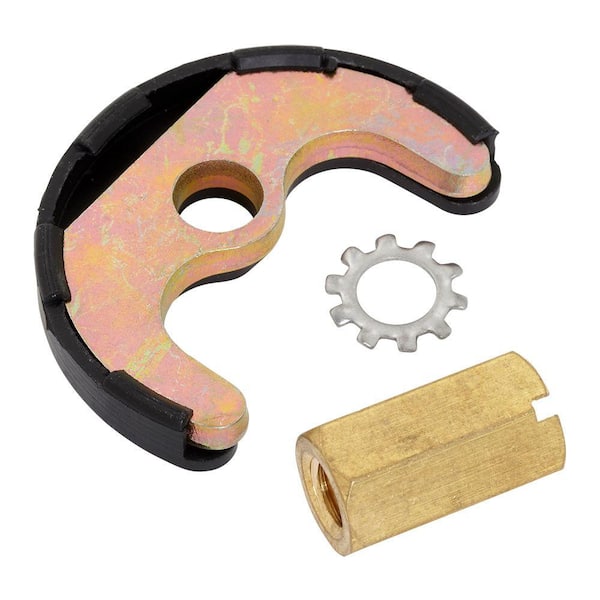
For faucets that continue to loosen despite regular maintenance, upgrading the mounting hardware provides a permanent solution. Replace standard plastic mounting nuts with brass or stainless steel alternatives that resist corrosion and provide more secure grip. Apply thread-locking compound specifically formulated for plumbing applications to mounting bolts before installation—this specialized adhesive prevents loosening from vibration while remaining removable for future maintenance.
Consider adding rubber isolation washers between the mounting hardware and sink surface to absorb vibration before it reaches the mounting points. These simple components, available at most hardware stores, create a buffer that prevents the transmission of handle movement to the mounting assembly. Properly installed, these washers significantly reduce the cumulative effect of daily use on your faucet’s stability.
Professional Intervention Guidelines
While most faucet loosening issues can be resolved with DIY maintenance, certain situations warrant professional plumbing expertise to prevent further damage or ensure proper repair.
Recognizing Complex Problems Beyond DIY Fixes
If your faucet continues to wobble after multiple tightening attempts and seal replacements, the problem likely involves structural issues with the mounting surface or internal faucet components. Significant corrosion on mounting hardware that prevents proper tightening, cracks in the sink deck around the mounting holes, or damage to the faucet’s internal mounting channels all require professional assessment.
Faucets with electronic components, touchless operation, or integrated water filtration systems often have specialized mounting requirements that complicate standard tightening procedures. Attempting repairs on these advanced fixtures without proper training risks damaging expensive components and voiding manufacturer warranties. When in doubt about your faucet’s specific requirements, consult a professional plumber before proceeding with complex disassembly.
Maximizing Professional Service Effectiveness
When calling a plumber for faucet stability issues, provide specific details about the problem’s progression, previous repair attempts, and your faucet model. This information helps the technician arrive prepared with appropriate tools and replacement parts. Request a comprehensive diagnostic assessment that examines not only the visible wobble but also checks for underlying issues like water damage or structural weaknesses in the mounting surface.
Professional plumbers often identify secondary problems during faucet repairs, such as deteriorating supply lines or failing shutoff valves that could lead to future emergencies. Taking advantage of their expertise during a service call prevents separate emergency visits later. For older faucets showing multiple signs of wear, ask for an honest assessment of whether replacement might prove more cost-effective than continued repairs.


