

That unpleasant chlorine taste in your tap water doesn’t have to be part of your daily routine. Installing a water filter directly under your kitchen sink delivers clean, great-tasting water on demand while keeping your counter space free and your sink looking uncluttered. Unlike pitcher filters that take up refrigerator space or faucet attachments that interfere with your sink’s functionality, an under-sink system works quietly beneath your cabinet, providing purified water through its own dedicated faucet. This permanent solution connects directly to your plumbing and requires minimal maintenance once properly installed.
Whether you’re concerned about lead pipes in older homes, chlorine taste from municipal treatment, or simply want better-tasting coffee and tea, a properly installed under-sink water filter delivers immediate results. The installation process is manageable for most homeowners with basic tools and moderate mechanical skills, typically taking less than an hour to complete. By following these precise steps, you’ll avoid common pitfalls that lead to leaks, poor performance, or unnecessary service calls.
Choose the Right Under-Sink Filter Configuration

Selecting the appropriate filter system prevents installation headaches and ensures optimal performance for your specific water conditions. Under-sink filters primarily fall into two categories: single-stage carbon filters for basic taste and odor improvement, and multi-stage reverse osmosis systems for comprehensive contaminant removal.
Single-stage carbon filters connect directly to your cold water line and require only a dedicated faucet and mounting space under your sink. These systems effectively remove chlorine, sediment, and organic compounds that affect taste and odor but don’t address dissolved solids or heavy metals. Installation takes 30-45 minutes with basic tools, making them ideal for renters or homeowners seeking quick improvements to municipal water.
Reverse osmosis systems provide more thorough filtration but require additional components: a pre-filter, membrane, post-filter, storage tank, and drain connection. These systems remove up to 99% of contaminants including lead, fluoride, and dissolved solids, but installation takes 1.5-2 hours and requires drilling a drain connection. Measure your under-sink cabinet carefully—RO systems need 15-18 inches of vertical clearance for the storage tank, which many standard cabinets lack.
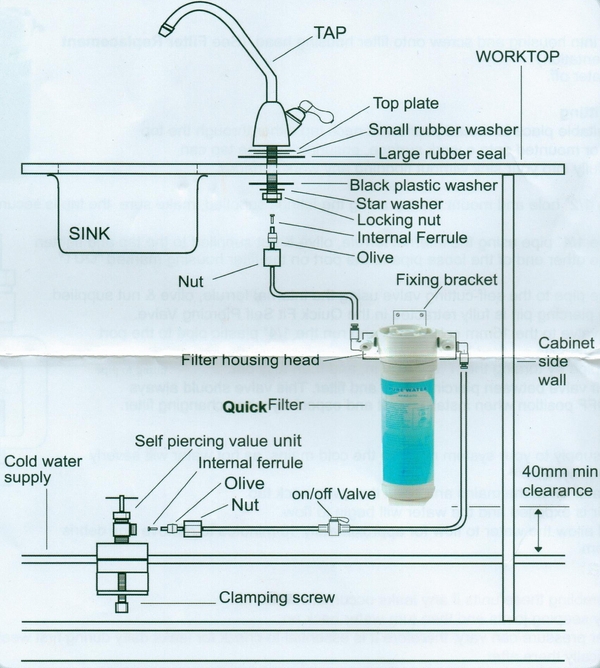
Determine Your Under-Sink Space Requirements
Before purchasing any system, measure your cabinet space with a tape measure to ensure proper fit. Most standard under-sink filters need at least 12 inches of vertical clearance and 8 inches of width, but compact models exist for tight spaces. Open your cabinet and check for obstacles like garbage disposals, dishwasher lines, or plumbing that might interfere with filter placement.
If you have a garbage disposal unit mounted on the left side of your sink (typical for right-handed sinks), plan to install the filter housing on the right side to maintain access to disposal components. For cabinets with limited vertical space, look for horizontal-mount filter housings that attach to the cabinet floor rather than hanging from the wall.
Gather Essential Installation Tools and Materials

Having everything ready before starting prevents mid-installation frustrations and accidental water damage from incomplete connections. Most filter kits include the housing, faucet, tubing, and fittings, but you’ll need standard tools from your workshop to complete the job.
Must-Have Tools Checklist
- Adjustable wrench or basin wrench (for tight spaces)
- Bucket and several clean rags (water will spill)
- Flashlight or headlamp (for seeing in dark cabinets)
- Plumber’s tape (PTFE tape for threaded connections)
- Drill with appropriate hole saw (if installing new faucet)
- Quarter-inch drill bit (for pilot holes)
- Measuring tape (for precise placement)
Verify your filter kit includes all necessary components before beginning. Most complete kits contain the filter housing, mounting hardware, tubing cutters, faucet assembly, and installation instructions. If any parts are missing, contact the manufacturer before proceeding—trying to improvise with incorrect fittings often leads to leaks.
Shut Off Water and Prepare Plumbing Connections
Skipping proper preparation causes the most common installation mistakes, including leaks that damage cabinets and floors. This critical phase establishes a solid foundation for your entire filtration system.
Disconnect Cold Water Supply Line
Locate the cold water shut-off valve beneath your sink—usually the right-hand valve when facing the pipes. Turn it clockwise until fully closed, then open your kitchen faucet to drain residual water from the line. Place a bucket under the valve connection point and use your adjustable wrench to disconnect the supply line from the valve.
Inspect the valve threads for corrosion or mineral buildup. If the valve appears damaged or leaks when reconnected, replace it with a new quarter-turn ball valve before proceeding—this small investment prevents future emergencies. Apply three wraps of plumber’s tape clockwise around the valve threads to create a watertight seal for your new connections.
Install Tee Fitting for Filter Connection
Most systems require installing a tee fitting on your cold water line to divert water to both your regular faucet and the filter system. Hand-tighten the fitting onto the valve, then secure it with your wrench using only a quarter-turn beyond hand-tight—over-tightening cracks plastic fittings. Connect one outlet of the tee to your existing supply line and the other to the filter system’s inlet tubing.
Mount Filter Housing and Install Dedicated Faucet
Proper mounting ensures easy maintenance access while preventing damage to the system from stored items under your sink. Position the filter housing where you can comfortably reach it for cartridge changes every 6-12 months.
Secure Filter Housing in Cabinet
Most systems include a mounting bracket that attaches to the cabinet wall or floor. Position it away from your garbage disposal’s electrical cord and any stored cleaning products. Mark screw holes with a pencil, drill pilot holes, and secure the bracket firmly. Slide the filter housing onto the bracket according to manufacturer instructions, ensuring the inlet and outlet ports face the correct direction (most housings have flow direction arrows).
Install Dedicated Filter Faucet
If your sink lacks a pre-drilled hole for the filter faucet, mark your drilling location on the sink deck or countertop. Use the appropriate hole saw size (typically 1-1/4″ or 1-1/2″) and drill slowly to prevent cracking. Feed the faucet base through the hole, place the rubber gasket on top, then secure it from below with the mounting nut—tighten just enough to compress the gasket without cracking the sink surface.
Connect the filtered water tubing from your housing outlet to the faucet base, applying plumber’s tape to threaded connections. Route excess tubing neatly along the cabinet floor using included cable ties to prevent kinks that restrict water flow.
Test for Leaks and Complete System Flush
Rushing this final phase causes most post-installation problems. Proper testing ensures your system delivers clean water without damaging your cabinet or flooring.
Initial System Flush and Leak Check
Open your filter faucet fully and let water run continuously for 5-10 minutes to flush manufacturing residues from the cartridge and tubing. During this flush, inspect every connection point for leaks—pay special attention to the tee fitting, filter housing connections, and faucet base. Feel connections with dry fingers to detect slow seeps that might not be visible.
Final Leak Verification
After flushing, close the filter faucet and wait 15 minutes before rechecking all connections. This waiting period reveals slow leaks that only appear after water pressure stabilizes. Place paper towels under each connection point to catch any drips you might miss during visual inspection.
If you discover leaks, tighten connections slightly with your wrench (for threaded fittings) or push tubing further into quick-connect fittings. Never overtighten plastic components—most leaks result from damaged fittings rather than loose connections.
Maintain Your Filter System for Optimal Performance
Proper maintenance ensures consistent water quality and prevents costly damage from neglected components. Most filter housings have a twist-off design that requires no tools for cartridge replacement.
Schedule Regular Cartridge Changes
Set calendar reminders to replace cartridges every 6-12 months based on your system’s specifications and household water usage. Signs your filter needs replacement include reduced water flow, returning chlorine taste, or visible sediment in filtered water. When replacing cartridges, shut off the water supply, place a bucket under the housing, twist off the housing, discard the old cartridge, insert the new one, and reassemble.
Prevent Common Maintenance Issues
Store replacement cartridges in their original packaging until needed to prevent moisture damage. Before installing new cartridges, flush them under running water for 30 seconds to remove loose carbon particles. After each cartridge change, run the filter faucet for 2-3 minutes to flush the new cartridge before using the water for drinking.
Your kitchen sink water filter installation is now complete, providing immediate access to cleaner, better-tasting water without cluttering your counter space. By following these precise steps, you’ve avoided the most common installation mistakes that lead to leaks, poor performance, or premature system failure. Remember to replace cartridges on schedule—neglected filters can actually worsen water quality by releasing trapped contaminants back into your water. With proper maintenance, your under-sink filter will deliver reliable performance for years, saving you money on bottled water while giving you confidence in every glass you pour. Should you encounter persistent issues like reduced flow or unusual tastes, consult your manufacturer’s troubleshooting guide before assuming the system needs replacement—most problems have simple solutions that take just minutes to fix.


