

Nothing transforms a tired kitchen faster than adding shiplap to your walls or backsplash area. This once-industrial building material has become a kitchen design superstar, offering texture, warmth, and character at a fraction of traditional tile costs. The best part? You can install shiplap in your kitchen over a single weekend with basic tools and moderate DIY skills. Unlike complex tile installations requiring specialized equipment, shiplap installation follows straightforward techniques that even beginner home improvers can master. With proper planning and execution, your kitchen will gain that coveted farmhouse charm while maintaining practical durability in high-moisture cooking environments.
Shiplap’s kitchen popularity stems from its remarkable versatility and surprising resilience. Originally designed for ship construction to prevent water intrusion, shiplap’s overlapping design naturally sheds moisture—making it uniquely suited for kitchen backsplashes where splatters and steam are daily realities. Homeowners consistently report shiplap installations looking pristine after two or more years of kitchen use when properly sealed and maintained. This durability combined with its relatively simple installation process means you can achieve professional-looking results without professional-level skills or budget.
Before grabbing your tools, understand that successful shiplap installation requires strategic planning specific to your kitchen layout. Whether you’re updating a narrow backsplash behind your stove, wrapping shiplap around your kitchen island, or creating a full accent wall, each application presents unique challenges and opportunities. The following guide provides step-by-step instructions for flawless shiplap installation that withstands kitchen demands while enhancing your space’s aesthetic appeal.
Determine Your Shiplap Placement and Orientation Strategy
Your installation’s visual impact depends entirely on strategic placement decisions made before purchasing a single board. For kitchen backsplashes, measure precisely from countertop to bottom of upper cabinets, noting all obstacles like windows, range hoods, and existing electrical outlets. This measurement determines how many boards you’ll need and whether vertical or horizontal installation better complements your kitchen’s proportions.
Vertical shiplap creates the illusion of taller ceilings by drawing the eye upward—a perfect solution for standard-height kitchens feeling cramped or closed-in. Horizontal installation provides traditional farmhouse warmth but can make already-low ceilings feel lower, so reserve this orientation for kitchens with very high ceilings. For kitchen islands, vertical installation typically works best as it creates clean lines that match cabinet heights and draws attention to your island as a focal point.
Calculate your exact square footage needs by multiplying wall height by width, then add 10% for waste and cuts. This prevents mid-project shortages that force you to hunt for matching boards. Write down all measurements clearly and take them to the store—having precise numbers eliminates guesswork when selecting pre-manufactured shiplap or requesting plywood rips for custom boards.
Gather Essential Shiplap Installation Tools for Kitchen Projects
Skip the generic “tools you’ll need” approach and grab exactly what matters for kitchen shiplap installation. Your foundation tools include a quality tape measure (25-foot minimum), a six-foot level (critical for ensuring straight installation), and a pneumatic nail gun with 2-inch finish nails. The nail gun dramatically speeds installation while creating more secure attachments than hand-nailing—rent one from your local hardware store if you don’t own it.
A jigsaw is non-negotiable for cutting precise notches around electrical outlets, corbels, and countertop edges. Unlike circular saws, jigsaws maneuver into tight spaces for interior cuts. For kitchen island projects, add a miter saw to your toolkit for creating clean 45-degree angles on trim pieces. Most DIYers already own a hammer, utility knife, and pencil—but verify you have these before starting.
Don’t forget installation supplies: construction adhesive (liquid nails), white putty for nail holes, appropriate caulk for moisture sealing, painter’s tape for clean lines, and receptacle spacers if covering existing electrical outlets. For kitchen-specific needs, choose semi-gloss paint that withstands frequent cleaning—eggshell finishes work for walls but won’t hold up behind stoves or sinks.
Select the Right Shiplap Material for Kitchen Durability

Avoid costly mistakes by choosing shiplap specifically suited for kitchen environments. Pre-manufactured tongue and groove shiplap costs more but creates seamless surfaces without visible gaps between boards—ideal for high-moisture areas where water might penetrate gaps. Standard shiplap (nickel-gap style) offers budget-friendly installation with distinctive shadow lines but requires more careful sealing at gaps to prevent moisture intrusion.
For most kitchen applications, eased-edge shiplap provides the best balance of aesthetics and practicality. The beveled edges create pronounced shadow lines while helping hide minor installation imperfections—a godsend for first-time installers. Many eased-edge options come pre-primed, saving preparation time and ensuring consistent paint coverage. If creating custom shiplap from plywood, request 5/8-inch thick boards ripped to 6-inch widths for optimal stability in humid kitchen environments.
When selecting boards, hand-pick the straightest pieces with minimal knots—these install more easily and create cleaner visual lines. Avoid warped boards regardless of price savings; they’ll create frustrating gaps during installation. For kitchen islands, five-millimeter plywood offers excellent value when ripped to 5-inch widths, providing sufficient thickness without excessive weight.
Prepare Kitchen Walls for Secure Shiplap Attachment
Proper wall preparation prevents the most common shiplap installation failures in kitchens. Start by turning off electrical power at the breaker box before removing outlet covers completely—this protects you during installation and reveals exact outlet positions for accurate cutting. Clean all wall surfaces thoroughly with TSP (trisodium phosphate) cleaner to remove kitchen grease that compromises adhesive performance.
Inspect walls for damage requiring repair before installation. Fill cracks and holes with spackling compound, allowing complete drying before sanding smooth. Sand glossy paint finishes to create better gripping surfaces for adhesive. For tile backsplashes, adhesive-only installation typically suffices, but textured walls require combination adhesive-and-nail attachment for secure holding power.
Address electrical box depth immediately—existing boxes will sit recessed behind new shiplap unless extended. Install inexpensive plastic receptacle spacers that fold up behind outlets, adding precisely the thickness needed for covers to fit flush against your new shiplap surface. These spacers remain invisible once outlet covers are reinstalled, solving a problem many DIYers overlook until it’s too late.
Install Vertical Shiplap Boards with Professional Alignment
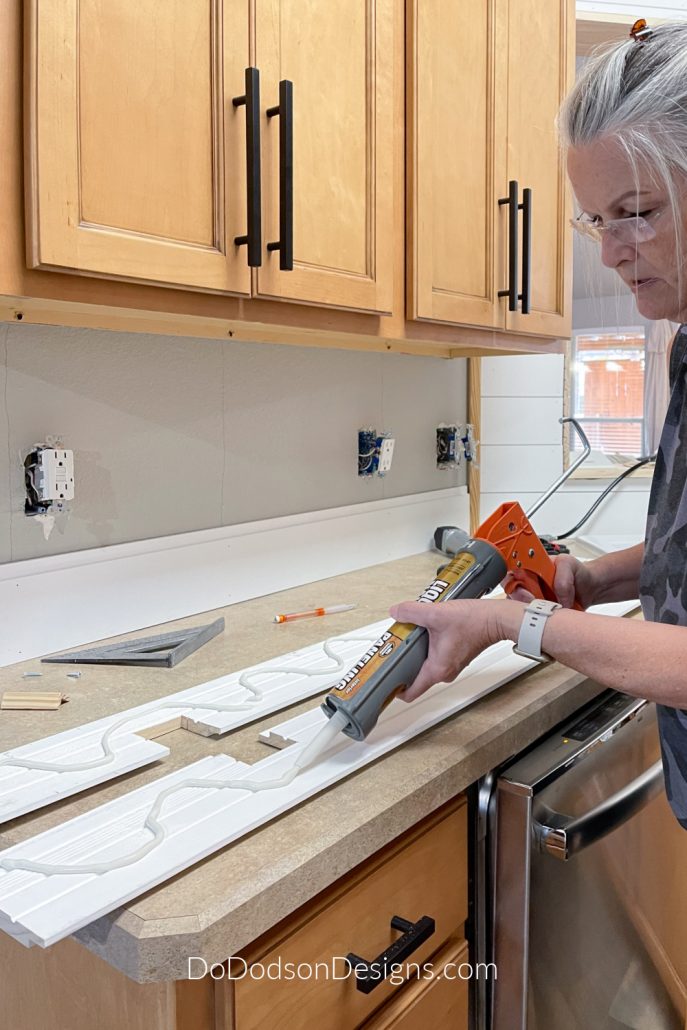
Vertical installation begins with establishing a perfectly plumb reference line using your level—this prevents the “drifting” effect that ruins many DIY installations. Hold your first board against the wall, checking for plumb with your level before marking top and bottom edges. Apply construction adhesive evenly across the board’s back, then position it against your reference line.
Nail securely into wall studs whenever possible—this provides maximum holding power in high-traffic kitchen areas. Between studs, angle your nail gun upward and downward to create more secure holds than perpendicular nailing alone. Maintain consistent spacing (typically 1/8 inch) using nickels or dedicated shiplap spacers between boards—the uniform gaps create shiplap’s distinctive shadow lines.
As you approach countertop height, use a scrap board to determine exact notch depth needed. Trace this measurement onto your shiplap, then cut carefully with your jigsaw. Install boards slightly above the countertop surface (1/8 inch gap), filling this space with caulk rather than letting wood contact the counter directly. This creates a moisture barrier that protects your shiplap from countertop splashes while maintaining clean visual lines.
Cut Precise Shiplap Openings Around Kitchen Outlets

Electrical outlets require custom cutouts that allow shiplap to fit neatly while maintaining safety and functionality. Hold the shiplap board in its final position against the wall, carefully aligning it with adjacent boards. Using a pencil, mark the outline of the electrical box plus a small margin for clearance—typically 1/4 inch beyond the box edges.
For inside cuts (where you cut into the middle of a board), drill a pilot hole first to insert your jigsaw blade. Cut carefully along your marked lines, remembering that outlet covers will hide these edges—perfect cuts aren’t necessary as long as the opening is large enough for safe access. Test fit each cutout before permanent installation to ensure proper clearance.
Don’t stress about precision here—visible imperfections will be completely covered by outlet covers. Focus instead on creating openings large enough that the shiplap fits neatly around the outlet’s perimeter without gaps. The time saved by not over-engineering these cutouts allows you to focus on areas that actually show in your finished installation.
Complete Kitchen Island Shiplap with Professional Edges
Kitchen island installation follows similar principles but requires special attention to three-dimensional edges. Begin by removing existing trim using a 6-in-1 tool and hammer, then measure each island side independently—sides often differ slightly in length. Sand rough edges of store-cut boards with medium-grit sandpaper to prevent snagging and create clean visual lines between boards.
Install boards from bottom to top, applying liquid nails before nailing. Maintain consistent spacing using your chosen spacer method—this uniformity creates the professional appearance that distinguishes quality installations. At corners where island sides meet, ensure vertical seams align perfectly from top to bottom for clean lines that enhance rather than detract from your work.
Finish with primed MDF trim covering bottom edges and vertical seams, mitered at 45-degree angles for professional corners. Apply construction adhesive to trim backs before nailing securely. Complete the installation with shoe molding along the bottom edge, mitering corners carefully for seamless transitions that hide the gap between island and floor.
Seal and Paint Kitchen Shiplap for Long-Term Durability
Proper finishing transforms raw shiplap into a durable kitchen surface that withstands daily use. Fill all nail holes with white putty, allowing complete drying before sanding smooth. Apply painter’s tape along edges where trim meets shiplap before caulking—this creates dramatically cleaner results than freehand application.
Run continuous beads of caulk along all seams, especially where shiplap meets countertops. This moisture barrier prevents water damage at the most vulnerable junctions. Prime shiplap boards before painting—raw wood requires two coats with light sanding between coats for optimal results. For kitchen-specific needs, choose semi-gloss paint that withstands frequent cleaning without damaging the finish.
Apply paint in multiple thin coats rather than fewer thick coats—this prevents brush marks and ensures even coverage. Allow adequate drying time between coats; rushing this step creates tacky finishes that attract dust. For kitchen islands specifically, three coats of semi-gloss paint in bright white tones create wipeable surfaces that withstand the abuse islands receive from daily activity.
Maintain Your Kitchen Shiplap Backsplash with Simple Practices
Proper maintenance keeps your shiplap looking beautiful while protecting your investment. Wipe down shiplap backsplashes immediately when water contacts the surface—unlike tile, wood shiplap can warp or develop mold if consistently wet. Clean surfaces regularly using soft cloths with mild soap and water, avoiding abrasive cleaners that scratch paint finishes.
Inspect caulked seams quarterly for signs of separation or cracking. Re-caulk seams as needed to maintain moisture barriers—this simple action significantly extends your installation’s life. Touch up painted surfaces where scuffs occur using leftover paint from your original installation.
Address moisture exposure immediately—water from sinks, countertop splashes, and cooking humidity all affect wood shiplap if ignored. The key to long-term durability is prompt attention to moisture. Wiping surfaces after cooking, using range hoods to reduce humidity, and addressing sink splashes immediately all contribute to shiplap longevity in your kitchen environment.
Calculate Realistic Shiplap Installation Costs for Your Kitchen
Understanding costs helps you plan realistically and make informed material decisions. Budget options using DIY-ripped plywood sheets can complete entire kitchen backsplashes for under $50 in materials. Mid-range projects using standard pre-made shiplap typically cost $150-300 for average-sized kitchens. Premium installations using tongue and groove shiplap may cost $400-800 or more.
Kitchen island projects specifically cost $50-100 in materials, including plywood, trim, and finishing supplies. The significant savings from DIY installation—often $1000 or more compared to professional tile work—provides compelling motivation for weekend warriors. Remember that DIY installation eliminates labor costs while developing valuable skills transferable to future home improvement projects, making shiplap one of the most rewarding kitchen transformations you can undertake.


