
Nothing transforms a kitchen like properly installed wall cabinets—they add storage, improve functionality, and create that polished, custom look homeowners desire. Installing kitchen wall cabinets correctly requires precision planning and execution, as even minor errors become glaringly obvious in the finished product. When wall cabinets hang crooked or uneven, the entire kitchen feels off-kilter and unprofessional. This guide provides the exact steps you need to mount your kitchen wall cabinets securely and perfectly aligned, avoiding the common pitfalls that lead to frustration and costly corrections.
The key to successful cabinet installation lies in preparation. Many DIYers rush this phase only to face alignment issues later that require removing and rehanging cabinets. Properly installed cabinets should withstand decades of use without loosening or shifting. With the right approach, you can achieve professional-looking results that add value to your home while creating a kitchen that functions beautifully for your daily needs.
Gather Essential Tools and Materials Before Starting

Having the complete toolkit ready prevents wasted time and ensures continuous workflow during installation. The right equipment makes the difference between a frustrating experience and a smooth project.
Measuring and marking tools form the foundation of accurate installation. You’ll need a quality 25-foot tape measure for wall dimensions, a carpenter’s square to verify 90-degree angles, and a 4-foot level for checking cabinet alignment. A pencil with a fine point or marking knife creates precise reference lines without damaging surfaces. For larger projects, a laser level significantly speeds up the process by projecting perfectly level lines across multiple wall sections.
Mounting and fastening equipment requires careful selection. Use a cordless drill with multiple speed settings and a dedicated impact driver for efficiently driving cabinet screws. A reliable stud finder prevents damaging walls while locating structural framing. Most critical are the fasteners themselves—2½-inch cabinet screws (often called “washer head” screws) provide the holding power needed for heavy cabinets. These specialized screws feature coarse threads designed to grip wood studs securely, unlike generic drywall screws that can pull out under sustained weight.
Safety and finishing equipment completes your toolkit. Safety glasses protect your eyes from falling debris during installation, while work gloves prevent splinters when handling cabinet edges. Have painter’s tape ready to protect cabinet surfaces during transport and installation, and keep a clean microfiber cloth nearby for wiping fingerprints from finished surfaces. Most importantly, arrange for a helper—cabinet installation becomes exponentially more difficult when working alone.
Plan Your Cabinet Layout with Precision
Careful layout planning determines whether your cabinets function well and appear professionally installed. Rushing this stage guarantees alignment problems that become impossible to fix after mounting.
Determine your ideal cabinet height based on standard guidelines and personal needs. The traditional measurement places wall cabinets 18 inches above the countertop, creating comfortable access while maintaining visual balance. However, this distance can range from 12 to 24 inches depending on ceiling height and user preferences. Taller individuals often benefit from higher mounting positions to reduce bending, while shorter users may prefer cabinets positioned slightly lower for easier access to upper shelves.
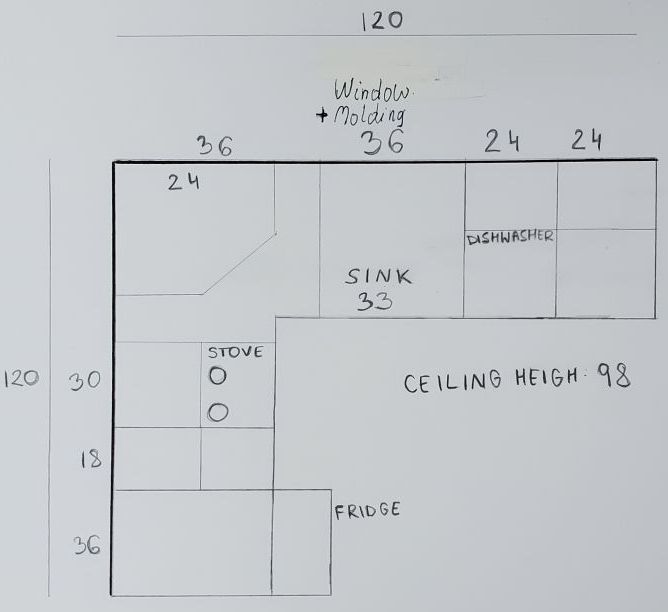
Map out your cabinet arrangement on paper before purchasing or moving any materials. Measure each wall section carefully, noting obstacles like windows, doors, or utility lines that affect cabinet placement. Most kitchens center the primary cabinet run around the sink area, with refrigerator and oven cabinets positioned at the ends. If your layout includes a peninsula or island, ensure you maintain the recommended 36 to 48 inches of clearance for comfortable traffic flow and seating.
Account for obstacles and utilities by marking their exact locations on your wall. Electrical outlets typically sit 18 inches above the floor in kitchens, which often positions them behind cabinet locations. Water supply lines and gas pipes also require identification before drilling or cutting. If your layout requires relocating any utilities, schedule this work with licensed professionals before beginning cabinet installation.
Prepare Walls and Workspace Thoroughly
Proper workspace preparation protects your home and materials while creating optimal conditions for precise installation. This often-overlooked phase prevents damage and streamlines the entire process.
Clear the work area completely by removing everything from countertops and nearby surfaces. Protect appliances, flooring, and remaining surfaces with heavy-duty drop cloths or cardboard to prevent scratches and dents. In older homes, prepare for wall debris when removing existing cabinets or patching holes from previous installations. Keep a dedicated trash container nearby to maintain a clean, safe workspace throughout the project.
Inspect and repair wall surfaces before mounting new cabinets. Remove existing cabinets if replacing old ones, filling any holes left by previous mounting hardware with spackle or joint compound. Sand repaired areas smooth once dry and apply primer if significant repairs were made. Check for loose or crumbling drywall—cabinets mounted on compromised surfaces won’t hold securely even with proper stud fastening. If walls are severely damaged or out of plumb by more than a quarter inch over 8 feet, consider applying a skim coat of joint compound to create a smooth mounting surface.
Locate and mark all studs using a quality stud finder. Mark stud locations with light pencil marks at the top, middle, and bottom of each stud’s position. Verify stud finder readings by driving small test nails into suspected locations. Remember that studs typically space 16 inches on center, though older homes may have irregular spacing. Clearly mark stud locations across the entire installation height—you’ll need these references for every cabinet you mount.
Establish the Perfect Starting Height
Setting the correct mounting height ensures proper alignment between wall cabinets and countertops, regardless of minor floor imperfections. This critical step prevents cumulative errors that become obvious with multiple cabinets.
Calculate your baseline measurement by determining your countertop height (typically 36 inches) and adding your desired gap between counter and cabinet. Standard gaps measure 18 inches, placing the bottom of wall cabinets at 54 inches above the finished floor. Adjust this calculation if using non-standard countertop heights or preferring different spacing.
Mark your reference line across all walls where cabinets will install using your level to draw a perfectly horizontal line at your calculated height. This line represents the bottom edge of your lowest cabinet and serves as the reference point for all subsequent measurements. Double-check this line against your level—a quarter-inch error at this stage compounds across multiple cabinets, resulting in visibly crooked installations.
Account for crown molding or soffits that may affect cabinet placement. If installing cabinets beneath existing crown molding, you may need to remove the molding, work around it, or select cabinets that fit beneath without requiring modification. Measure carefully around soffits (the boxed-in areas above cabinets that often house ductwork or electrical) to ensure your cabinets fit properly without creating visual problems.
Install Cabinets with Professional Precision
With preparation complete, begin mounting cabinets systematically to ensure perfect alignment and secure mounting. Working methodically prevents the common mistakes that lead to crooked installations.
Mount a temporary support rail along your reference line using a 1×4 board screwed temporarily into the studs. This provides a stable surface for setting cabinets while you work, eliminating the need for a helper to hold each cabinet steady. The support rail proves especially valuable when working alone and should be removed after all cabinets are securely mounted.
Position your first cabinet carefully, aligning its bottom edge precisely with your reference line. Have your helper hold the cabinet in position while you check for plumb using your level on both the front face and side edges. Make minor adjustments by slightly loosening or tightening mounting screws—never drive screws fully tight until perfect alignment is confirmed. Once satisfied, drive screws through the mounting rails into the studs, using at least two screws per stud for standard cabinets.
Continue installing adjacent cabinets by working outward from your starting point. Place each new cabinet against the previous one, ensuring face frames align flush with no gaps. Use your level frequently to verify continued plumb and check that cabinet tops align evenly. Clamps help hold cabinets in perfect alignment while driving screws, especially for face frame joints that don’t naturally rest flush against each other.
Secure all cabinets together after mounting each one to the wall. Most cabinets have predrilled holes in their face frames for connecting adjacent units. Drive cabinet screws through these holes into neighboring cabinets, pulling the joints tight and eliminating gaps. This interconnection creates a unified cabinet bank that shares weight across multiple mounting points.
Complete Final Adjustments for a Professional Finish
The refinement phase transforms a functional installation into a professional-quality result through careful attention to detail. These final steps distinguish amateur work from expert craftsmanship.
Check and adjust alignment across all cabinet doors and drawers. Examine gaps between doors—they should be consistent from top to bottom and side to side. Most cabinets have adjustable hinges allowing side-to-side and up-and-down correction of door positioning. Make these adjustments systematically until all doors align perfectly with neighbors. Check drawer alignment similarly, adjusting any drawer guides that allow for horizontal or vertical correction.
Install cabinet hardware after making all alignment adjustments. Measure and mark consistent positions for handles and knobs across all cabinets—typically 3 to 4 inches from the bottom or top of the door, centered horizontally. Pre-drill pilot holes to prevent wood splitting, then drive mounting screws by hand or with a low-speed drill to avoid over-tightening.
Add trim and filler pieces to create clean transitions between cabinets and walls. Filler strips fill gaps when cabinets don’t exactly fill available wall space, while trim pieces cover gaps between cabinet edges and walls. Cut these pieces carefully with a miter saw for crisp corners, attaching them with finishing nails or appropriate construction adhesive.
Seal gaps between cabinets and walls with paintable silicone caulk for a finished look and to prevent moisture accumulation. Apply caulk in a continuous bead, smoothing it with a wet finger for a clean line. This step proves especially important near sinks and dishwashers where moisture exposure occurs regularly.
Installing kitchen wall cabinets correctly transforms your kitchen’s functionality and appearance while adding lasting value to your home. Take your time with each step, double-check measurements, and address minor issues immediately before they become major problems. Properly installed cabinets will serve your household beautifully for decades when mounted with precision and care.


