
Nothing transforms a home quite like a kitchen renovation, and installing new kitchen units forms the backbone of this essential project. Whether you’re tackling a complete kitchen overhaul or simply upgrading outdated cabinetry, understanding how to install kitchen units properly ensures your investment delivers both beauty and functionality for years to come. Many homeowners hesitate at the thought of cabinet installation, fearing complex measurements and alignment issues, but with the right approach, this project becomes manageable for dedicated DIYers. This guide cuts through the confusion, providing crystal-clear instructions that turn what seems daunting into an achievable weekend project.
Before you unpack a single cabinet, recognize that successful kitchen unit installation hinges on three critical elements: meticulous preparation, quality tools, and systematic execution. Rushing through measurements or skipping proper wall preparation leads to frustrating misalignments that compromise both appearance and function. While professional installers complete average kitchens in 1-2 days, DIYers should budget 2-3 weekends for a standard installation, allowing time for adjustments and unexpected challenges. The satisfaction of completing this project yourself, however, makes the effort worthwhile—plus, you’ll save hundreds compared to professional installation costs.
Essential Tools Checklist for Kitchen Unit Installation

Gathering the right tools before starting prevents frustrating mid-project interruptions and ensures professional results. The complete toolkit for how to install kitchen units falls into four critical categories that address every phase of the installation process.
Precision Measurement Tools form the foundation of accurate installation. You’ll need a 25-foot tape measure with clear markings, a 4-foot spirit level for checking cabinet alignment across multiple units, and a high-visibility pencil for marking reference points. A laser level, while not essential, dramatically improves accuracy when establishing level lines across multiple walls and pays for itself in saved time and frustration.
Cutting and Modification Equipment handles necessary adjustments to cabinets and panels. A circular saw with a fine-tooth blade makes clean cuts through cabinet components, while a jigsaw proves invaluable for precision cuts around electrical outlets and plumbing penetrations. Don’t forget an oscillating multi-tool for those tight spaces where larger tools won’t fit—a must-have for professional-looking results around obstacles.
Mounting Hardware and Fasteners secure your kitchen units firmly in place. A quality cordless drill with multiple speed settings drives screws efficiently without stripping them, while a magnetic bit holder keeps screws in place during overhead work. Most importantly, you’ll need 2.5-inch cabinet installation screws designed specifically for mounting cabinetry into wall studs—regular drywall screws won’t provide sufficient holding power for heavy cabinets.
Personal Safety Gear protects you throughout the installation process. Safety glasses prevent eye injuries from flying debris during cutting operations, while work gloves protect your hands from splinters and sharp edges when handling cabinet components. Knee pads transform floor work from uncomfortable to manageable, especially during the critical base cabinet installation phase.
Strategic Workspace Preparation Before Installation Begins
Proper preparation separates successful kitchen installations from frustrating failures. Before touching your first cabinet, transform your workspace into a professional-grade installation environment.
Clear the installation area completely by removing old cabinets, countertops, and appliances. This critical first step reveals wall conditions that might affect your new installation—look for cracks, uneven surfaces, or water damage that requires repair before proceeding. Patch holes with spackle and sand smooth, creating a clean, dry surface that ensures your new kitchen units mount flush against the wall. Remember that cabinet faces will highlight any wall imperfections, so take time to address these issues now.
Address electrical and plumbing considerations before mounting cabinets. Take photos of your current outlet and switch locations to reference during reinstallation, and verify that your cabinet layout accommodates all necessary access points. For wall cabinets, ensure outlets fall within cabinet compartments rather than behind cabinet backs where they’d be inaccessible. If plumbing lines interfere with cabinet placement, consult a professional plumber before proceeding—safety and code compliance take priority.
Finalize your cabinet layout with precise measurements that account for traffic patterns and appliance placement. Standard base cabinets stand 34.5 inches tall with a 3.5-inch toe kick, while wall cabinets typically mount 18 inches above countertop height. Measure from your floor’s highest point (usually near exterior walls) to establish a consistent reference line—this prevents the common mistake of cabinets appearing uneven due to floor variations. Mark this line clearly across all walls using a chalk line snapped against your level reference.
Perfecting Wall Cabinet Installation Technique
Professional installers always mount upper cabinets before base units for practical reasons that benefit DIYers too. Working at standing height reduces fatigue, and upper cabinet placement determines precise countertop height, making them the logical starting point for how to install kitchen units.
Start by installing a temporary support board along your level reference line using 1×3 lumber secured to wall studs. This simple jig holds cabinets in position while you verify alignment and drive permanent fasteners. Begin with your corner cabinet, ensuring it sits flush against both walls, then raise it until perfectly aligned with your reference line. Drive two 2.5-inch cabinet screws through the back panel into wall studs—always predrill pilot holes to prevent splitting the cabinet material.
Connect adjacent cabinets using the manufacturer’s cam lock system or by driving screws through face frames. Maintain consistent cabinet front alignment by placing a straightedge across multiple units—any misalignment becomes immediately visible. For cabinets wider than 24 inches, add a third mounting screw near the cabinet center for additional support against sagging. Fill any gaps between cabinet sides and walls with tapered shims before final fastening, concealing these behind filler panels later.
Executing Base Cabinet Installation with Precision
Base cabinet installation requires special attention to floor conditions and plumbing considerations. These units bear significant weight from countertops and daily use, demanding secure mounting and perfect leveling.
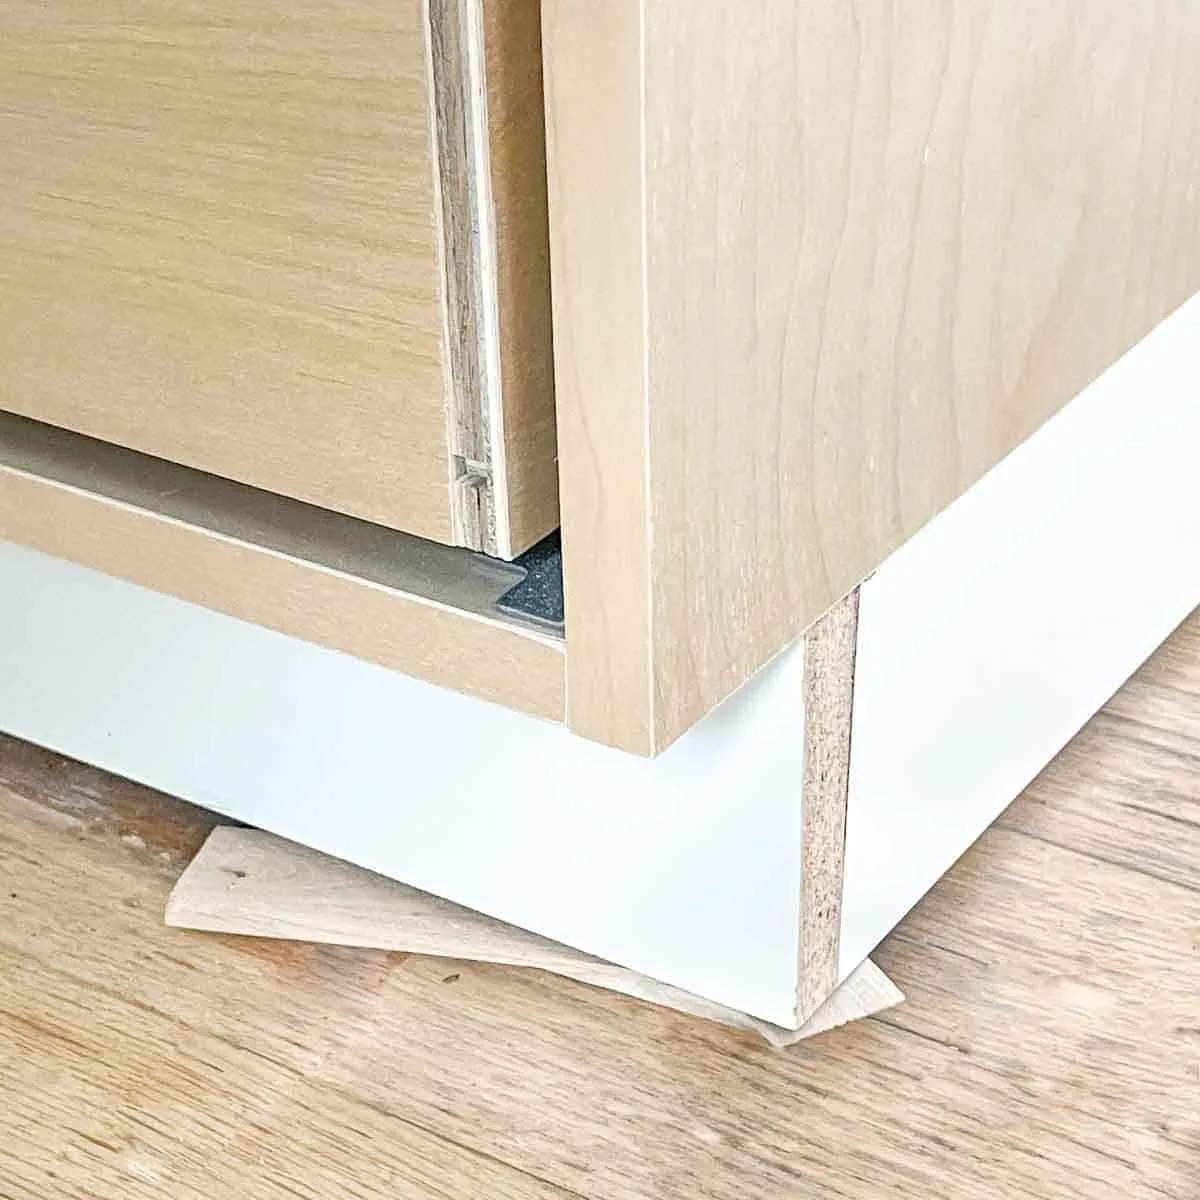
Begin installation at your floor’s highest point, typically near an exterior wall. Position your first corner cabinet, then use plastic shims beneath the cabinet to achieve perfect level positioning both front-to-back and side-to-side. Drive screws through the cabinet’s top rail into wall studs, angling them slightly downward for maximum holding power. Most cabinets require two screws per stud location, with wider units needing additional fasteners.
Connect adjacent base cabinets by driving screws through predrilled holes in the face frames. Before fully tightening, verify cabinet tops align perfectly using a 4-foot level across multiple units—countertops require a completely level surface. Adjust shims beneath cabinets until tops form a single plane, then secure connections. For cabinets housing sinks, carefully measure and cut access holes for plumbing using a jigsaw with a fine-tooth blade, leaving at least 1 inch of back panel intact for structural support.
Installing Critical Trim and Finishing Components
Filler panels and trim pieces bridge gaps between cabinets and walls, creating the seamless appearance of professional installations. These finishing touches require careful measurement and secure attachment.
Measure gaps between cabinet ends and walls at top, middle, and bottom points—walls are rarely perfectly straight. Cut filler panels from matching cabinet material using a circular saw with a fine-tooth blade, then test fit and adjust until panels sit flush against both cabinet and wall. Attach panels from inside the cabinet using construction adhesive and 1-inch brad nails, ensuring they align perfectly with cabinet face frames.
Install toe kick covers by measuring the total cabinet run length, then cutting material to size with notches for cabinet legs. Attach using the clips provided with your cabinet system or construction adhesive, ensuring consistent height and alignment with cabinet fronts. For wall cabinets, add crown molding using a miter saw for clean 45-degree corners, securing with finishing nails into wall studs or solid backing.
Perfecting Door and Hardware Installation
Door and hardware installation transforms functional cabinets into beautiful kitchen features. This final phase demands patience and attention to detail for professional results.
Mount hinges to cabinet doors following manufacturer specifications, typically positioning them 3-4 inches from each corner. Attach doors to cabinets with all screws initially loose, allowing for final alignment adjustments. Close each door and use the hinge adjustment screws to achieve perfect alignment with adjacent doors—most modern hinges offer three-way adjustment for height, depth, and side-to-side positioning.
Install drawer fronts by extending drawer boxes fully, then securing fronts using the manufacturer’s mounting system. Verify alignment with adjacent fronts before tightening completely. For hardware installation, create a consistent template using cardboard to ensure handles and knobs position identically across all doors and drawers—standard placement sits 2-3 inches from the bottom corner on doors and centered horizontally on drawers.
Final Quality Checks Before Countertop Installation
Complete your kitchen unit installation with systematic quality checks that catch issues before countertop installation. Test all doors and drawers for smooth operation, verifying hinges hold position without sagging and drawer slides glide effortlessly. Tighten any loose mounting screws and add additional anchors if needed.
Inspect all trim pieces and filler panels for secure attachment and clean appearance. Fill any visible screw holes with matching putty, sanding smooth once dry. Wipe all surfaces thoroughly with a soft cloth to remove construction dust before countertop installation—this prevents debris from becoming trapped between cabinets and countertops.
By following these precise steps for how to install kitchen units, you’ll achieve professional-quality results that transform your kitchen space. The satisfaction of completing this project yourself, combined with the functional beauty of your new kitchen, makes the effort well worth it. Remember that patience during installation pays dividends in years of reliable service from your newly installed kitchen units.


