
Installing kitchen cabinets on concrete walls presents unique challenges that differ significantly from standard wood stud installations. Concrete’s extreme density demands specialized tools, different fastening systems, and techniques specifically designed for this demanding surface. Unlike wood walls where you can simply locate studs and drive screws, concrete walls require careful planning, the right anchors, and proper drilling methods to create a secure, long-lasting installation. Whether you’re finishing a basement kitchen, working with concrete block walls, or mounting cabinets on a poured concrete foundation, understanding these specialized techniques ensures your cabinets stay securely mounted for decades of daily use.
This guide walks you through the complete process from gathering tools to hanging your final cabinet. You’ll learn which tools truly matter, how to select the right anchors for your specific situation, and step-by-step techniques that professional installers use to achieve perfect results. By the end, you’ll have the knowledge to tackle your concrete wall cabinet project with confidence, avoiding common mistakes that lead to loose cabinets or damaged walls.
Select the Right Concrete-Specific Drilling Equipment
Why Standard Drills Fail on Concrete Walls
Standard drill drivers lack the percussive action necessary to penetrate cured concrete efficiently. These tools will fail almost immediately when applied to concrete surfaces because they merely spin against the surface without fracturing the material. You need a hammer drill or rotary hammer drill that combines rotation with thousands of micro-impacts to fracture concrete particles. For most residential projects, a 1/2-inch variable-speed hammer drill offers adequate power, though cordless models now provide sufficient performance for typical kitchen installations.
Critical Masonry Bit Selection Criteria
Your drill bit selection is equally critical. Standard twist bits cannot withstand concrete’s hardness and will overheat and dull within seconds of contact. You need carbide-tipped or diamond-tipped masonry bits specifically designed for hammer drill use. These bits feature reinforced tips capable of withstanding extreme heat and abrasion. Select bit diameters that match your planned anchors precisely, and consider purchasing bits slightly longer than minimally required to accommodate any wall covering or uneven surfaces. For cabinet mounting rails, you’ll typically need bits in the 3/16-inch to 1/2-inch range depending on your anchor selection.
Choose the Best Concrete Anchor System for Cabinets
Sleeve Anchors vs. Tap-Cons: Which Works Better
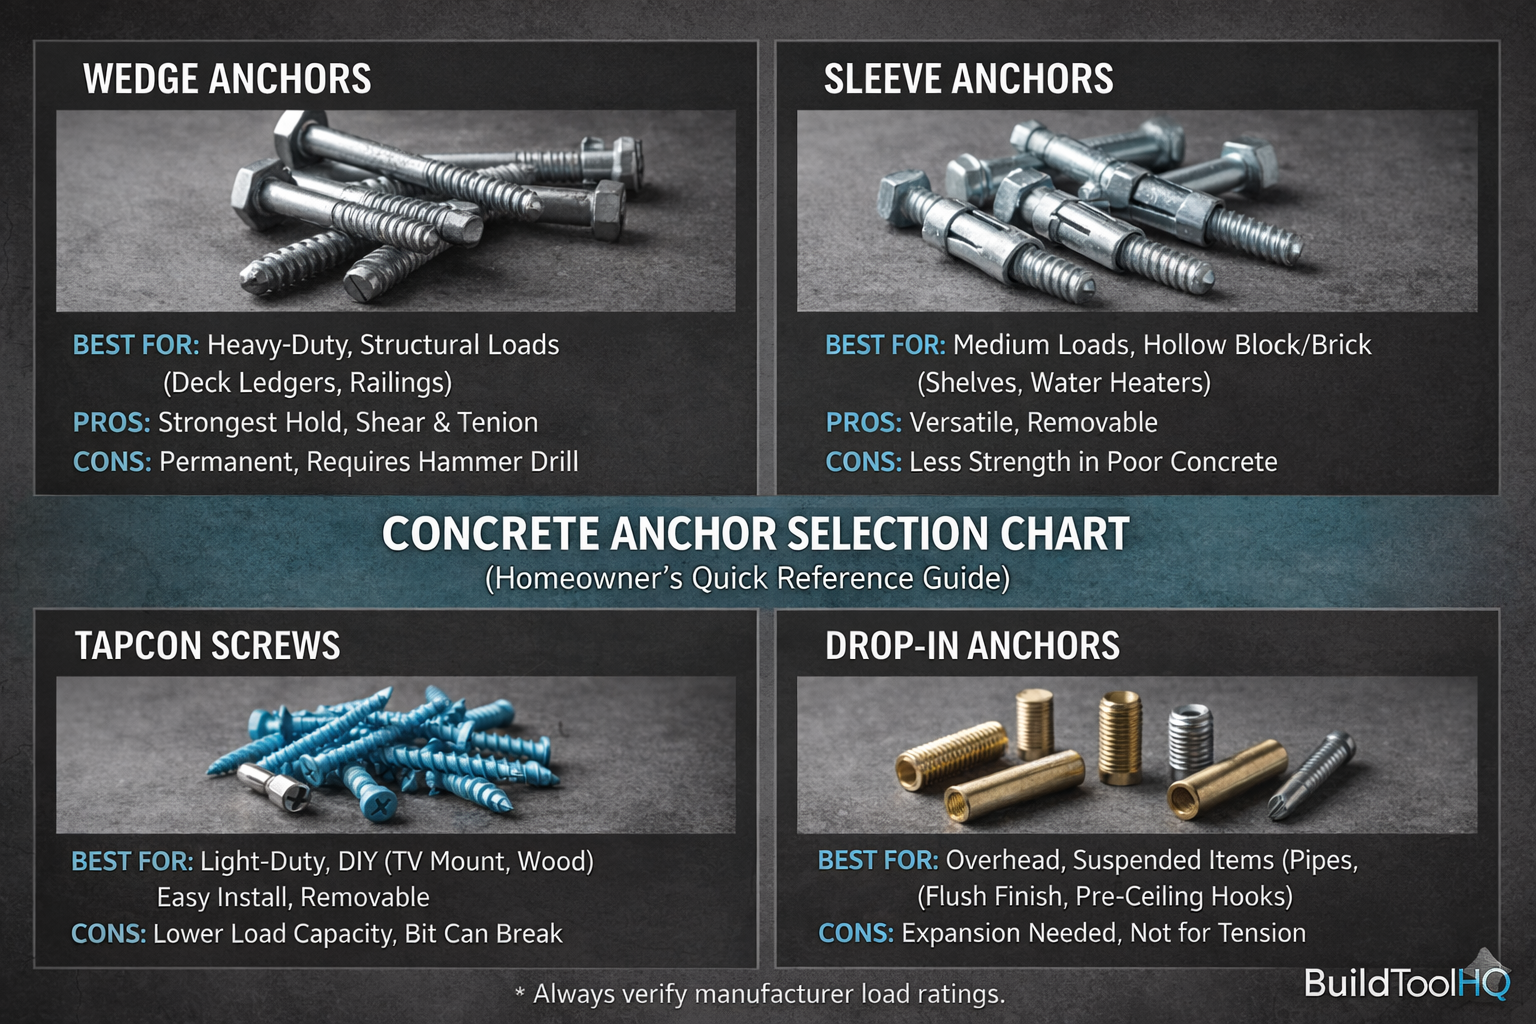
Sleeve anchors provide excellent holding values in solid concrete by expanding against the concrete walls as the fastener tightens. These anchors consist of a threaded bolt surrounded by a metal sleeve, with the sleeve expanding outward to create mechanical grip as you tighten the nut. For most kitchen cabinet mounting rail applications, 3/8-inch diameter sleeve anchors provide adequate holding strength for standard cabinet loads.
Tap-Cons (concrete screws) offer another excellent option with the significant advantage of removeability and reusability. These specialized screws feature threads designed specifically for concrete engagement, cutting their own threads into pre-drilled holes. The holding values often exceed those of sleeve anchors, and the ability to remove and reinstall proves valuable during adjustment phases. For cabinet mounting, 3/16-inch and 1/4-inch diameter Tap-Cons work well, with hole depth typically requiring holes slightly deeper than the screw length.
When to Use Wedge Anchors for Maximum Security
Wedge anchors provide the highest holding values for permanent concrete fastening but require through-hole installation with the anchor passing entirely through the mounting rail and into the concrete. These anchors expand at the base as the nut tightens, creating extremely secure connections suitable for heavy cabinet loads. While wedge anchors typically represent overkill for standard kitchen cabinets, they remain essential for particularly demanding applications or when mounting extremely heavy cabinets where maximum security is critical.
Perfect Your Concrete Wall Cabinet Layout Before Drilling
Standard Cabinet Height Measurements for Concrete Walls
Before touching any tools, invest significant time in measuring and marking your wall space. Measure the total wall width where cabinets will mount, noting obstacles such as windows, doors, utility boxes, or corners that affect cabinet positioning. Standard base cabinets stand 34-1/2 inches from floor to countertop surface, while wall cabinets typically mount 18 inches above the countertop surface, placing them approximately 54 inches from the floor in standard installations.
Mark your intended cabinet layout directly on the wall using a pencil and straightedge, drawing horizontal lines indicating the top of base cabinets and the bottom of wall cabinets. Mark vertical lines for cabinet ends and any divisions between cabinets. This layout serves as your reference throughout the installation process, so verify accuracy at this stage. Errors in layout compound throughout installation, resulting in misaligned cabinets, uneven gaps, and doors that don’t close properly.
Mounting Rail Spacing Requirements for Concrete Installations
Cabinet mounting rails distribute cabinet weight across multiple fasteners, reducing load on any single anchor point. For concrete walls, mount rails horizontally at designated heights, with one rail near the top of the cabinet and another near the bottom for wall cabinets. Calculate fastener spacing based on cabinet weight and anchor capacity, typically requiring fasteners at 16 inches on center or less, with additional fasteners at cabinet ends and near concentrated weight areas such as hinges or drawer mechanisms.
Prepare Concrete Walls for Secure Cabinet Mounting
Critical Moisture Testing Before Installation
Conduct a moisture test by taping a small plastic sheet to the wall surface, sealing all edges completely. Leave this in place for 24-48 hours, then check the underside for condensation or moisture accumulation. Significant moisture presence indicates problems requiring resolution before cabinet installation. Address moisture issues by identifying and correcting the source, which might involve improving drainage, installing vapor barriers, applying waterproof coatings, or addressing plumbing leaks.
Wall Surface Assessment and Preparation Steps
Thoroughly assess your concrete wall’s condition before mounting anything. Check for cracks, chips, spalling, moisture issues, or previous damage that might affect holding values or require repair before installation. Small hairline cracks typically don’t significantly affect anchor holding values, but larger cracks or gaps indicate potential degradation requiring evaluation. Spalling surfaces might need grinding or patching before reliable mounting is possible.
Test your concrete’s hardness using a simple scratch test with a masonry nail or concrete screw. If the material scratches easily and crumbles, you might be dealing with softer concrete requiring longer cure times or different anchor selections. If the material proves extremely hard and difficult to scratch, your standard drilling approach should work well.
Master Concrete Drilling Techniques for Perfect Holes
Step-by-Step Concrete Drilling Process
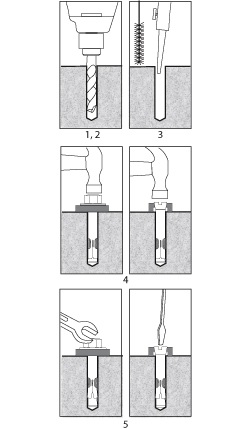
Begin by securing your mounting rail firmly, as unstable drilling position creates oversized, misaligned holes. Position the drill bit precisely on your mark, holding the drill perpendicular to the concrete surface. Begin at low speed with light pressure, allowing the bit to establish its starting position before increasing speed and pressure.
Drill to the depth specified for your anchors, typically measured from the concrete surface to the hole bottom. Many hammer drills include depth stops, or you can use a piece of tape wrapped around the bit at the correct depth as a visual guide. Drill slightly deeper than minimally required to accommodate dust accumulation and ensure full anchor insertion. For most cabinet mounting anchors, drilling 1/4 inch to 1/2 inch deeper than the anchor length provides adequate clearance.
Concrete Dust Removal Protocol for Maximum Anchor Strength
Clear holes of concrete dust between drilling multiple holes using compressed air or a vacuum. For best results, brush hole sides with a small wire brush, then blow or vacuum again. Concrete dust remaining in the hole reduces effective anchor engagement and can reduce holding values by 25% or more. Taking an extra minute per hole to clean thoroughly pays significant dividends in final installation quality.
When encountering aggregate stones during drilling, reduce pressure and continue at consistent speed, allowing the bit to work through the material. If the drill stalls completely, reverse direction briefly to dislodge the bit, then resume forward drilling. For very hard concrete, ensure your drill is in hammer mode with maximum speed setting and consider using a fresh bit specifically designed for hard concrete.
Install Anchors Correctly for Maximum Holding Power
Sleeve Anchor Installation Sequence
For sleeve anchor installation, insert the anchor fully into the pre-drilled hole by hand, ensuring the sleeve sits flush with or slightly below the concrete surface. The anchor must bottom out in the hole for proper expansion, so verify depth before insertion. Install the washer and hand-tighten the nut onto the exposed threads, then use a wrench or socket set to tighten firmly. Most sleeve anchors require two to three full turns past hand-tight to achieve full expansion, but avoid over-tightening that can strip threads or cause concrete fracture.
Tap-Con Concrete Screw Installation Process
Tap-Con installation requires predrilling to exact manufacturer specifications using the correct diameter bit. Insert the screw by hand or with a light touch from a screwdriver, starting threads in the hole. Use a variable-speed drill or impact driver set to low speed to drive the screw with steady pressure. Drive until the head seats firmly against the mounting surface, stopping before head deformation or concrete stress cracks appear.
Mounting Rail Installation Sequence for Perfect Alignment
Position mounting rails at your layout heights, ensuring they are perfectly level across their entire length. Secure rails temporarily before drilling any anchor holes using a few concrete screws or temporary anchors, checking level and alignment before committing to full installation. With rails temporarily secured, mark anchor locations through the rail into the concrete, spacing anchors according to your calculated requirements.
Drill anchor holes at each marked location using the appropriate technique for your chosen anchor type. Clean each hole thoroughly before proceeding to the next, then install anchors in a pattern that maintains rail alignment, working from one end to the other while periodically checking rail position. After installing all anchors, verify the mounting rail is still level and properly positioned before proceeding to cabinet hanging.
Solve Common Concrete Wall Installation Challenges
Fixing Out-of-Plumb Concrete Walls During Installation
Out-of-plumb concrete walls, common in older homes, create challenges for cabinet installation. Check wall plumb using a long level or plumb bob before mounting. When walls bow or twist, shimming behind mounting rails or cabinet backs creates uniform cabinet alignment. Use tapered shims driven where gaps exist, creating flush contact between cabinet surfaces and walls. Particularly difficult walls might require cutting cabinet backs or installing furring strips to create a new, plumb mounting surface.
Preventing Moisture Damage Behind Concrete-Mounted Cabinets
Installing cabinets directly against concrete risks moisture damage over time, even without immediate moisture problems. Concrete is porous and allows moisture vapor transmission that can accumulate behind cabinets. Consider installing rigid foam insulation sheets as both moisture barrier and thermal break between the concrete wall and mounting system. Alternatively, apply a liquid-applied moisture barrier or waterproofing membrane to the concrete surface before mounting rails.
Supporting Extra-Heavy Cabinets on Concrete Walls
Extra-heavy cabinets require enhanced mounting systems beyond standard practices. Use more anchors per cabinet, reducing spacing to 12 inches on center or less. Use larger diameter anchors rated for heavier loads, such as 3/8-inch or 1/2-inch sleeve anchors. For extremely heavy cabinets, consider supplementary support systems such as cabinet legs that transfer weight to the floor or wall-mounted shelf standards with multiple support brackets.
Complete Final Adjustments and Maintenance Protocol
Post-Installation Verification Checklist
After installation, conduct thorough alignment checks before considering the project complete. Check cabinet faces for flush alignment using a straightedge held across adjacent cabinet doors or drawer fronts. Verify all doors close properly and align consistently across the cabinet run, adjusting hinges according to manufacturer instructions to correct any minor alignment issues. Test all drawers for smooth operation and proper alignment within their openings.
Install all door and drawer hardware according to your plan, ensuring handles and pulls align consistently across all doors and drawers. Install any decorative elements such as crown molding, valances, or end panels that complete the cabinet installation. Conduct a final inspection of all visible surfaces, checking for damage, smudges, or installation debris requiring cleanup.
Annual Maintenance for Concrete Wall Cabinet Installations
After installation, establish a schedule for periodic inspection of your cabinet mounting system. Annually check that all mounting screws remain tight, tightening any loose screws before they become problematic. Inspect wall areas around cabinets periodically for signs of moisture damage, mold growth, or pest infestation. Document anchor locations for future reference, and take photographs of the installation before completing finishes to capture mounting rail positions and anchor locations. Proper maintenance ensures your concrete wall cabinet installation remains secure and functional for decades.


