
Replacing your kitchen faucet with a new Kohler model transforms both functionality and aesthetics while saving hundreds compared to professional installation. Most homeowners can complete this project in 90 minutes with basic tools, thanks to Kohler’s thoughtful engineering designed for DIY success. Whether you’re upgrading from an outdated fixture or replacing a leaky faucet, this guide delivers precise instructions to achieve professional results without plumbing expertise. Kohler’s commitment to user-friendly design means their kitchen faucets incorporate features like tool-free connections and clear installation markers that simplify the process even for first-time installers.
Before you begin, recognize that faucet installation involves critical water connections where mistakes can cause significant damage. Proper preparation prevents costly leaks and ensures years of reliable performance from your investment. This comprehensive guide covers every phase from workspace setup to final testing, including model-specific considerations for Kohler’s popular pull-down, touchless, and traditional designs. By following these proven techniques, you’ll gain confidence in your DIY skills while saving 50-70% compared to hiring a plumber.
Gather Essential Tools and Materials Before Starting
Having every tool within reach prevents frustrating interruptions during installation. For a successful Kohler faucet installation, collect these specific items before removing your old fixture: an adjustable wrench set (8-10 inch provides optimal leverage in tight spaces), a basin wrench (non-negotiable for reaching mounting nuts under deep sinks), a flashlight with magnetic base (hands-free illumination is crucial), and both flathead and Phillips screwdrivers. Include needle-nose pliers for disconnecting stubborn supply lines and channel-lock pliers for stubborn nuts that won’t budge with standard wrenches.
Don’t overlook these often-forgotten essentials: a small mirror on a flexible arm helps visualize hidden connections, plumber’s tape (PTFE tape) for creating watertight seals on threaded joints, and a roll of paper towels for immediate leak detection. While Kohler typically includes stainless steel supply lines with their faucets, purchase backup lines rated for potable water if your existing connections show corrosion or wear. Bring a large bucket (5-gallon works best) to catch residual water, and place an absorbent mat in your cabinet to protect against drips. Wear knee pads with gel cushioning – you’ll spend 30-40 minutes in awkward positions beneath your sink, and comfort affects your precision.
Prepare Your Kitchen Workspace for Flawless Installation
Thorough workspace preparation prevents damage to your cabinets and ensures efficient workflow. Start by removing all items from beneath your sink, including trash cans, cleaning supplies, and stored containers. Clear a secondary workspace on your countertop for organizing new faucet components and tools. Lay down a heavy-duty plastic drop cloth inside the cabinet, extending it several inches beyond the cabinet edges to catch stray water droplets that might otherwise seep into cabinet walls.
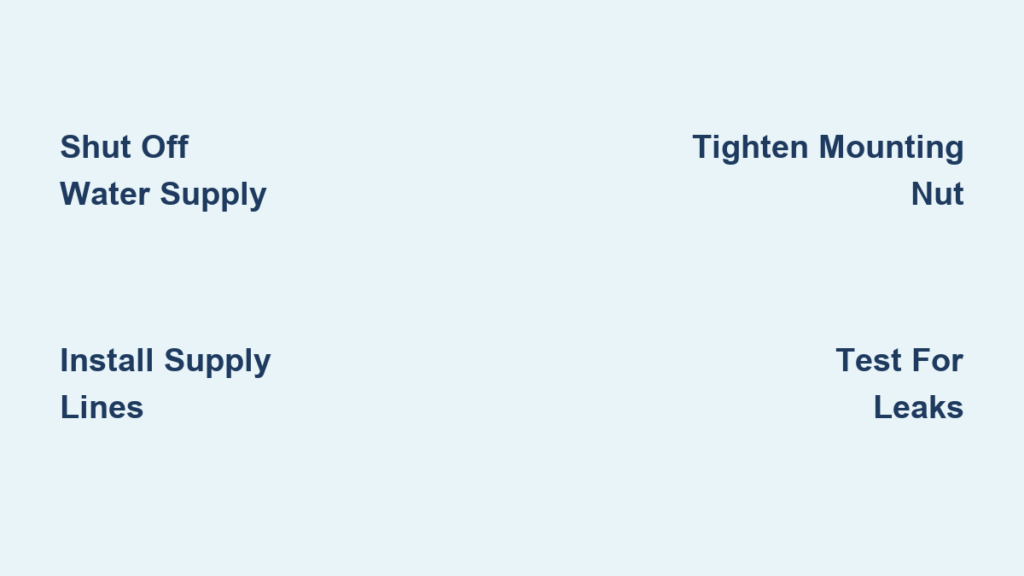
Shut off water supply completely by turning both hot and cold shutoff valves clockwise until they stop. If valves stick, wrap a rag around them for better grip but avoid excessive force that could break old valves. Open your existing faucet fully to drain residual water from supply lines, leaving it open during installation to prevent pressure buildup. Place your bucket directly beneath the supply line connections and disconnect the lines temporarily to drain any remaining water. Test that water is truly off by attempting to run your old faucet – if water flows, locate and shut off your main house supply before proceeding. This critical step prevents accidental flooding during installation.
Remove Your Old Kitchen Faucet Without Damage
Systematic removal of your existing faucet prevents damage to plumbing components. Begin by disconnecting supply lines using your adjustable wrench – hold the valve body steady with one wrench while loosening the connection nut with another to prevent twisting the valve. Wrap supply line ends with rags to minimize drips when disconnected. If your faucet has a sprayer hose, disconnect it from the faucet body or main hose connection, noting how it’s routed for reference during reinstallation.
Locate the mounting assembly beneath your sink – Kohler replacement faucets typically fit standard 1-3/8 inch sink holes, but verify your sink opening matches your new faucet’s requirements. Use your basin wrench to loosen the mounting nut securing the old faucet, working in quarter-turn increments to avoid stripping threads. If the nut resists, apply penetrating oil and wait 10 minutes before trying again. Once loose, lift the old faucet straight up to avoid scratching your sink surface. Remove any old plumber’s putty residue with a plastic scraper (metal tools can damage sink finish), then clean the mounting area thoroughly with rubbing alcohol to ensure proper adhesion for your new faucet’s gasket.
Install Your New Kohler Faucet Correctly First Time
Proper installation begins with understanding your specific Kohler model’s requirements. Single-handle models like the Sensate or Forte series require different mounting than double-handle configurations like the Wilrick or K-10433. Pull-down spray models need special attention to hose routing. Before installation, lay out all components and verify nothing is missing using Kohler’s packing list. Most Kohler faucets come pre-assembled except for mounting hardware, but check for any factory-installed protective caps that must be removed before installation.
Feed the new faucet’s supply lines through the sink hole from above, ensuring the base sits flush against the sink surface without gaps. For models requiring plumber’s putty (typically older designs), roll a 1/4-inch diameter bead around the base flange before setting in place – newer models with rubber gaskets skip this step. From beneath the sink, slide the mounting washer onto the supply lines followed by the retaining nut. Hand-tighten first, then use your basin wrench for a quarter-turn more. Never overtighten – Kohler specifies 15-20 ft-lbs torque maximum to prevent cracking the mounting surface. Verify proper alignment by checking the faucet’s position from multiple angles before final tightening.
Connect Water Supply Lines Without Leaks
Correct supply line connection prevents the most common post-installation problems. Kohler’s color-coded supply lines (red for hot, blue for cold) simplify correct installation, but double-check your shutoff valve configuration matches standard plumbing conventions. Apply plumber’s tape to both the faucet inlet threads and shutoff valve connections – wrap 3-4 layers clockwise (following thread direction) without overlapping tape edges. This creates a reliable seal while allowing future disconnections without binding.
Connect supply lines to shutoff valves by hand-tightening first, then using your adjustable wrench for a quarter-turn more. Kohler recommends against using Teflon tape on quick-connect fittings found on newer models. For pull-down spray models, route the spray hose through the faucet body following Kohler’s specific path indicators (usually marked with arrows), ensuring no kinks or sharp bends that would impede retraction. Connect the spray hose to its quick-connect fitting with firm hand pressure until it clicks into place. Leave slack in all connections to prevent stress on fittings when opening cabinet doors.
Test Your Installation Thoroughly Before Finalizing
Comprehensive testing catches issues before they cause damage. Slowly open shutoff valves counterclockwise, monitoring connections for immediate leaks. With valves fully open, run both hot and cold water through your new Kohler faucet for 5 minutes to flush manufacturing debris from the system. Check all connections beneath the sink every 30 seconds during this period, tightening any weeping joints with quarter-turn increments.
Test every function: regular flow, spray mode activation (if equipped), and handle operation through full range. For touchless models, verify sensor responsiveness at various distances. Operate the handle repeatedly to check for smooth movement without binding. Place dry paper towels beneath each connection point and check after 15 minutes for any slow leaks invisible during initial testing. Kohler recommends running hot water for 2 minutes to check for thermal expansion leaks that only appear when water heats up. Only after passing these tests should you consider your installation complete.
Troubleshoot Common Kohler Installation Problems
Even careful installations encounter issues solvable with these targeted fixes. If water leaks from the faucet base, check if the mounting nut is properly tightened (most common cause) or if the rubber gasket is damaged or improperly seated. For persistent base leaks, remove the faucet and inspect the sink surface for debris preventing proper sealing. Low water pressure usually indicates debris in the aerator – remove it by hand or with an aerator key and rinse thoroughly. If your pull-down spray head won’t retract smoothly, check for kinks in the hose beneath the sink and ensure it moves freely through the faucet spout.
Handle stiffness often results from misaligned handle adapter – loosen the mounting screw, adjust the handle position, then retighten. For models with ceramic disc valves, ensure the cartridge is properly seated during installation. If you notice dripping from the spout when handles are off, the cartridge may be improperly installed or contaminated with debris. Kohler’s lifetime warranty covers manufacturing defects, but proper installation prevents most issues. Consult Kohler’s online installation videos for model-specific troubleshooting when standard fixes don’t resolve problems.
Maintain Your Kohler Faucet for Long-Term Performance

Proper maintenance preserves your Kohler faucet’s appearance and function for decades. Clean regularly with a soft microfiber cloth and mild soap, avoiding abrasive cleaners that damage protective finishes. For mineral buildup in hard water areas, soak affected areas with equal parts white vinegar and water for 5-10 minutes before wiping clean. Never use bleach-based cleaners on stainless steel or chrome finishes as they cause permanent discoloration.
Check supply lines every six months for bulges, corrosion, or moisture around connections. Replace lines proactively every 5-7 years regardless of appearance – aging rubber deteriorates internally before showing external signs. Clean aerators quarterly by unscrewing and soaking in vinegar solution to maintain optimal flow. For pull-down models, lubricate the hose swivel points annually with plumber’s grease to ensure smooth operation. Following these simple maintenance steps ensures your Kohler faucet delivers reliable performance while maintaining its like-new appearance throughout its exceptional lifespan.


