

That frustrating trickle instead of a strong stream when you turn on your kitchen faucet disrupts meal prep, dishwashing, and every other kitchen task. Slow water flow in kitchen faucet problems plague homes nationwide, transforming simple chores into time-consuming ordeals. Whether your faucet has gradually weakened over months or suddenly lost pressure, most flow issues can be diagnosed and fixed without professional help. This guide reveals exactly how to fix slow water flow in kitchen faucet systems, from quick aerator cleanings to cartridge replacements—all with basic tools you likely already own.
Diagnose the Root Cause Before Grabbing Tools
Before wasting time on unnecessary repairs, pinpoint where your flow problem originates. This targeted approach saves you from replacing parts that aren’t causing the issue and prevents further damage from misdiagnosis.
Determine if both hot and cold water are affected equally. Turn on the cold water first and observe the flow rate, then repeat with hot water. If both temperatures produce similarly reduced flow, your problem likely resides within the faucet assembly itself. If only one temperature is affected, the issue may involve that specific supply line or the water heater for hot water problems.
Check other fixtures throughout your home. Test bathroom sinks, showers, and outdoor faucets to see if they experience similar flow reduction. Multiple affected fixtures indicate a system-wide pressure issue rather than a problem specific to your kitchen faucet. This distinction determines whether you need to focus on the faucet itself or investigate your home’s plumbing system.
Consider the timeline of your flow problem. Gradual reduction over months or years typically indicates mineral deposit accumulation—a normal occurrence in hard water areas. Sudden flow loss often points to mechanical failure, a closed valve, or debris that has broken loose and created a blockage. This history provides crucial clues about which repair approach to pursue first.
Clean Your Clogged Faucet Aerator in 5 Minutes
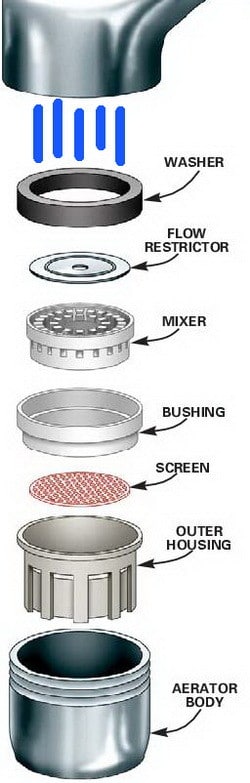
The faucet aerator causes approximately 70% of slow water flow in kitchen faucet issues. This small attachment at the spout tip mixes air with water and contains multiple tiny mesh screens that trap mineral deposits from hard water, restricting flow over time.
Remove the aerator using basic tools. Most aerators unscrew counterclockwise by hand. If stuck, wrap a cloth around it to protect the finish and use adjustable pliers for gentle leverage. Never force a stuck aerator, as you risk damaging the faucet spout threads.
Soak and scrub all components thoroughly. Disassemble the aerator, noting component order for reassembly. Place all parts in white vinegar for 30-60 minutes to dissolve mineral deposits. After soaking, use a soft-bristled toothbrush to clean each component, especially the mesh screens where flow openings become completely blocked. Rinse thoroughly with clean water.
Reassemble correctly or replace damaged parts. Worn washers, cracked screens, or deformed parts indicate replacement is necessary rather than just cleaning. Most aerator replacements cost $5-$25 and restore full flow immediately when installed properly. Hand-tighten the aerator back onto the faucet—over-tightening can crack the housing or strip threads, causing leaks.
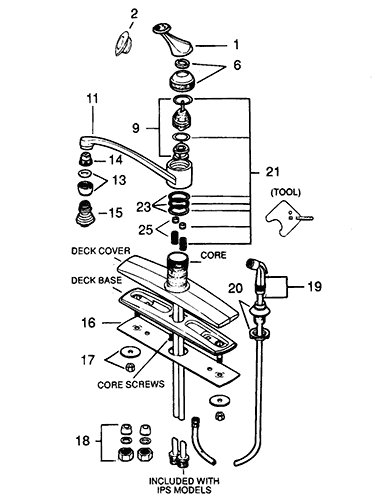
Replace Faulty Cartridge Causing Flow Restrictions
If cleaning the aerator didn’t solve your slow water flow problem, the cartridge inside your faucet likely needs attention. Cartridges control water flow and temperature in single-handle faucets and can develop internal restrictions from mineral buildup or worn seals.
Shut off water supply before starting. Turn both hot and cold valves beneath your sink fully clockwise. Open the faucet to release remaining pressure and drain water from the lines. Place a towel under the faucet to catch drips during the repair process.
Remove and inspect the cartridge. Locate the handle screw (often hidden under a decorative cap), remove it, and lift off the handle. Unscrew the retaining nut and extract the cartridge. Examine it for visible damage, mineral buildup on seals, or worn components. While you can clean it with vinegar, cartridges are precision components that often require replacement for lasting results.
Install an exact replacement cartridge. Take the old cartridge to a hardware store to find an exact match. Align positioning pins correctly when inserting the new cartridge—improper alignment causes leaks or continued flow problems. Reassemble in reverse order, hand-tightening connections before final snugging with tools. Test both hot and cold water to confirm restored flow.
Inspect and Swap Restricted Supply Lines
When aerator cleaning and cartridge replacement fail to improve flow, your flexible supply lines may be restricting water. These lines connect your faucet to household water supply and can develop internal restrictions from mineral sedimentation.
Disconnect supply lines safely. Turn off water supply valves and place a bucket beneath connections. Disconnect lines from both the faucet inlet and shut-off valves, allowing water to drain. Briefly turn on shut-off valves to test pressure directly—strong flow here but weak flow at faucet confirms the restriction lies within the faucet assembly.
Replace lines with correct sizing. Standard kitchen faucet supply lines use 3/8-inch compression fittings, though some older installations differ. Hand-tighten new connections first, then use pliers to snug them an additional quarter to half turn. Over-tightening can crack fitting nuts or damage valve stems, creating new problems.
Test Your Home’s Water Pressure System
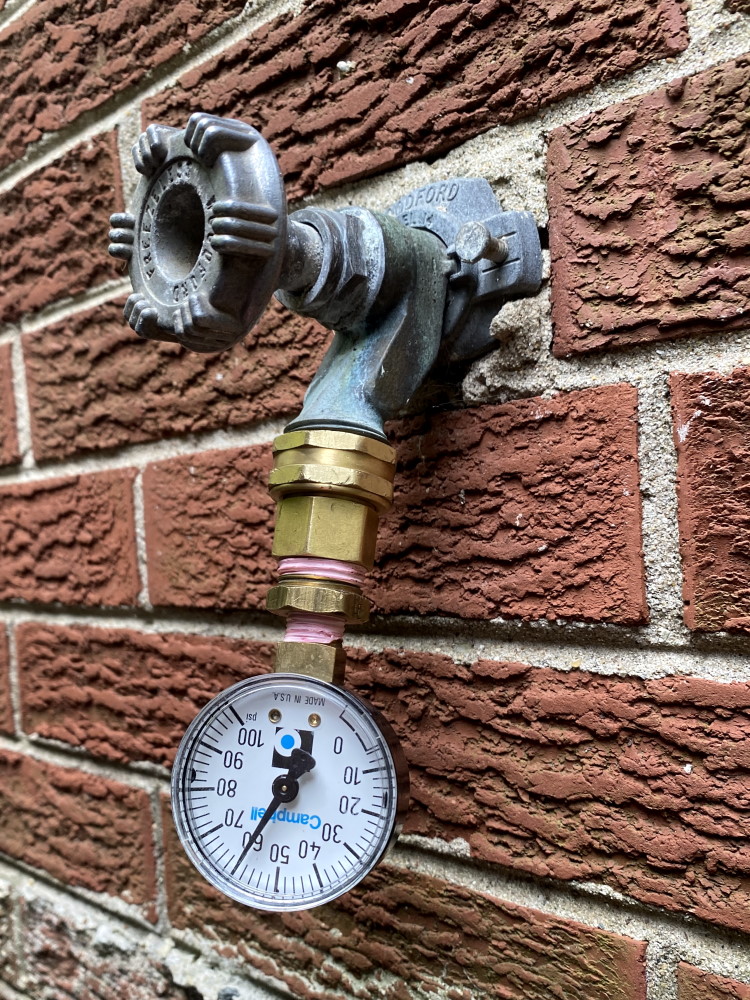
Sometimes slow kitchen faucet flow stems from your home’s overall water pressure system rather than the faucet itself. Municipal supply pressure fluctuates, and private well systems may experience pressure drops requiring professional attention.
Measure your home’s water pressure. Purchase an inexpensive pressure gauge ($15 at hardware stores) and attach it to an outdoor faucet. With all other fixtures off, note the reading. Normal residential pressure ranges from 40 to 80 psi, with 50-60 psi considered optimal. Readings below 40 psi indicate insufficient supply pressure.
Determine if the problem affects multiple fixtures. Test bathroom sinks, showers, and other faucets. Low pressure affecting only the kitchen suggests a localized restriction. Whole-house low pressure indicates supply-side issues requiring professional diagnosis of pressure regulators, water softeners, or municipal supply problems.
Prevent Future Flow Problems with Simple Maintenance
After restoring your faucet’s flow, implement regular maintenance habits to prevent recurrence. Prevention is far easier and less expensive than repeated repairs.
Monthly aerator maintenance takes less than 5 minutes. Simply unscrew the aerator, rinse it under running water, and use a soft brush to remove debris. For hard water areas, monthly vinegar soaks prevent significant mineral accumulation.
Annual cartridge replacement in hard water regions maintains consistent flow. While cartridges last 5-10 years in soft water areas, hard water accelerates deterioration. Replacing cartridges every 3-5 years prevents gradual performance decline that often goes unnoticed until flow becomes severely restricted.
When to Call a Professional Plumber for Faucet Issues
Many slow flow issues resolve with DIY approaches, but some situations require professional expertise. Persistent issues after addressing aerator, cartridge, and supply lines often involve hidden restrictions requiring specialized diagnostic equipment.
Signs indicating professional help is needed include:
– Water discoloration (brown or yellow tints suggesting pipe corrosion)
– Audible banging or knocking in pipes when fixtures operate
– Visible water damage under sinks or around fixtures
– Pressure that varies significantly between different times of day
Complete faucet replacement, water softener installation, or pressure regulator work often benefits from professional installation, especially for high-end fixtures with complex features.
Budget Smart: Cost Breakdown of Faucet Flow Repairs
Understanding potential costs helps you budget appropriately and decide between DIY repair or professional service.
DIY repair costs:
– Aerator cleaning: $0 (vinegar and toothbrush you likely have)
– Aerator replacement: $5-$25
– Cartridge replacement: $15-$50
– Supply line replacement: $10-$30
Professional service costs:
– Basic faucet repair: $150-$350
– Complete faucet replacement: $250-$600 for standard models
– Emergency service calls: 1.5 to 2 times standard pricing
Most minor slow water flow in kitchen faucet issues cost less than $75 to fix yourself with basic tools, making DIY repair the economical choice for accessible problems.
Slow water flow in your kitchen faucet doesn’t have to be a permanent frustration. By systematically diagnosing the cause—starting with the simple aerator and progressing through cartridge, supply lines, and pressure testing—you can restore strong, reliable water flow without professional help in most cases. Regular maintenance prevents recurrence and extends your faucet’s service life significantly. When DIY approaches reach their limits, professional plumbers provide the expertise needed to address hidden plumbing problems safely. Whether you tackle the repair yourself or call in a professional, addressing slow flow promptly prevents minor issues from becoming major plumbing emergencies. Your kitchen faucet should deliver consistent, strong flow every time you turn it on—and with these proven methods, you can ensure it does.


