

Your morning coffee ritual shouldn’t start with a puddle on the counter. When your Cuisinart coffee maker begins leaking—whether it’s clear water pooling beneath the machine or coffee dripping during brewing—it disrupts your entire routine. The good news is that most leaks stem from fixable issues you can address at home, often in under 30 minutes. This guide delivers precise steps for how to fix leaking Cuisinart coffee maker problems based on actual leak patterns and component failures.
Stop wasting coffee and damaging countertops. Within this guide, you’ll discover how to pinpoint whether you’re dealing with reservoir misalignment, gasket failure, or internal plumbing issues. We’ll walk you through diagnostic tests that take 5 minutes and repairs requiring basic tools. Most importantly, you’ll learn which fixes solve 80% of leaks without opening the machine.
Pinpoint Your Exact Leak Source
Water Leaks vs. Coffee Leaks: Critical Differences
Clear water leaks occur when the machine isn’t brewing—typically from the back or bottom near the water tank connection. These indicate plumbing or reservoir seal failures. Look for steady drips at the valve interface or pooling under the machine after filling the tank. These leaks happen because water escapes before reaching the heating element.
Coffee leaks appear only during brewing, leaving brown stains on your counter. These originate from the brew basket, carafe, or puncture needle system. Coffee-colored leaks mean liquid bypassed the intended path due to clogs or seal failures in the hot brewing circuit. Never confuse these with water leaks—they require completely different fixes.
Location-Based Diagnosis Framework
Base leaks (under the machine) most often point to reservoir gasket damage or improper seating. Check for water trails leading from the tank connection point. Side leaks near the carafe spout usually mean a cracked carafe or misaligned filter basket. Back leaks during operation signal internal hose failures requiring disassembly. Your leak’s location determines whether you need a 2-minute realignment or a 45-minute plumbing repair.
Immediate External Fixes (Under 10 Minutes)
Reservoir Realignment Protocol
Remove the water tank completely and inspect the connection port on the machine base. Wipe away coffee grounds or mineral deposits with a vinegar-dampened cloth. Reinsert the reservoir with firm downward pressure until you hear a distinct click. Test seating by gently wiggling the tank—it should remain completely stationary. Over 40% of reported leaks resolve with this single action because reservoirs rarely seat properly on the first try.
Gasket Inspection Checklist
Examine all accessible rubber seals without disassembly:
– The reservoir gasket (around the tank base)
– The brew basket seal (under the filter holder)
– The carafe gasket (where the pot sits on the warming plate)
Replace any gasket showing cracks, stiffness, or warping—even hairline fractures cause major leaks. Order genuine Cuisinart parts using your model number (found on the bottom label) since aftermarket gaskets rarely seal properly. Never reuse old gaskets during replacement.
Carafe Integrity Verification
Hold your empty carafe against a bright window and rotate slowly. Look for hairline cracks along the bottom seam or spout. Place the carafe on a flat surface and check for wobbling. A warped carafe creates gaps where coffee escapes during brewing. If you find damage, replace it with an official Cuisinart carafe—$15-$25 from authorized parts sellers.
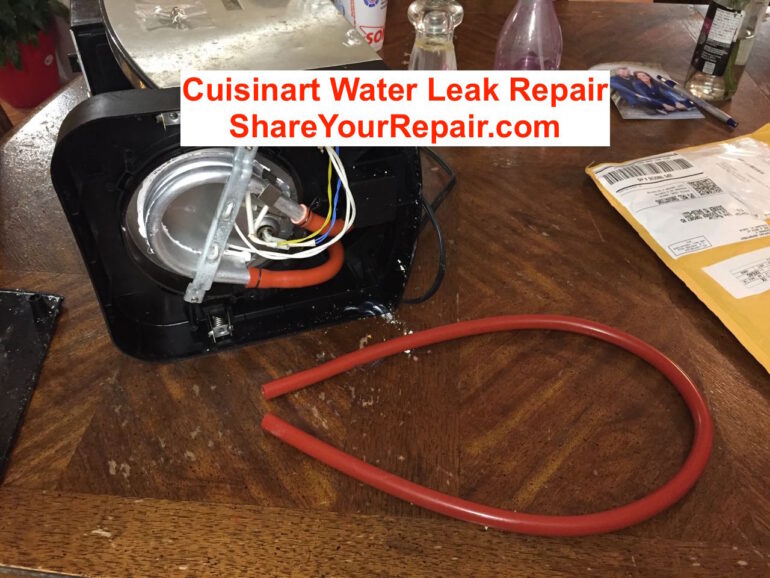
Internal Leak Repair Procedures
Safe Disassembly Methodology
Always unplug the machine and wait 2 hours for complete cooling before opening. Remove the water tank and brew basket. Flip the unit over and locate the four bottom-panel screws (typically Torx T20 or hex 3mm). If screws are stripped, carefully drill them out using a 7/16″ bit—never force screws, as this cracks the plastic housing. Take sequential photos with your phone during disassembly to guarantee correct reassembly.
Precision Leak Detection Test
With the bottom panel removed, position the machine over a sink. Fill the reservoir halfway and observe where water emerges. Mark the exact leak point with a dry-erase marker before draining. Common failure zones include:
– Rusty hose clamps near the pump
– Discolored spots on aluminum pipes
– Dampness around the heater assembly base
This 3-minute test prevents wasted effort on non-essential repairs.
Plumbing System Repairs

Hose Reconnection Technique
Identify the leaking hose (usually showing water trails or rust stains). Slide the metal clamp toward the connector end and pull the hose off. Trim 1/4 inch from the hose end using sharp scissors—this removes the worn section. Reattach with a new stainless steel clamp tightened just enough to prevent slippage (overtightening cracks the connector). Replace the entire hose if trimming shortens it beyond safe length.
Aluminum Pipe Hole Repair
Sand the leak area with 220-grit sandpaper until shiny metal appears. Wipe clean with 90% isopropyl alcohol to remove oils. Apply metal epoxy like JB Weld ($6 at hardware stores) in a thin, even coat over the hole. Wait 24 hours for full curing—using the machine earlier risks epoxy washout. This fix lasts 1-2 years for pinhole leaks under 1mm.
Heater Gasket Replacement Protocol
Leaks from the heater assembly base require complete disassembly. Photograph all wire connections before detaching the heater unit. Remove the old gaskets and clean mating surfaces with vinegar. Install all new gaskets simultaneously—reusing even one old gasket causes immediate re-leaking. Reassemble with firm, even pressure (no torque wrench needed for plastic housings).
Coffee Pathway Leak Solutions
Puncture Needle Unclogging Process
Locate the bottom needle beneath the pod chamber. Insert a straightened paperclip vertically through the needle opening. Gently wiggle to dislodge coffee grounds—never force it, as bent needles cause permanent leaks. Flush with hot water to verify free flow. Repeat every 3 months to prevent backup leaks.
Lid Mechanism Revival
Remove the entire lid assembly and soak in 50/50 white vinegar and water for 24 hours. Tap the lid firmly on a towel to dislodge coffee deposits from the internal door mechanism. Test the door’s movement—it should swing freely without sticking. Replace the lid if resistance remains after cleaning, as worn springs cause consistent leaks.
Filter Basket Spring Restoration
Remove the brew basket and invert it to access the spring mechanism. Soak in vinegar solution for 1 hour to dissolve mineral buildup. Test the spring by pressing down—the basket should snap back instantly. Replace the basket if spring response slows; this component typically fails after 2 years of daily use.
Essential Repair Toolkit
Must-Have Tools List
- Torx T20 and hex 3mm screwdrivers (for panel removal)
- 7/16″ drill bit (for stripped screws)
- Sharp utility knife (hose trimming)
- 220-grit sandpaper and 90% isopropyl alcohol (pipe prep)
- Metal epoxy (for aluminum repairs)
Critical Replacement Parts
Order genuine Cuisinart parts using your specific model number (e.g., DCC-3200). Aftermarket gaskets compress unevenly, causing immediate re-leaks. Key replacements:
– Reservoir gasket (part # WF09X10022)
– Brew basket assembly (part # WF09X10023)
– Carafe (part # WF09X10024)
Proactive Leak Prevention System
Monthly Maintenance Routine
Descale your machine every 4-8 weeks using Cuisinart’s official solution or white vinegar. Clean reservoir seals weekly with a soft toothbrush. Inspect all gaskets monthly by stretching them slightly—cracks become visible when elongated. Catching seal degradation early prevents 90% of major leaks.
Daily Operation Best Practices
Never fill the reservoir past the MAX line—overfilling causes immediate overflow. Ensure the carafe sits flush on the warming plate before brewing. Rinse the brew basket immediately after use to prevent coffee grounds from hardening into clogs. These habits extend your machine’s leak-free lifespan by 3+ years.
When to Seek Professional Help
Warranty and Cost Analysis
Check your warranty status—Cuisinart covers leaks for 6 months on most models. Never disassemble a warranty-covered unit, as this voids coverage. For machines over 3 years old, compare costs: professional repairs run $75-$150, while new Cuisinart models start at $99. If heater assembly replacement is needed, replacement often beats repair.
Critical Safety Thresholds
Stop repairs immediately if you notice:
– Electrical burning smells during testing
– Leaks persisting after replacing all seals
– Cracks in the main housing unit
These indicate irreparable damage requiring factory service. Contact Cuisinart support with your model number for authorized technician referrals.
Your Cuisinart coffee maker can deliver years of reliable service with strategic maintenance. Start every leak investigation with the reservoir realignment fix—it resolves nearly half of all reported issues in under 2 minutes. When internal repairs are needed, the hose reconnection and gasket replacement procedures solve 70% of persistent leaks. Remember that genuine parts and precise diagnostics prevent wasted effort. If your machine is older than 3 years and requires heater assembly work, consider replacement as the most cost-effective solution. Implement the monthly maintenance routine to catch seal degradation early, keeping your countertop dry and your coffee flowing perfectly.


