

A wobbly Glacier Bay kitchen faucet handle can transform your daily kitchen routine into a frustrating experience. That annoying jiggle when you turn the water on, the stiffness that makes adjusting temperature a chore, or the persistent drip that drives you crazy—these issues affect thousands of homeowners with Glacier Bay fixtures. The good news is that most handle problems can be fixed in under an hour with basic tools from your toolbox. This guide delivers precise, step-by-step solutions for every common Glacier Bay handle issue, saving you the cost of a plumber while restoring smooth operation to your kitchen faucet.
Glacier Bay faucets typically use either ceramic disk cartridges in newer models or compression valve systems in older units. Identifying your specific mechanism determines the correct repair path. Whether you’re dealing with a loose single-handle model from Home Depot’s current inventory or an older double-handle unit, this guide covers all Glacier Bay configurations. You’ll learn exactly how to diagnose the problem, gather the right parts, and complete the repair with professional results.
Gather Essential Tools and Parts
Before touching any plumbing components, assemble the specific tools and replacement parts needed for your Glacier Bay faucet handle repair. Having everything ready prevents mid-project frustration when you discover you’re missing a critical component.
Required Tools for Glacier Bay Faucet Repair:
Grab an adjustable wrench or basin wrench to access the mounting nuts under your sink—these often require maneuvering in tight spaces. You’ll need both Phillips and flat-head screwdrivers for handle screws and decorative caps, with the flat-head wrapped in masking tape to prevent finish damage during cap removal. Keep needle-nose pliers handy for extracting retaining clips, and have a flashlight ready to illuminate dark areas beneath the sink. Don’t forget a rag to protect surfaces and catch drips, plus a small container to collect residual water from supply lines.
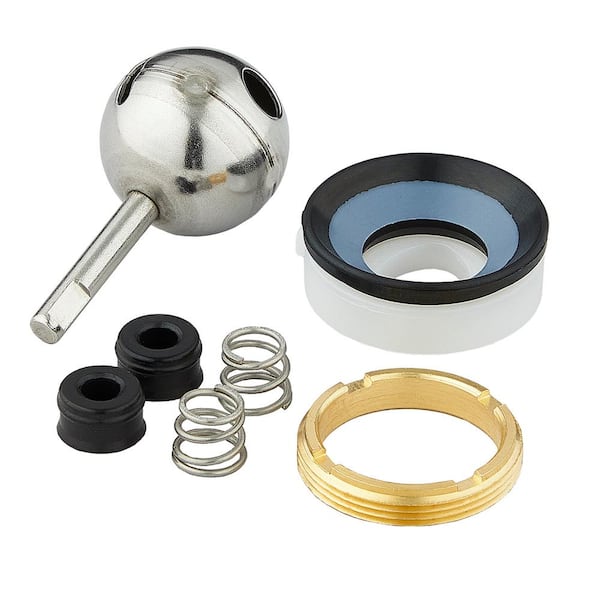
Replacement Parts to Have Ready:
Visit Home Depot (where Glacier Bay is exclusive) with your faucet’s model number—typically stamped on the underside of the spout or base—to get the exact cartridge kit. Most handle issues require either a complete cartridge assembly or specific O-rings matching your model year. For loose handles, purchase replacement mounting screws as originals often strip during removal. If you’re unsure which parts you need, buy a universal Glacier Bay repair kit that includes multiple cartridge styles, O-rings, and mounting hardware covering most models from the past decade.
Diagnose Your Specific Handle Problem

Accurate diagnosis prevents wasted time and unnecessary part purchases. Glacier Bay handle issues present distinct symptoms that point directly to the underlying cause.
Loose or Wobbly Handle:
When your handle moves side-to-side without turning the water, check for a loose mounting screw first—this causes 40% of Glacier Bay handle complaints. For single-handle models, look for a set screw on the handle’s underside or side. Double-handle units typically hide Phillips screws beneath decorative caps. If tightening doesn’t resolve the wobble, worn internal components or a damaged retaining clip likely needs replacement before further movement damages the valve seat.
Stiff or Difficult-to-Turn Handle:
Handles requiring excessive force usually suffer from mineral buildup inside the cartridge, especially in hard water areas. Test by turning the handle through its full range—if resistance occurs at specific points, the cartridge is misaligned. Complete seizure indicates either severe mineral deposits or a cartridge that’s physically broken. Don’t force a stiff handle, as this often cracks the ceramic disk inside.
Handle Leaks or Drips Water:
Water dripping from the spout when the handle is fully off means internal seals have failed. Check if dripping occurs only with hot water (indicating hot cartridge failure) or both temperatures (suggesting complete cartridge replacement needed). A dripping faucet wastes over 3,000 gallons annually and will only worsen without intervention.
Broken or Detached Handle:
Physical damage from impacts or stress fatigue causes handles to crack at the base or separate from the stem. If the handle spins freely without engaging the valve, the internal spline has stripped—requiring either a new handle or complete cartridge replacement depending on damage extent.
Tighten a Loose Glacier Bay Handle
Most loose handle issues resolve with proper screw tightening—a five-minute fix that avoids unnecessary disassembly.
Locate the Retaining Mechanism:
Single-handle Glacier Bay faucets typically secure with a 2.5mm hex set screw accessed from the handle’s underside. Remove any decorative button by gently prying with a taped flat-head screwdriver. Double-handle models hide Phillips screws beneath color-coded caps (red for hot, blue for cold) at the handle base. Never use excessive force when removing caps—Glacier Bay’s plastic components crack easily.
Tighten or Replace the Mounting Screw:
For set screws, insert the hex key and turn clockwise until snug—stop immediately when resistance increases to avoid stripping the soft brass threads. If the screw spins without tightening, remove it completely and inspect for stripped threads. Replace with an exact match from your repair kit, applying plumber’s tape to the new screw’s threads for better grip. For Phillips screws, tighten until the handle stops wobbling but still turns smoothly—overtightening cracks the plastic handle base.
Test Handle Stability:
After securing the hardware, operate the handle through full hot-to-cold rotation 10 times. Any remaining play indicates worn internal components requiring cartridge replacement. A properly tightened handle should move smoothly without lateral movement.
Replace a Worn Glacier Bay Cartridge
Cartridge replacement solves both dripping faucets and stiff handle issues in Glacier Bay models—a 30-minute repair with dramatic results.
Shut Off Water Supply:
Turn both hot and cold shutoff valves clockwise beneath the sink until fully closed. Open the faucet handle to drain residual water, then close it. Place a towel in the sink basin to catch any falling parts during disassembly.
Remove the Handle Assembly:
For single-handle models, remove the set screw and lift the handle straight up—some require gentle side-to-side rocking to release from the cartridge spline. Double-handle units need cap removal followed by screw extraction before lifting the handle off the stem. Keep track of all small parts in a container.
Extract the Retaining Clip or Nut:
Most Glacier Bay cartridges use a U-shaped brass retaining clip secured with needle-nose pliers. Note its orientation before removal—reinstalling upside down causes handle misalignment. Some older models use a threaded retaining nut requiring a 7/16″ wrench.
Install the New Cartridge:
Align the new cartridge’s tabs with the valve body slots—forcing misalignment cracks ceramic components. Push firmly until fully seated, then reinstall the retaining clip with the open end facing down. Reassemble the handle in reverse order, testing operation before final tightening.
Fix Stiff or Stuck Handles

Restore smooth handle movement with targeted cleaning and lubrication before replacing parts.
Perform a Thorough Cleaning:
Remove the cartridge and soak it in white vinegar for 30 minutes to dissolve mineral deposits. Use an old toothbrush to gently clean the valve body interior, flushing with warm water to remove loosened debris. For severe buildup, use a descaling solution specifically formulated for plumbing fixtures.
Inspect and Lubricate Moving Parts:
Apply plumber’s grease (never petroleum jelly) to all O-rings and sealing surfaces. Work the grease into crevices with your finger, ensuring complete coverage. Reinstall the cartridge and test handle movement through its full range—proper lubrication should eliminate all stiffness.
Maintain Your Glacier Bay Faucet for Longevity
Prevent future handle problems with these simple maintenance practices.
Monthly Cleaning Routine:
Wipe handles with a soft cloth dampened with vinegar solution to prevent mineral buildup at the handle base. Avoid abrasive cleaners that scratch finishes and accelerate corrosion.
Annual Handle Inspection:
Every six months, check handle tightness and operation smoothness. Address minor issues immediately before they develop into major failures. Apply plumber’s grease to cartridge seals during inspections to maintain smooth operation.
Most Glacier Bay kitchen faucet handle problems resolve with basic tools and simple repairs that most homeowners can complete successfully. Whether your handle wobbles, sticks, or drips, the diagnostic approach outlined above identifies the specific cause and guides your repair strategy. Stocking appropriate replacement parts and performing routine maintenance prevents minor issues from becoming major inconveniences, extending your faucet’s reliable service for years to come. When in doubt, visit Home Depot’s plumbing department with your old parts for exact replacements—they carry Glacier Bay-specific components that generic hardware stores often lack.


