
A blown fuse in your kitchen can bring meal preparation to a complete standstill, leaving you with non-functional outlets and a refrigerator that might start warming up. This common electrical issue affects countless homeowners every day, yet many feel uncertain about how to address it safely and effectively. Understanding the process of diagnosing and fixing a blown fuse empowers you to restore power quickly while protecting your home’s electrical system from dangerous overloads or hidden faults.
Kitchen circuits face unique electrical demands that make them prone to fuse failures. Modern kitchens host numerous high-wattage appliances—refrigerators, microwaves, dishwashers, garbage disposals, and countless countertop devices—all competing for electrical capacity on circuits that may have been installed decades ago when kitchen electricity needs were far simpler. Learning to distinguish between a simple fuse replacement and a symptom of deeper electrical problems ensures you resolve issues correctly the first time.
This guide walks you through the complete process of identifying, fixing, and preventing blown kitchen fuses. You’ll discover how to diagnose the root cause, perform safe replacements, and implement strategies that reduce future electrical problems. By the end, you’ll understand when DIY solutions suffice and when professional electrical help becomes essential for your safety.
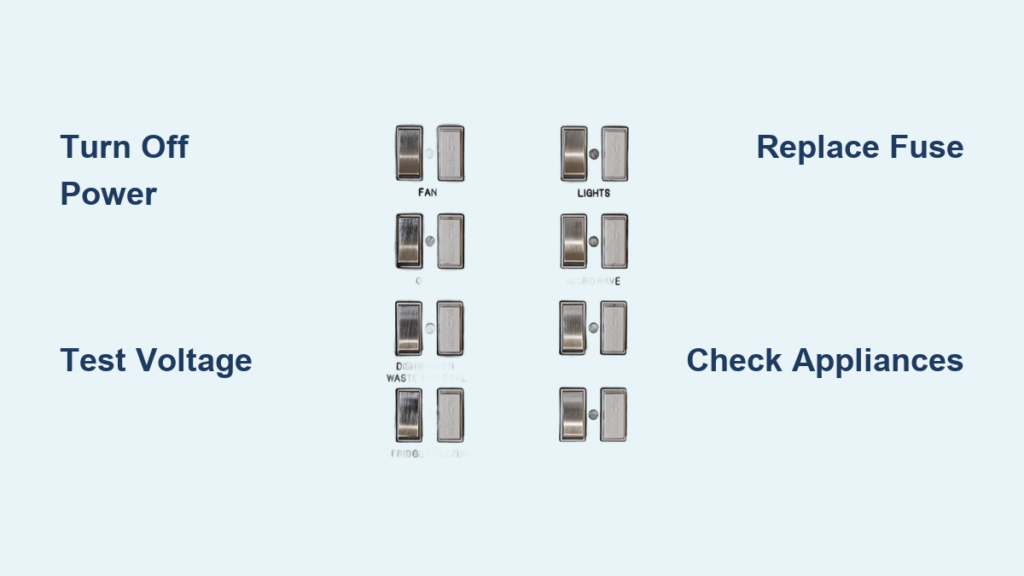
Identify Which Kitchen Circuits Lost Power
Pinpoint Exactly Which Outlets Are Affected
Before attempting to fix a blown fuse in kitchen circuits, you must determine precisely which areas have lost power. Start by testing multiple outlets with a simple lamp or phone charger—not all kitchen outlets connect to the same circuit. Modern kitchens typically have at least two dedicated 20-amp circuits for countertop receptacles, plus separate circuits for major appliances like refrigerators, dishwashers, and garbage disposals.
Check hardwired appliances first—does your refrigerator still run? Is the built-in microwave operational? These often connect to dedicated circuits separate from standard receptacles. If your refrigerator has stopped working while other kitchen outlets still function, you’re likely dealing with a dedicated circuit problem rather than a general kitchen circuit failure. This distinction determines whether you need a simple fuse replacement or professional assessment for critical appliance circuits.
Note any patterns in the power loss. Does power fail only when using multiple appliances simultaneously? Does one specific appliance consistently cause the problem? Documenting these details helps diagnose whether you’re facing simple circuit overload, a faulty appliance, or a more serious wiring issue requiring professional attention.
Locate Your Electrical Panel and Identify the Culprit Fuse
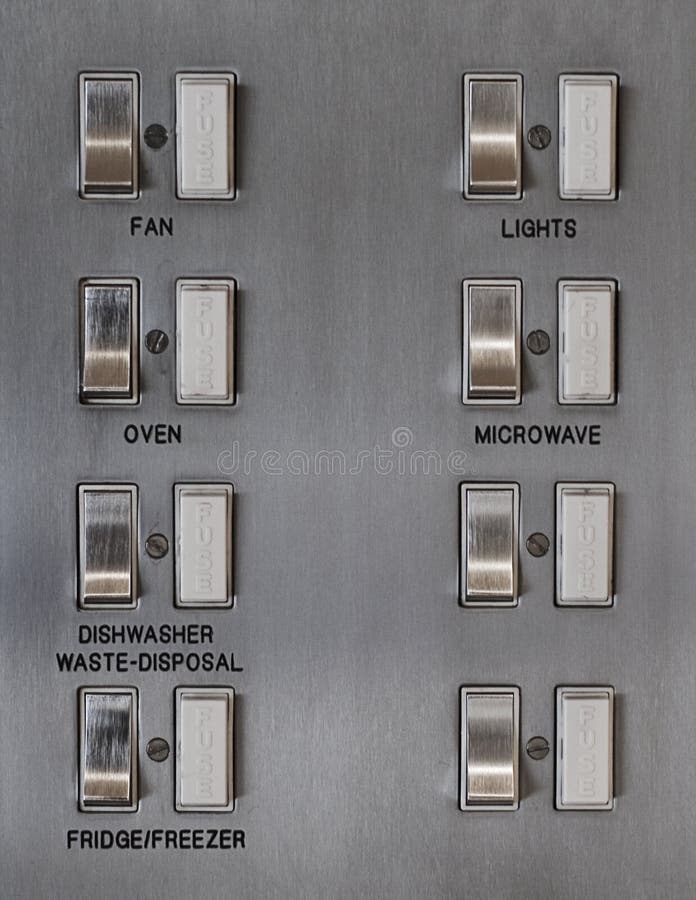
Kitchen fuse issues require immediate identification of your home’s electrical panel location—typically in the basement, garage, or utility closet. Older homes use fuse panels with screw-in or cartridge fuses, while newer construction features circuit breaker panels. For fuse panels, look for cylindrical fuses arranged in rows; for breaker panels, identify switches that have tripped to the middle position.
Kitchen circuits should be clearly labeled in your panel, though many homeowners discover inaccurate or missing labels when problems arise. If labels are unclear, perform a systematic test: turn off or remove one fuse/breaker at a time while checking which outlets lose power. Use masking tape and marker to properly label circuits as you identify them—this saves considerable time during future electrical issues.
Focus specifically on circuits labeled “kitchen,” “kitchen receptacles,” or “small appliance branch circuits.” Standard kitchen circuits typically use 15-20 amp fuses or breakers. Major appliances like electric ranges or ovens operate on 240-volt circuits with double-pole breakers or higher-amperage fuses that require different replacement procedures.
Gather Essential Tools Before Touching Electrical Components
Critical Safety Equipment for Fuse Replacement
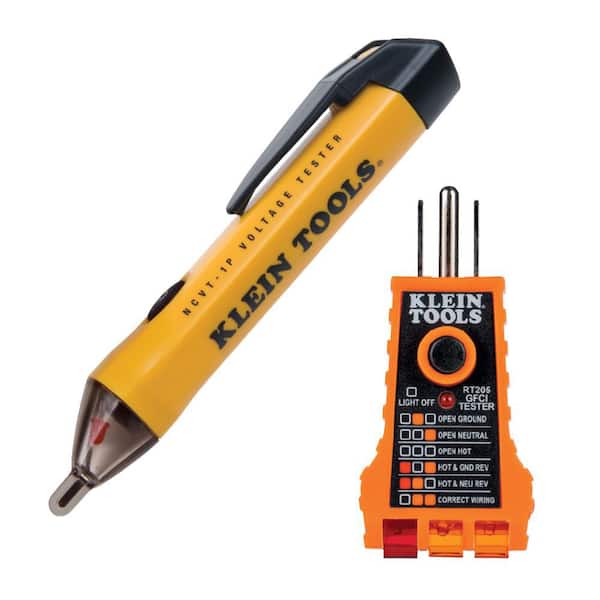
Never attempt to fix a blown fuse in kitchen circuits without proper safety equipment. A non-contact voltage tester is absolutely essential—this inexpensive tool verifies whether power has been successfully disconnected before you handle electrical components. Test the voltage tester on a known live circuit first to confirm it’s functioning correctly.
Safety glasses protect your eyes from potential sparks or debris during electrical work. Rubber-soled shoes provide insulation from ground contact, while dry cotton clothing reduces electrical conductivity compared to synthetic materials. Keep a Class C fire extinguisher (rated for electrical fires) accessible during the repair process—electrical work carries inherent fire risks that require immediate response capability.
Never work on electrical systems when tired, medicated, or impaired—clear mental state prevents potentially fatal accidents. Inform someone else in your household that you’re working on electrical systems, providing an additional safety margin in case of emergency. These precautions transform what could be a dangerous DIY project into a safe, manageable task.
Correct Replacement Fuses for Kitchen Circuits
Selecting the proper replacement fuse makes the difference between temporary fix and creating a dangerous situation. Kitchen receptacle circuits typically use 15-20 amp fuses—using higher amperage fuses removes critical protection and risks wiring overheating. Using lower amperage fuses causes unnecessary nuisance tripping during normal kitchen operations.
For screw-in fuses, verify the physical size matches your socket—Edison base fuses come in standard sizes with different thread diameters to prevent incorrect installation. For cartridge fuses protecting 240-volt kitchen appliances, match the diameter exactly (common sizes: 1/4″, 1/2″, 9/16″). Time-delay fuses work best for circuits powering refrigerator or dishwasher motors that cause temporary current surges during startup.
Purchase replacement fuses from reputable electrical suppliers rather than discount retailers. Look for UL, CSA, or ETL certification marks—these indicate independent safety testing. Quality varies significantly among manufacturers, and inferior fuses may fail prematurely or provide inconsistent protection that compromises your electrical safety.
Execute Safe Fuse Replacement Procedure in 5 Minutes
Power Down and Verify Complete Disconnection
Before attempting to fix blown fuse in kitchen panel, disconnect power to the affected circuit completely. For breaker panels, stand to the side of the panel (not facing it directly) and move the breaker handle firmly to the full off position before resetting. For fuse panels, remove the panel cover using appropriate screwdrivers, then verify power is off using your voltage tester at multiple points.
Test the voltage at the affected outlets first, then directly at the fuse socket. Insert the non-contact tester into outlet slots—it should not light up or beep. For cartridge fuses, test both ends of the fuse holder; for plug fuses, test between the center contact and threaded shell. Never assume power is off—this verification step prevents potentially fatal electrical accidents.
After confirming power disconnection, unplug all appliances from affected circuits, particularly high-wattage devices that may have contributed to the original overload. This precaution prevents immediate circuit overload when you restore power, giving you time to diagnose the root cause before restoring full functionality.
Remove Blown Fuse and Install Correct Replacement
With power verified off, remove the blown fuse using proper technique. For cartridge fuses, use a fuse puller to grasp the fuse firmly and pull straight out—never use pliers that might crush the fuse. For plug fuses, rotate counterclockwise until unscrewed completely—resistance indicates possible socket damage requiring professional attention.
Inspect the removed fuse for clues about why it failed. Cartridge fuses with visible gaps or discoloration indicate overload; shattered glass or melted components suggest serious short circuits. Plug fuses with darkened glass or broken filaments confirm failure but provide less diagnostic information.
Install the new fuse by aligning threads properly and rotating clockwise until hand-tight—never force it. Cartridge fuses should seat firmly with even pressure. Before restoring power, double-check that the replacement matches the correct amperage and type for your kitchen circuit. A properly installed fuse seats flush with the socket surface with solid electrical contact.
Diagnose Why Your Kitchen Fuse Blew in the First Place

Determine If Circuit Overload Caused the Failure
Kitchen circuits commonly fail due to simple overload—too many appliances drawing power simultaneously. Calculate whether your circuit loads exceed capacity by adding the amperage of all devices normally operating on that circuit. Refrigerators draw 3-8 amps, microwaves 8-15 amps, coffee makers 5-10 amps, and toasters 8-12 amps—running several simultaneously can easily exceed 20-amp circuit capacity.
If your fuse blew during normal cooking activities with multiple appliances running, simple load management may prevent recurrence. Operate high-draw appliances sequentially rather than simultaneously, particularly when using multiple countertop devices. Modern kitchens often require two dedicated 20-amp circuits for countertop receptacles—redistributing appliances across available circuits reduces overload risk.
Test Appliances for Internal Faults
When fuses blow repeatedly despite load management, individual appliance testing identifies faulty devices. Unplug all appliances from the affected circuit, replace the fuse, then plug in appliances one at a time, waiting several minutes between additions. The appliance that causes the fuse to blow has identified itself as the problem source.
Refrigerators require extended testing over 24-48 hours since compressors cycle automatically. Immediate fuse failure when plugging in a specific appliance indicates serious internal fault requiring professional repair or replacement. Continuing to use a faulty appliance risks repeated fuse failures and potential fire hazards.
Prevent Recurring Kitchen Fuse Problems Long-Term
Implement Smart Load Management Strategies
Prevent future blown fuses by distributing high-wattage appliances across multiple circuits. Avoid plugging multiple major appliances into the same receptacle strip—kitchen circuits weren’t designed for modern appliance density. Operate high-draw appliances sequentially rather than simultaneously when possible.
Consider upgrading to dedicated circuits for frequently used appliances. While electrical codes mandate dedicated circuits for specific appliances, adding dedicated circuits even where not required improves system reliability. Refrigerators particularly benefit from dedicated circuits to prevent food spoilage during other kitchen activities.
Schedule Regular Electrical Maintenance
Annual electrical system maintenance prevents many fuse-related problems. Inspect all accessible outlets, switches, and appliance cords for damage, discoloration, or unusual wear. Tighten loose faceplates and replace any components showing signs of heat damage. Test GFCI outlets monthly by pressing test and reset buttons.
Listen for buzzing, crackling, or arcing sounds from electrical panels—these indicate loose connections requiring professional attention. Note any unusual odors, particularly burning or plastic melting smells, which suggest developing faults. Professional electrical assessment every 5-10 years ensures your kitchen electrical system meets modern safety standards and usage demands.
Recognize When Professional Electrical Help Is Essential
Immediate Warning Signs Requiring Electrician Intervention
Certain symptoms demand professional electrical assessment regardless of apparent severity. Burning smells, sizzling sounds, warm outlets or switches, visible sparks, or water contact with electrical components indicate serious hazards requiring immediate professional attention. Do not continue using affected circuits—turn off power at the panel and contact an electrician promptly.
Recurring fuse failures despite proper load management signal underlying problems requiring professional diagnosis. Repeatedly blown fuses on the same circuit indicate inadequate wiring, deteriorating connections, or hidden damage that DIY solutions cannot safely address. Licensed electricians possess the expertise, equipment, and code knowledge to diagnose and resolve these situations effectively.
When attempting to fix blown fuse in kitchen circuits, remember that electrical safety always trumps convenience. Proper diagnosis, safe replacement procedures, and understanding when to call professionals ensures your kitchen electrical system operates reliably while protecting your home and family from fire and shock hazards. Smart load management, regular maintenance, and timely upgrades transform frustrating fuse problems into manageable, preventable occurrences rather than recurring emergencies.


