

Kitchen exhaust fans are essential for removing smoke, odors, and excess moisture during cooking. Without proper ventilation, grease buildup can create fire hazards while humidity damages cabinetry and walls. If your current exhaust system underperforms or you’re upgrading your kitchen, knowing how to properly install an exhaust fan ensures optimal air quality and protects your home from long-term damage. This guide walks you through the entire installation process with actionable steps you can follow confidently.
Choosing the Right Exhaust Fan for Your Kitchen
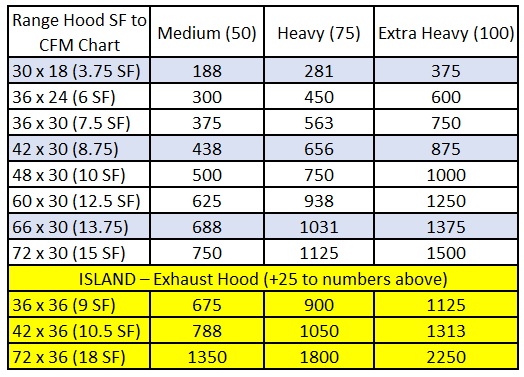
Before picking up tools, selecting the appropriate exhaust fan model prevents costly mistakes later. Your kitchen’s size determines the necessary airflow capacity measured in cubic feet per minute (CFM).
Determining Correct Fan Size and Type
Calculate your kitchen’s square footage by multiplying length by width, then multiply by 1 to get the minimum required CFM. For example, a 12×10 foot kitchen needs at least 120 CFM. Add 100 CFM if you have a gas range. Wall-mounted models work well for exterior walls, while ductless recirculating units suit spaces without exterior access.
Key considerations when selecting your fan:
– Match fan capacity to your cooking habits (higher CFM for frequent frying or wok cooking)
– Verify compatibility with existing ductwork diameter
– Check noise ratings (sones) for quieter operation
– Ensure housing dimensions fit your installation space
Essential Tools and Materials Checklist
Gather these items before starting your installation to avoid mid-project delays:
- Cordless drill with assorted bits
- Hole saw kit matching duct size
- Stud finder and level
- Duct tape and metal foil tape
- Wire nuts and electrical connectors
- Vent hood mounting hardware
- Safety glasses and work gloves
Preparing for Installation: Safety First
Installing an exhaust fan involves electrical work and structural modifications, making proper preparation critical for safety and code compliance.
Shutting Off Power and Checking Building Codes
Turn off the circuit breaker controlling your kitchen’s electrical outlets at the main panel before touching any wiring. Use a voltage tester to confirm power is off. Research local building codes regarding minimum CFM requirements, duct length limitations, and exterior termination points—most codes require exhausting to the outside rather than into attics or crawl spaces.
Locating Optimal Placement Position
Position your exhaust fan directly above your cooking surface, centered over the stove. Maintain 24-30 inches between the fan and cooktop for electric ranges or 30-36 inches for gas models. Use a stud finder to identify wall or ceiling framing members, ensuring you can secure the fan properly without cutting through structural elements.
Step-by-Step Exhaust Fan Installation Process
With preparation complete, follow these sequential steps for proper installation. Allow 3-4 hours for the entire process depending on your experience level and kitchen layout.
Cutting the Mounting Opening
Mark your cutout location using the fan’s template or measurements from the manufacturer’s instructions. Place the template on the wall or ceiling, ensuring it’s perfectly level with a bubble level. Drill starter holes in each corner, then use a jigsaw to carefully cut along your lines. Remove drywall or plaster cleanly without damaging surrounding areas.
Mounting the Exhaust Unit
Secure the mounting bracket to wall studs or ceiling joists using appropriate screws. Lift the exhaust fan into position, aligning it with the bracket. Connect the fan housing to the mounting system according to manufacturer specifications—most units click or screw into place. Verify the unit sits flush against the wall or ceiling with no gaps.
Connecting Ductwork Properly
Attach flexible or rigid ducting from the fan outlet to your exterior vent cap. Keep duct runs as short and straight as possible—each 90-degree bend reduces airflow efficiency by 25%. Seal all joints with metal foil tape (never regular duct tape, which degrades over time). Maintain a slight downward slope from fan to exterior to prevent moisture accumulation.
Electrical Wiring Connection

This critical step requires careful attention to detail and safety protocols.
Making Safe Electrical Connections
Run electrical cable from your nearest junction box to the fan location, securing it with staples every 12-18 inches. Connect white wires together with a wire nut, then black to black, and ground to ground. Tuck all connections neatly into the electrical box before mounting the fan housing. Double-check that no bare wire protrudes from connectors.
Testing Before Final Assembly
Restore power at the circuit breaker and test fan operation before installing filters or decorative elements. Verify all speed settings work correctly and the fan runs quietly without vibration. If your model includes lights, test those functions too. Address any issues immediately while the unit remains accessible.
Final Sealing and Finishing Touches
Proper sealing ensures your exhaust fan performs efficiently without creating drafts or moisture problems.
Weatherproofing Exterior Vent Termination
Install the exterior vent cap according to manufacturer instructions, ensuring the damper opens freely. Apply exterior-grade silicone caulk around the vent housing where it meets siding to prevent water intrusion. Check that snow or debris won’t block the outlet during winter months.
Installing Filters and Final Components
Place grease filters into their slots following directional arrows. Some models require specific filter orientation for optimal performance. Attach decorative trim pieces according to instructions, ensuring they don’t obstruct airflow. Wipe down the entire unit with a damp cloth to remove installation debris.
Troubleshooting Common Installation Issues
Even careful installations sometimes encounter problems that require quick resolution.
Addressing Weak Airflow Problems
If your fan seems underpowered after installation, check for these common issues:
– Excessive duct bends or length (shouldn’t exceed 25 feet total)
– Crushed or kinked duct sections restricting airflow
– Incorrect filter installation blocking the intake
– Undersized ductwork relative to fan capacity
Fixing Unusual Noises During Operation
Rattling or humming sounds typically indicate mechanical issues:
– Tighten all mounting screws and housing components
– Ensure ducting isn’t touching fan blades
– Verify electrical connections aren’t vibrating
– Lubricate motor bearings if specified in manual
Maintenance for Long-Term Performance
Proper upkeep extends your exhaust fan’s lifespan and maintains optimal performance.
Creating a Filter Cleaning Schedule
Grease filters require monthly cleaning in active kitchens. Remove filters and soak in hot, soapy water for 15 minutes before scrubbing with a non-abrasive brush. Rinse thoroughly and allow complete drying before reinstalling. Replace charcoal filters in ductless models every 6-12 months.
Annual Motor and Housing Inspection
Once a year, perform deeper maintenance:
– Wipe down interior housing to remove grease buildup
– Check fan blades for balance and damage
– Verify electrical connections remain tight
– Lubricate motor bearings if your model requires it
Final Note: Properly installed kitchen exhaust fans significantly improve indoor air quality while protecting your home from moisture damage. By following these detailed steps, you’ve created an effective ventilation system that removes cooking contaminants efficiently. Remember to clean filters regularly and inspect your system annually to maintain peak performance. If you encounter electrical issues beyond your expertise or complex ductwork challenges, consult a licensed professional to ensure safe, code-compliant operation. Your kitchen’s air quality and longevity depend on proper ventilation—enjoy cooking without the lingering smells and moisture problems!


