
Your kitchen shelves stare back at you—chipped paint, stubborn stains, or that sad, worn laminate that no amount of scrubbing fixes. You’ve scrolled through Pinterest dreaming of crisp, clean surfaces that make your dishes pop, but the thought of replacing entire shelves feels overwhelming. What if you could transform them in under an hour for less than $20? Covering kitchen shelves isn’t just about hiding flaws; it’s the fastest way to elevate your entire kitchen’s look without demolition or designer prices. In this guide, you’ll discover seven proven covering methods with exact measurements, foolproof installation tricks, and real solutions for tricky corners—all tested in real kitchens. Whether you’re renting, on a tight budget, or just hate DIY disasters, these techniques deliver restaurant-worthy results without the stress.
Why Your Kitchen Shelves Need Covering Now (Not Later)
Ignoring damaged shelves accelerates wear. Spills seep into cracks, making stains permanent and surfaces harder to clean. Most homeowners don’t realize that unlined shelves lose resale appeal—buyers notice peeling laminate before your fancy backsplash. Covering them blocks moisture, prevents scratches from heavy pots, and creates a seamless backdrop for your dishware. Crucially, it’s 90% faster than replacing shelves: no carpentry, no dust, and zero impact on your rental agreement. If your shelves feel sticky, show water rings, or clash with your new decor, covering them isn’t optional—it’s the smartest upgrade you’ll make this year.
7 Foolproof Methods to Cover Kitchen Shelves
Adhesive Contact Paper: The Renters’ Secret Weapon
Peel-and-stick contact paper works on any smooth surface—laminate, wood, or metal—and removes cleanly. Measure shelf depth before buying; standard rolls are 18–20 inches wide. For shelves deeper than 20 inches, buy extra and seam pieces vertically at the back (not the front). Critical step: Clean shelves with rubbing alcohol first—any grease causes bubbling. Apply slowly from back to front, using a credit card to push out air pockets. If you mess up, gently lift and reposition; most contact paper has 3–5 repositioning cycles. Pro tip: Choose matte finishes to hide fingerprints, and avoid glossy types near sinks where water beads create streaks.
Vinyl Shelf Liners: Non-Slip Protection for Heavy Items
Forget flimsy paper—vinyl liners grip heavy cast iron and prevent sliding. Opt for 2mm-thick rubberized vinyl with a textured surface (looks like woven fabric but won’t trap crumbs). Cut with sharp utility scissors: place liner upside down, trace shelf outline, then add 1/8 inch extra on all sides for a snug fit. When applying, press firmly around edges where shelves meet walls—this seals against moisture. Warning: Never use near heat sources like ovens; vinyl can warp above 140°F. For spice racks or narrow shelves, pre-cut pieces with pinking shears to prevent fraying.
Painted Shelves: Seamless Integration in 3 Steps
Painting creates built-in cabinet cohesion but demands precision. Use oil-based enamel like Rust-Oleum Cabinet Transformations—it dries hard as plastic. Sand shelves lightly with 220-grit paper first (skip this and paint peels within weeks). Apply thin coats with a 1.5-inch angled brush, working with the wood grain. Key mistake to avoid: Painting shelf edges first traps dust; always paint the flat surface first, then edges. Let dry 24 hours before loading dishes. For open shelving, choose satin finish—it hides imperfections better than high-gloss.
Peel-and-Stick Wallpaper: Designer Looks Without Damage
High-end kitchens use removable wallpaper on shelves for patterned backsplashes. Pick “self-adhesive vinyl wallpaper” (not traditional paper—it tears when removed). Measure height between shelves first; standard wallpaper is 27 inches tall. Apply top-to-bottom in one fluid motion, smoothing from center outward. Troubleshooting: If bubbles form, pierce with a pin and press flat. Avoid intricate patterns—they highlight uneven cuts; geometric lines or subtle textures forgive errors. Cost: $25–$40 per roll covers 10–15 linear feet of shelving.
Reusable Fabric Covers: Washable & Rent-Friendly
For kitchens with kids or pets, machine-washable fabric covers handle spills effortlessly. Use cotton duck cloth (heavyweight but breathable) cut 1 inch larger than shelves on all sides. Hem edges with iron-on tape to prevent fraying—no sewing required. Secure with removable adhesive dots (like Command Poster Strips) at corners; never glue fabric directly. Pro tip: Spray with Scotchgard before installation to repel stains. Replace covers seasonally: light florals for spring, deep blues for winter.
Cork Mats: Natural Texture for Open Shelving
Cork adds warmth to floating shelves while protecting delicate dishware. Buy 1/4-inch thick self-adhesive cork rolls (not tiles—they leave gaps). Cut with a craft knife on a cutting mat: score along a straight edge, then snap upward. Apply pressure for 30 seconds per square foot—cork expands in humidity, so leave 1/16 inch gaps at walls. Maintenance hack: Renew dull cork by rubbing with fine steel wool, then seal with food-safe mineral oil. Avoid in steam-heavy kitchens; cork swells near dishwashers.
Bamboo Mats: Eco-Friendly Style That Lasts
Bamboo mats work for rustic or modern kitchens and resist knife scratches. Choose flat-woven mats (not ribbed—they catch crumbs). Trim with heavy scissors: place mat upside down, clamp a straight board along cut line, and snip firmly. Adhere with double-sided tape only at the back edge—let the front hang slightly loose to prevent peeling when loading dishes. Critical note: Bamboo fades in direct sunlight; position away from windows or apply UV-resistant sealant.
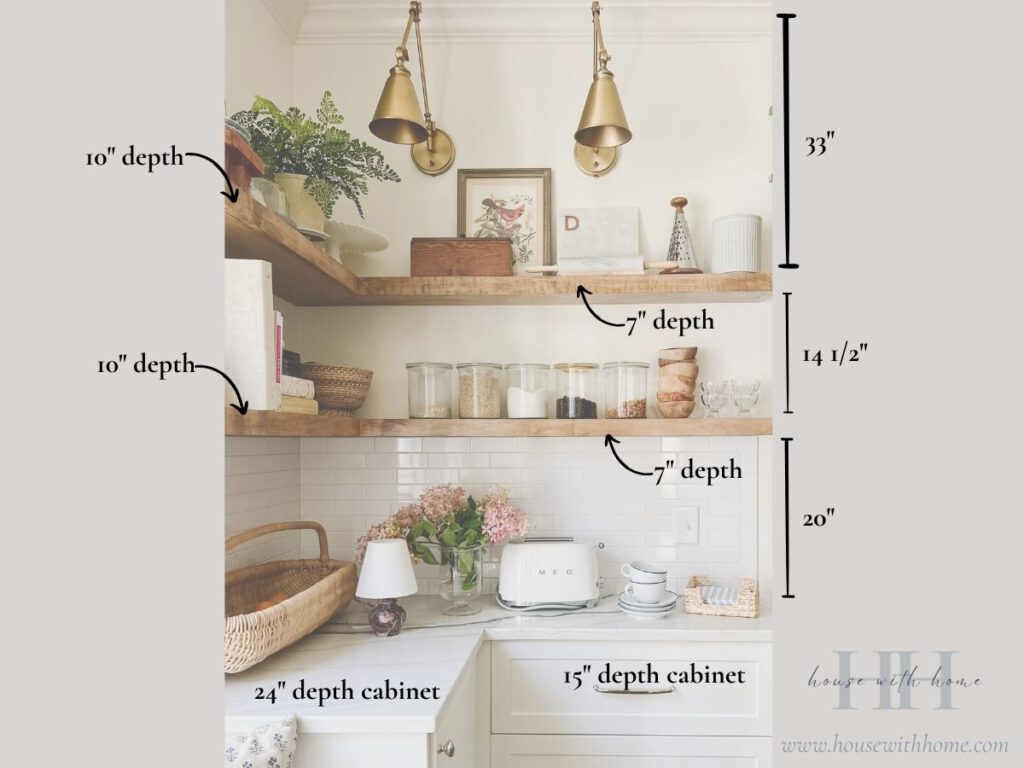
Choosing the Right Material for Your Kitchen Layout
Your shelf location dictates material choice. Under-sink shelves need waterproof vinyl—contact paper delaminates from humidity. Near stovetops, avoid vinyl and wallpaper; use heat-resistant cork or paint instead. For glass-front cabinets, pick transparent liners (like clear acrylic sheets cut to size) that make dishes “float.” Open shelving demands thicker materials (bamboo or cork) that look intentional, not like cover-ups. Never use adhesive products on unfinished wood—they bleed stains. Always test a small area first: tape a liner scrap overnight to check for discoloration.
Essential Prep Work Before Applying Any Covering
Skipping prep guarantees bubbling or peeling. First, empty shelves and wipe with TSP cleaner (trisodium phosphate)—it strips grease better than vinegar. Rinse with damp cloth and wait 1 hour until completely dry. Sand glossy surfaces lightly with 320-grit paper; wipe dust with microfiber cloth. For warped shelves, place heavy books overnight to flatten. Pro move: Outline shelf edges with painter’s tape before applying liner—this creates crisp lines and catches excess adhesive. If shelves wobble, tighten mounting screws now; covering won’t fix structural issues.
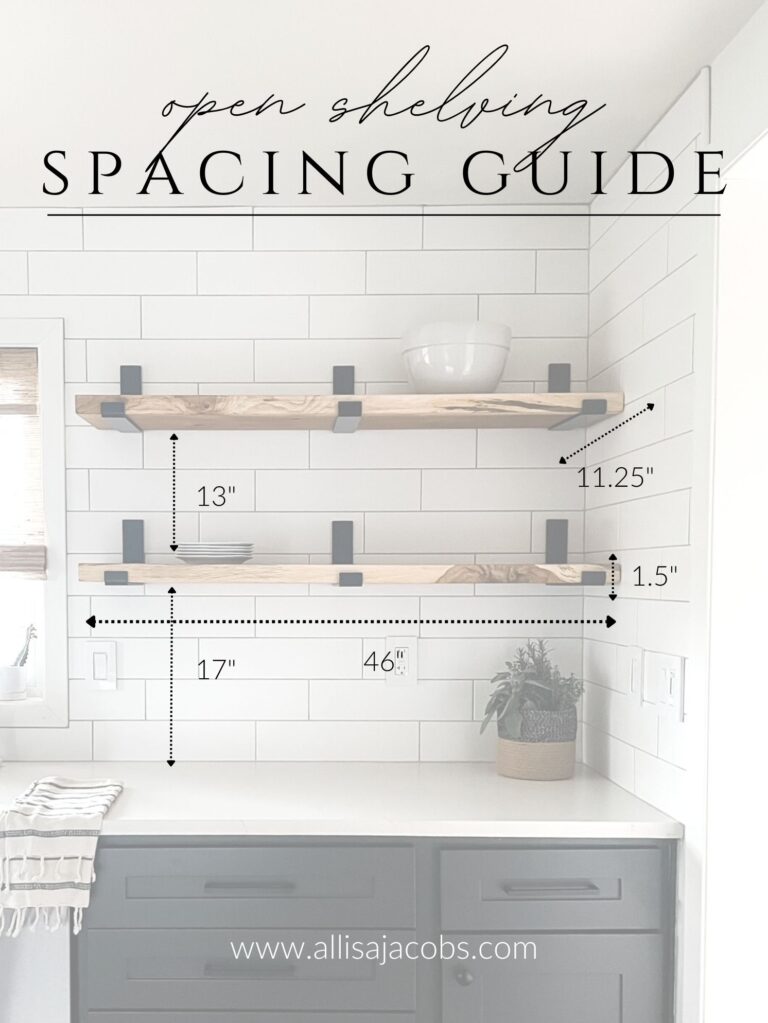
How to Measure Shelves Perfectly (No More Gaps or Overhangs)
Measure width at three points: front, middle, back. Shelves often bow, so use the smallest measurement. For depth, measure from cabinet front to back wall—don’t assume standard depths. Critical trick: Cut liners 1/4 inch smaller than measurements. Example: A 12.2-inch deep shelf gets a 11.95-inch liner. This prevents visible edges when closing cabinet doors. Always cut vertically; horizontal seams show when viewed from below. Use a metal ruler and rotary cutter for straight lines—scissors cause jagged edges.
3 Costly Mistakes That Ruin Shelf Covering Projects

Mistake 1: Ignoring expansion gaps
Materials swell in humidity. Vinyl and cork need 1/8-inch space at walls. Without it, liners buckle into unsightly waves within weeks.
Mistake 2: Rushing the adhesive set time
Peel-and-stick products need 72 hours to bond fully. Loading dishes too soon causes edge lifting. Place a light towel on covered shelves for the first day to weigh them down.
Mistake 3: Using the wrong liner thickness
Thin contact paper (under 0.5mm) tears when moving heavy items. For dish storage, use 1mm+ thickness. Conversely, thick liners (over 2mm) prevent cabinet doors from closing.
Maintaining Covered Shelves for Long-Term Beauty
Wipe spills immediately with a damp microfiber cloth—never paper towels (they scratch). For sticky residue, use 50/50 water-vinegar spray. Reusable fabric covers should be washed monthly in cold water; air dry to prevent shrinkage. Every 6 months, inspect edges for lifting and re-adhere with glue dots. Pro tip: Place felt pads under heavy pots to prevent liner dents. With proper care, vinyl and cork lasts 5+ years; contact paper typically needs replacing every 2 years.
Transform Your Kitchen Today—No Skills Required
Covering kitchen shelves is the ultimate high-impact, low-effort upgrade. You’ve got the exact measurements, material hacks, and mistake-proof steps to tackle this in a single afternoon. Start with one shelf as a test run—your spice rack or under-sink cabinet—to build confidence. Once you see how crisp and clean it looks, you’ll race to do the rest. Remember: perfect edges come from slow application, not expensive tools. Grab a roll of matte vinyl or adhesive cork this weekend, and by Monday, your kitchen will feel like a whole new space. For next steps, try coordinating your shelf liner with drawer liners using the same material—it creates designer-level cohesion that costs less than your morning coffee run.


