
You’ve noticed greasy buildup on your cabinet fronts, stubborn fingerprints around handles, and maybe even some mysterious sticky spots that won’t wipe away. If you’re searching for “how to clean Wren kitchen cabinets,” you’re not alone—many homeowners want specific care instructions for these popular UK-made cabinets. While official Wren documentation would provide the most precise guidance, the cleaning principles for most quality kitchen cabinets are surprisingly similar regardless of brand. The right approach depends primarily on your cabinet’s finish rather than its manufacturer. This guide delivers practical, effective cleaning techniques that work for virtually all cabinet types, including those with finishes commonly found on Wren kitchens.
Kitchen cabinets take a beating from cooking splatters, hand oils, and daily wear. Using the wrong cleaning method can damage finishes, leaving cabinets looking worse than before you started. Many homeowners make the critical mistake of reaching for harsh chemicals that strip protective coatings, especially on modern matte or painted finishes. This comprehensive guide walks you through identifying your cabinet material, selecting appropriate cleaning solutions, and implementing proper techniques that maintain your kitchen’s appearance without causing damage. You’ll learn time-tested methods that professional cleaners use and discover why some “common sense” approaches actually harm cabinet surfaces.
Identifying Your Cabinet Finish Before Cleaning

Before applying any cleaner, you must determine your cabinet’s surface type. Using the wrong method on the wrong finish causes irreversible damage—what works for wood won’t suit laminate, and glossy finishes need different care than matte. Most Wren cabinets (like many modern kitchen brands) use either painted finishes, laminate, or thermofoil materials rather than natural wood. To identify your finish, examine a hidden area like the inside of a cabinet door.
How to Perform the Finish Identification Test
Conduct this simple test in an inconspicuous location:
- Apply a small amount of mineral spirits to a cotton ball
- Gently rub a hidden area for 5 seconds
- Observe what happens to the surface:
– If the finish softens or comes off: You have a painted finish
– If nothing happens: You likely have laminate or thermofoil
– If it slightly darkens but doesn’t remove: Could be sealed wood
Critical mistake to avoid: Never test cleaning solutions on visible surfaces first. Many homeowners damage their cabinet fronts by skipping this identification step and using inappropriate cleaners.
Why Finish Identification Matters for Cleaning Results
Your cabinet’s finish determines everything about your cleaning approach. Painted cabinets (common in contemporary Wren kitchens) require pH-neutral cleaners to prevent dulling, while laminate surfaces can handle slightly stronger solutions but are vulnerable to water seepage at edges. Matte finishes—increasingly popular for their modern look—show every streak and require special microfiber techniques. Glossy finishes hide imperfections better but reveal every fingerprint. Understanding your specific surface prevents costly mistakes like using abrasive pads on soft paint or ammonia-based cleaners on wood.
Essential Cleaning Solutions for Modern Kitchen Cabinets
You don’t need expensive specialty products for effective cabinet cleaning. The right homemade solutions work better than many commercial cleaners and won’t damage protective finishes. Most cabinet damage occurs from using inappropriate store-bought products containing harsh chemicals that manufacturers don’t warn about on labels.
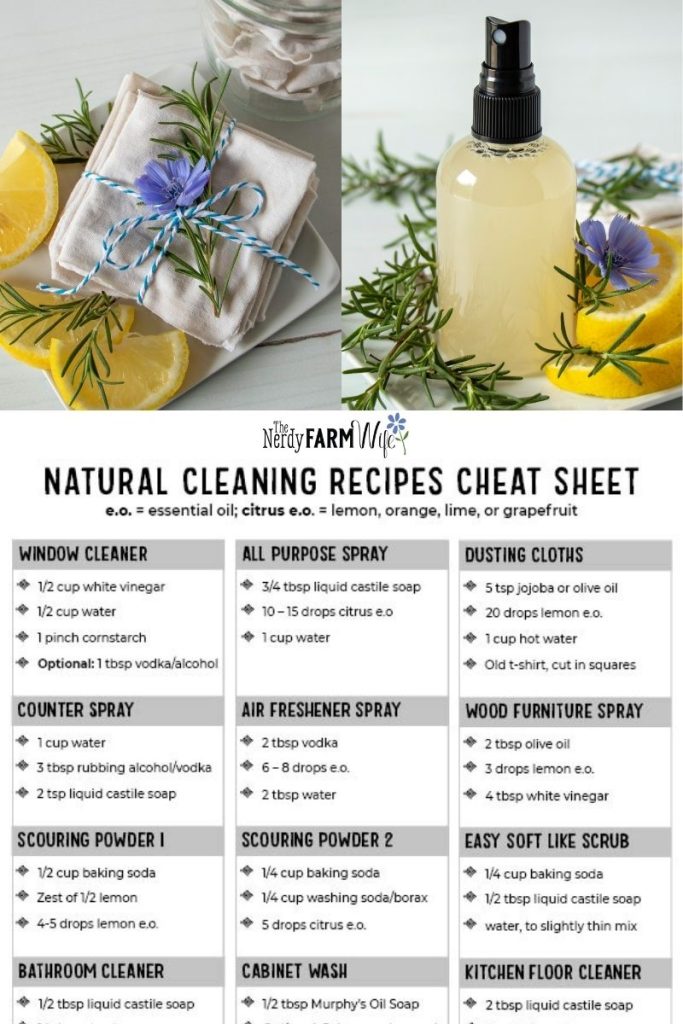
Creating the Perfect All-Purpose Cabinet Cleaner
This versatile solution works on most finishes when properly diluted:
- 2 cups warm water
- ¼ cup white vinegar (for grease-cutting power)
- 1 teaspoon mild dish soap (free of degreasers)
- 10 drops lemon essential oil (optional for freshness)
Pro tip: Always test any solution on an inconspicuous area first. Spray onto a microfiber cloth rather than directly onto cabinets to prevent liquid seepage into edges and joints.
Specialty Solutions for Tough Cabinet Problems
Different cabinet issues require targeted approaches:
For greasy buildup on upper cabinets: Increase vinegar to ½ cup in the basic solution and add 1 tablespoon baking soda. Apply with a soft sponge, let sit for 2 minutes (don’t let dry), then wipe with a damp microfiber cloth.
For sticky residue around handles: Mix equal parts water and rubbing alcohol in a spray bottle. Apply to a cloth (never directly) and gently rub problem areas. The alcohol evaporates quickly without leaving residue.
For water spots on matte finishes: Use a 50/50 mix of distilled water and white vinegar on a microfiber cloth, wiping in the direction of any grain pattern. Immediately follow with a dry microfiber cloth using light pressure.
Step-by-Step Cabinet Cleaning Process That Protects Finishes
Most homeowners clean cabinets haphazardly, causing uneven results and potential damage. A systematic approach delivers professional-looking results without harming surfaces. The key is working from top to bottom and addressing hardware properly.
Preparing Your Cabinets for Cleaning
Before applying any cleaner, complete these essential preparation steps:
- Remove all items from countertops below cabinets
- Take down cabinet hardware (handles/knobs) if possible—this allows thorough cleaning of mounting areas
- Vacuum cabinet tops and edges with a soft brush attachment to remove loose dust
- Lay towels on countertops to protect from drips
- Open windows for ventilation if using vinegar solutions
Time estimate: 15-20 minutes for a standard kitchen. Skipping preparation leads to streaky results and potential damage from unremoved debris.
Proper Technique for Cleaning Cabinet Fronts and Doors
Follow this method for streak-free results:
- Start with upper cabinets, working left to right
- Spray your cleaning solution onto a microfiber cloth (never directly on cabinets)
- Wipe using gentle downward strokes—this follows natural grain patterns on most finishes
- For stubborn spots, hold the damp cloth against the area for 30 seconds before gently rubbing
- Immediately dry with a second clean, dry microfiber cloth using light pressure
- Pay special attention to edges and corners where grime accumulates
Visual cue: Stop when the surface looks uniformly clean with no darker or lighter patches. Over-wiping creates swirl marks, especially on matte finishes.
Critical Mistakes That Damage Cabinet Finishes

Many standard cleaning practices actually harm modern cabinet surfaces. These common errors cause irreversible damage that requires professional refinishing to correct.
Products That Destroy Cabinet Finishes
Avoid these cabinet killers at all costs:
- Ammonia-based cleaners (like Windex): Cause painted finishes to yellow and crack
- Bleach or chlorine products: Strip protective coatings and discolor materials
- Abrasive cleaners (Comet, Soft Scrub): Create micro-scratches that trap dirt
- Oven cleaners: Too caustic—will dissolve most modern finishes
- Undiluted vinegar: Too acidic for frequent use on stone or wood surfaces
Expert note: Many all-purpose cleaners contain hidden damaging ingredients. Check labels for “ammonia,” “bleach,” “sulfuric acid,” or “hydrochloric acid”—if present, don’t use on cabinets.
Technique Errors That Shorten Cabinet Life
Even with proper cleaners, incorrect techniques cause damage:
- Using circular wiping motions (creates visible swirls)
- Letting cleaning solution dry on surfaces
- Scrubbing too hard, especially on matte finishes
- Neglecting to dry surfaces thoroughly
- Using paper towels (can scratch and leave lint)
Maintaining Clean Cabinets Between Deep Cleanings
Preventive care reduces the need for intensive cleaning sessions and extends the life of your cabinet finishes. Daily habits make a significant difference in maintaining that “just cleaned” appearance.
Daily and Weekly Maintenance Routine
Implement these simple habits:
- Wipe handles and high-touch areas daily with a dry microfiber cloth
- After cooking, quickly wipe cabinet fronts near the stove with a slightly damp cloth
- Keep a small spray bottle of your all-purpose solution under the sink for quick touch-ups
- Address spills immediately before they dry and harden
- Use cabinet liners inside upper cabinets to catch dust and crumbs
Pro tip: Place a small footstool in your kitchen for easy access to upper cabinets—this encourages regular quick cleaning of hard-to-reach areas.
Seasonal Deep Cleaning Schedule
For lasting cabinet beauty, follow this maintenance calendar:
- Monthly: Clean cabinet fronts with your all-purpose solution
- Quarterly: Remove hardware and clean mounting areas thoroughly
- Bi-annually: Clean inside of cabinets and wipe down shelves
- Annually: Inspect for any finish damage and address immediately
Final Note: Proper cabinet cleaning isn’t about finding one magic product—it’s about understanding your specific surfaces and using appropriate techniques. While this guide provides universal principles applicable to most cabinet types including those with finishes similar to Wren kitchens, always consult official manufacturer care instructions when available. For Wren cabinet owners specifically, contacting Wren Kitchens directly for their official care guide remains the best practice for brand-specific maintenance. By following these methods consistently, you’ll keep your kitchen looking fresh and well-maintained without risking damage to your investment. The time you invest in proper cabinet care today prevents costly refinishing or replacement down the road.


