
Outdoor kitchens are a fantastic addition to any home, but without proper cleaning routines, grease buildup, weather damage, and stubborn stains can quickly turn your dream cooking space into a maintenance nightmare. Many homeowners discover too late that standard indoor cleaning methods don’t work for outdoor cooking areas exposed to sun, rain, and temperature extremes. You’ll learn industry-approved techniques to keep your outdoor kitchen looking new while extending its lifespan—without damaging expensive surfaces or voiding warranties. By following these specific cleaning protocols, you’ll maintain a hygienic cooking environment that’s ready for spontaneous gatherings.
Immediate Grease and Food Residue Removal After Cooking
The most critical cleaning happens right after you finish cooking when surfaces are still warm but not hot. Grease that cools and hardens becomes exponentially more difficult to remove, requiring harsh chemicals that can damage surfaces over time.
Why Post-Cooking Cleaning Matters Most
Waiting until the next day to clean your outdoor kitchen allows grease to polymerize—a chemical process where liquid fats transform into a sticky, rubbery substance that bonds tightly to surfaces. This hardened grease attracts dust and dirt, creating a grimy layer that pressure washing alone cannot remove. Cleaning while surfaces are still warm (but not hot enough to cause burns) allows you to wipe away 90% of residues with minimal effort.
Step-by-Step Post-Cooking Cleaning Protocol
- Wait for safe temperatures – Allow surfaces to cool to approximately 100°F (just warm to touch) before cleaning
- Apply citrus-based degreaser – Spray generously on grates, grease trays, and adjacent surfaces
- Let dwell for 3-5 minutes – This breaks down grease without harsh fumes
- Scrub with non-abrasive brush – Use stainless steel-specific brushes to avoid scratching
- Wipe with microfiber cloths – Use multiple cloths to prevent redistributing grease
- Final rinse with clean water – Remove all cleaning residue to prevent buildup
Pro tip: Keep a dedicated outdoor kitchen cleaning caddy stocked with supplies near your cooking area so you never skip this crucial step.
Deep Cleaning Stainless Steel Surfaces Without Damage

Many homeowners accidentally damage expensive stainless steel components by using inappropriate cleaners or techniques that create permanent scratches, compromising both appearance and corrosion resistance.
How to Identify Your Stainless Steel Finish
Before cleaning, determine your stainless steel finish type as cleaning methods vary significantly:
– Brushed finish: Visible parallel grain lines (most common)
– Mirror finish: Highly reflective, like a mirror
– Satin finish: Soft sheen with subtle texture
Using the wrong technique on brushed stainless creates “swirl marks” that ruin the uniform appearance, while abrasive cleaners on mirror finishes create permanent micro-scratches.
Stainless Steel Deep Cleaning Procedure
- Remove surface debris with dry microfiber cloth
- Apply stainless steel cleaner following the grain direction
- Use non-scratching pads specifically designed for stainless
- Wipe in direction of grain—never circular motions
- Rinse thoroughly with clean water
- Dry completely with lint-free cloth to prevent water spots
Warning: Never use steel wool, abrasive cleaners, or chlorine-based products on stainless steel—they cause pitting and corrosion that worsens over time.
Concrete Countertop Stain Removal Techniques
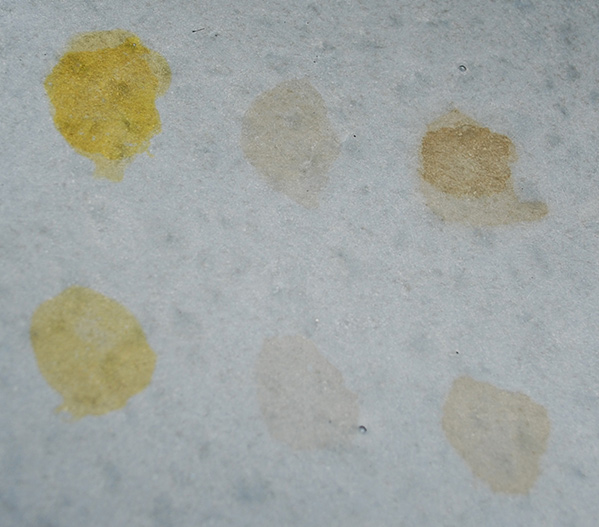
Staining is the most common issue with outdoor concrete countertops, especially from acidic foods like tomatoes, wine, or citrus that etch the surface if not cleaned promptly.
Identifying Stain Types on Concrete
Different stains require different treatments:
– Oil-based stains (grease, cooking oils): Darker spots that don’t lighten when wet
– Organic stains (food, leaves): Yellowish-brown discoloration
– Metal stains (rust from tools): Orange or reddish discoloration
– Alkaline etching (from improper cleaners): Dull, lighter areas
Concrete Stain Treatment Protocol
For fresh oil-based stains (less than 24 hours):
1. Cover with baking soda or cornstarch to absorb
2. Wait 2-3 hours, then brush off
3. Apply poultice of dish soap and baking soda
4. Cover with plastic wrap overnight
5. Rinse thoroughly
For set-in stains:
1. Create alkaline solution (1 part ammonia to 3 parts water)
2. Apply to stain, cover with plastic wrap
3. Wait 24 hours before rinsing
4. Repeat if necessary
Never use vinegar or acidic cleaners on concrete—they etch the surface and worsen staining.
Grill Grate Cleaning Methods That Prevent Rust
Improper grill grate cleaning is the leading cause of premature rust formation, especially on cast iron and steel grates exposed to outdoor elements.
When to Clean Grill Grates: Timing Matters
Cleaning timing significantly affects rust prevention:
– During cooking: When grates reach 500°F+, carbonized residues release more easily
– Immediately after cooking: While still warm (200-300°F)
– Never clean when cold: Causes moisture trapping in microscopic pores
Rust-Preventive Grill Grate Cleaning
- Brush while hot – Use brass-bristled grill brush during final cooking minutes
- Cool to warm temperature (200-300°F)
- Apply high-heat oil (avocado or grapeseed oil) with paper towel
- Wipe evenly across entire grate surface
- Allow to polymerize for 15 minutes before covering
Pro tip: Season cast iron grates monthly with a thin coat of oil baked on at 400°F for 1 hour to maintain protective layer.
Tile and Grout Cleaning for Outdoor Kitchen Backsplashes

Outdoor kitchen tiles face unique challenges from weather exposure combined with cooking splatters, creating stubborn grime that standard indoor tile cleaners can’t handle.
Weather-Resistant Tile Cleaning Solution
Create a cleaning solution that withstands outdoor elements:
– 1 cup hydrogen peroxide (3%)
– ½ cup baking soda
– 1 tablespoon liquid dish soap
– 2 cups hot water
This mixture effectively removes cooking residues while inhibiting mold growth better than vinegar solutions that evaporate quickly outdoors.
Effective Tile and Grout Scrubbing Technique
- Pre-rinse with garden hose to remove loose debris
- Apply cleaning solution generously to grout lines
- Use narrow-angle brush (15-30 degree angle) for grout
- Scrub in one direction following grout lines
- Rinse thoroughly with low-pressure setting
- Apply tile sealant after 48 hours of drying
Warning: Avoid high-pressure washers directly on grout—they erode the material over time, creating gaps for moisture penetration.
Seasonal Deep Cleaning Schedule for Longevity
Most outdoor kitchen damage occurs from neglecting seasonal maintenance specific to changing weather patterns and usage frequency.
Spring Cleaning Protocol
- Complete grease system flush – Replace all grease filters and trays
- Check for winter damage – Inspect for rust, cracks, or material fatigue
- Deep clean ventilation – Remove and clean chimney caps and ducts
- Reapply protective coatings – To metal surfaces and concrete
Fall Winterization Steps
- Thorough grease removal – Prevents rancidity during storage
- Apply corrosion inhibitors to all metal components
- Seal concrete surfaces with penetrating sealer
- Install protective covers designed for your specific equipment
Final Note: Consistent cleaning prevents 80% of outdoor kitchen maintenance issues. The key is matching your cleaning methods to specific materials and acting promptly after cooking sessions. By implementing these targeted techniques, your outdoor kitchen will remain functional and attractive for years. Remember that prevention is always easier than restoration—spending 10 minutes cleaning after each use saves hours of deep cleaning later. For best results, establish a cleaning routine that matches your usage frequency and local climate conditions.


