
Discovering mold on your kitchen appliances isn’t just unsightly—it’s a serious health hazard that can contaminate your food and spread spores throughout your home. From the dark patches on your refrigerator seal to the musty smell coming from your dishwasher, mold thrives in the warm, moist environments created by everyday kitchen equipment. If you’ve spotted fuzzy black, green, or white growth on your coffee maker reservoir or blender gasket, you need immediate, effective solutions to eliminate this problem safely. The good news is that with the right approach, you can restore your appliances to mold-free condition without costly replacements or professional services. This guide provides appliance-specific cleaning techniques that target mold at its source, using solutions you likely already have in your home.
Essential Safety Precautions Before Cleaning Mold
Never begin mold removal without proper protection—mold spores become airborne during cleaning and can cause respiratory issues when inhaled. Always wear disposable nitrile or latex gloves to prevent skin contact with both mold and cleaning solutions. A N-95 respirator is critical for filtering airborne spores; surgical masks offer minimal protection against microscopic mold particles. Safety goggles without ventilation holes shield your eyes from splashes, especially when using vinegar or hydrogen peroxide solutions. Open windows and activate exhaust fans before starting to create cross-ventilation that carries spores outside rather than allowing them to settle elsewhere in your kitchen. People with asthma, allergies, or compromised immune systems should avoid mold cleaning entirely—delegate this task or consider professional remediation.
Identify Where Mold Hides in Kitchen Appliances
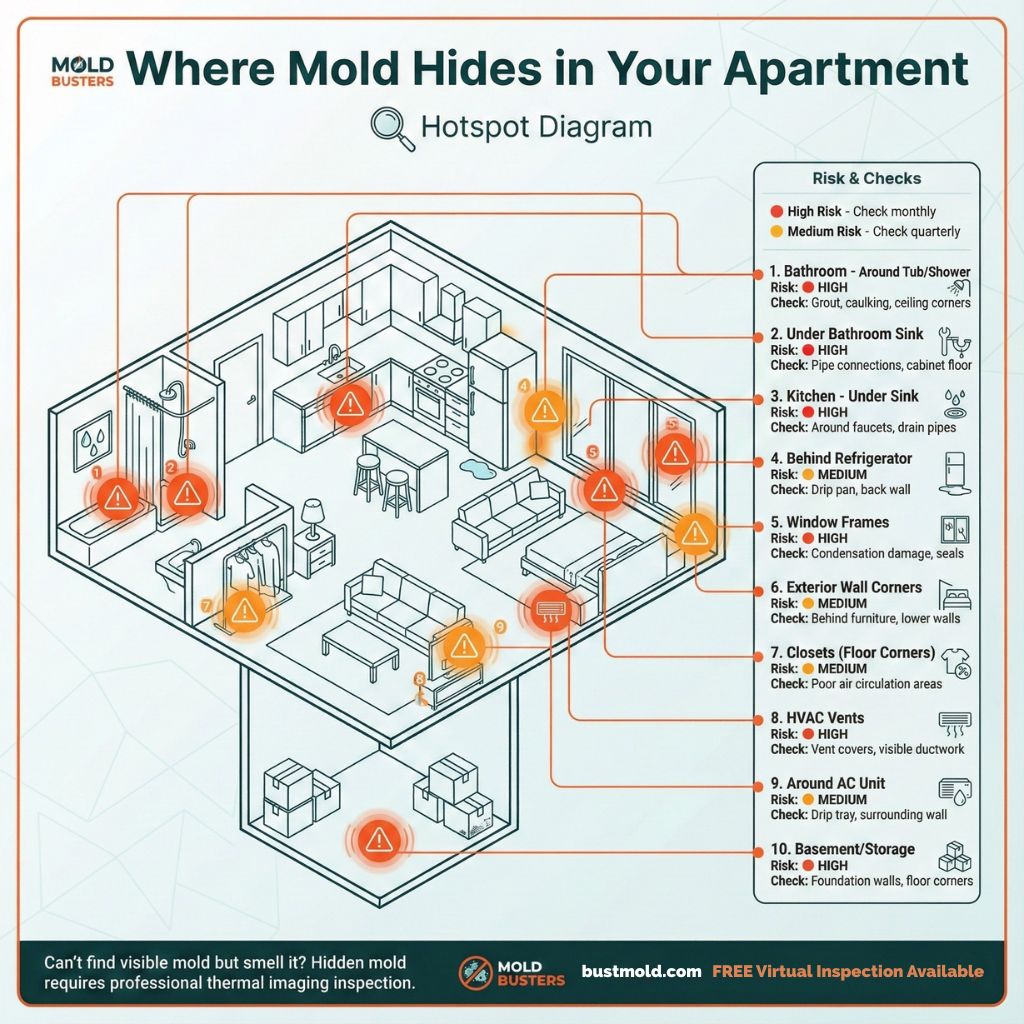
Mold often develops in unexpected places where moisture accumulates unnoticed. In refrigerators, inspect the door gasket folds, drip pan underneath the unit, and vegetable crisper drawers where condensation collects. Dishwashers harbor mold in the door gasket, filter assembly, and spray arm holes—run your finger along the seal to feel for slimy residue that indicates hidden growth. Coffee makers develop mold in the water reservoir, internal tubing, and around the brew basket where coffee oils combine with moisture. Blenders and food processors commonly grow mold along the rubber gasket where the blade attaches to the container—remove the blade assembly to check this critical area. Even small appliances like toaster ovens develop mold in crumb trays and around heating elements where food particles accumulate.
Gather Your Cleaning Supplies
Prepare these essential items before starting: white distilled vinegar in a spray bottle for natural disinfection, baking soda for gentle scrubbing, hydrogen peroxide (3%) for stubborn stains, and microfiber cloths that won’t leave lint behind. You’ll need various brushes—a soft toothbrush for crevices, a small bottle brush for narrow openings, and a medium scrub brush for larger surfaces. Don’t forget disposable gloves, an N-95 mask, and safety goggles. For severe cases, have commercial mold removers like Concrobium Mold Control on hand, but avoid bleach on porous surfaces as it only kills surface mold without penetrating to roots.
Clean Mold from Refrigerator Components

Start with the door gasket—remove it if possible by gently pulling from its track. Soak in hot, soapy water for 30 minutes, then scrub each fold with a toothbrush dipped in vinegar. For stubborn black mold, make a paste of baking soda and water, apply directly, and let sit for 15 minutes before scrubbing again. Rinse thoroughly and dry completely before reinstalling. Access the drip pan (usually at the front bottom of the refrigerator), empty any standing water, and scrub with vinegar solution—replace the pan only when completely dry. For interior surfaces, remove all shelves and drawers, wash in hot, soapy water with added vinegar, and wipe the entire interior with a 1:3 vinegar-water solution. Never skip the drying step—use a dry microfiber cloth on all surfaces before replacing food items.
Restore Your Dishwasher to Mold-Free Condition
Begin by removing and cleaning the filter—soak in hot, soapy water for 30 minutes, then scrub with an old toothbrush to remove all debris. Clear clogged spray arm holes using a toothpick, being careful not to enlarge them. Soak the entire spray arm in vinegar for 30 minutes to dissolve mineral deposits. Wipe the door gasket thoroughly with vinegar, lifting and cleaning each fold with an old toothbrush. For the final step, place a bowl of vinegar on the top rack and run a hot cycle without dishes—this sanitizes the entire system. Leave the door open after cleaning to ensure complete drying, as trapped moisture causes immediate regrowth.
Eliminate Mold from Coffee Makers and Espresso Machines
:strip_icc()/How_to_clean_coffeemaker_0201-Step-01-Clean-With-Vinegar-828dacfe7f974698ad332dac86b70ed8.jpg)
Fill the water reservoir with equal parts white vinegar and water, then run a partial brew cycle and let it sit for 30 minutes. Complete the cycle, then run two full cycles with clean water to flush all vinegar residue. Remove the brew basket and soak in vinegar for 30 minutes before scrubbing with a soft brush. For carafes, fill with warm water, dish soap, and a handful of rice—swirl vigorously to remove stains without scratching. Clean the drip tray thoroughly with vinegar solution, paying special attention to corners where residue accumulates. For espresso machines with milk frothing systems, disassemble all components and soak in hot, soapy water before running vinegar through the system.
Treat Mold in Small Appliances and Accessories
For blenders and food processors, remove the blade assembly and inspect the rubber gasket for mold—soak the gasket in vinegar for 15 minutes if affected. Clean the container interior with baking soda paste and a bottle brush, avoiding abrasive scrubbers on plastic surfaces. Wipe the motor base with a damp cloth (never submerge in water), paying attention to buttons and connection points. Clean all accessories and storage compartments thoroughly, ensuring complete drying before reassembly. Store appliances with lids slightly ajar to allow air circulation—never store damp components together.
Natural Cleaning Solutions for Mold Remediation
White vinegar kills 82% of mold species on contact—apply undiluted to affected surfaces and let sit for one hour before wiping. Baking soda paste provides gentle abrasion for scrubbing without damaging surfaces while absorbing residual moisture. Hydrogen peroxide (3%) effectively kills mold and removes stains—apply directly, let bubble for 10 minutes, then wipe clean. Tea tree oil mixed with water (1 tsp per cup) creates a powerful preventive spray—apply to cleaned surfaces and let air dry. These natural solutions work effectively for most kitchen appliance mold problems without harsh chemical fumes.
Prevent Mold from Returning to Your Appliances
Wipe down appliance surfaces immediately after use to remove moisture and food residue. Run a vinegar cleaning cycle in your dishwasher monthly and clean coffee maker reservoirs weekly. Leave refrigerator and dishwasher doors slightly ajar when not in use to allow complete drying. Store small appliances with lids removed or slightly open to prevent moisture trapping. Set monthly reminders to inspect and clean vulnerable areas like refrigerator gaskets and drip pans. Address any appliance leaks immediately—even small drips create ideal mold conditions over time.
When to Call Professional Remediation Services
Seek professional help if mold covers more than ten square feet, appears in multiple appliances simultaneously, or returns despite thorough cleaning. Stop immediately and consult a professional if cleaning triggers respiratory symptoms, as certain mold species produce dangerous mycotoxins. Professionals have specialized equipment to locate hidden moisture sources causing persistent mold problems. In some cases, replacing heavily contaminated components may be more cost-effective than repeated remediation attempts.
Final Thoughts on Maintaining a Mold-Free Kitchen
Consistent preventive habits form your best defense against kitchen appliance mold. Monthly inspections take just minutes but catch problems early when they’re easiest to address. Immediate cleanup of spills and moisture eliminates mold’s foundation before it establishes. Proper ventilation and humidity control transform your kitchen into an environment where mold cannot thrive. While most mold problems respond well to DIY cleaning, don’t hesitate to seek professional help when health concerns arise or infestations prove persistent. By following these appliance-specific techniques, you’ll protect your family’s health and extend the life of your kitchen equipment—ensuring your kitchen remains a safe space for preparing food you can trust.


