
Your kitchen faucet isn’t just a functional necessity—it’s a daily workhorse that should make your life easier, not more frustrating. Too many homeowners select kitchen faucets based solely on style, only to discover later that the size creates splashing problems, difficulty filling pots, or awkward positioning that disrupts their workflow. How to choose the right size kitchen faucet requires careful measurement of your sink configuration and understanding how different dimensions impact your daily tasks. A properly sized faucet delivers water precisely where you need it, accommodates your largest cookware, and creates visual harmony with your sink and countertop.
The wrong size choice leads to constant compromises: a faucet that’s too short forces you to tilt pots dangerously close to the edge, while an oversized model splashes water across your countertops. This guide cuts through the confusion by focusing on the specific measurements that actually matter for your kitchen layout. By the time you finish reading, you’ll know exactly how to measure your sink, calculate the ideal spout reach and height, and avoid the most common sizing mistakes that send perfectly good faucets back to the store.
Measure Your Sink Configuration First
Your sink dimensions dictate the acceptable range for faucet size—ignoring these measurements guarantees frustration after installation. Start by measuring your sink basin depth from bottom to rim; deeper sinks (10+ inches) require taller faucets to clear the rim, while shallow sinks (under 8 inches) work better with compact designs. Next, measure your sink width at its widest point to determine appropriate spout reach.
The most critical measurement is the distance from your sink edge to the faucet mounting holes. Measure from the sink rim to the center of where your faucet will mount—this directly determines your minimum required spout reach. For double-basin sinks, measure to the center point between basins since you’ll likely position your faucet there for maximum versatility.
Don’t forget overhead clearance constraints. Measure from your mounting surface to the bottom of cabinets, windows, or pot racks above your sink, then subtract 3-4 inches for comfortable operation. This calculation gives you your maximum allowable faucet height. Many homeowners discover too late that their dream faucet hits the bottom of overhead cabinets when the spray head extends upward.
Understanding Spout Reach
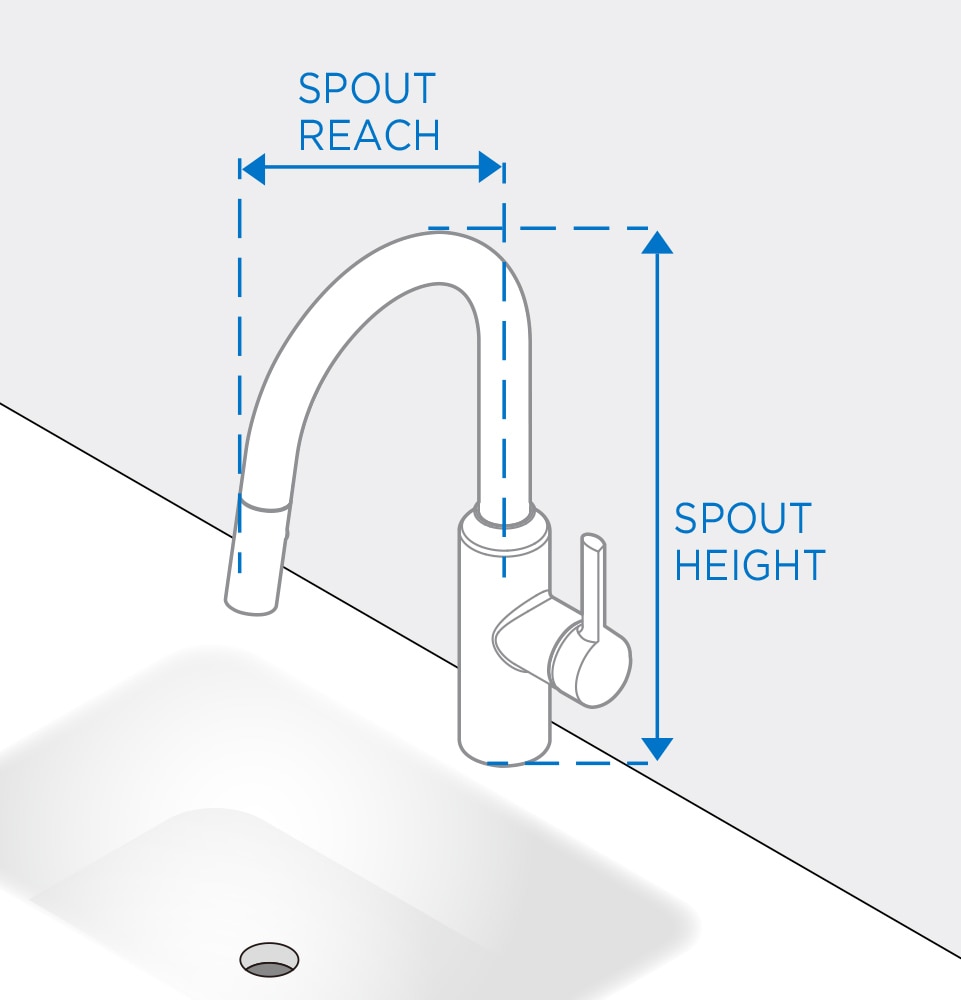
Spout reach—the horizontal distance from mounting point to spout opening—determines whether water covers your entire sink basin. A reach that’s too short leaves corners dry and forces awkward repositioning of cookware, while excessive reach causes splashing and visual imbalance.
For standard single-basin sinks (22-24 inches wide), an 8-9 inch reach delivers water to the basin center while maintaining an effective spray pattern. Narrow sinks under 18 inches need only 6-8 inch reaches, while oversized sinks over 30 inches require 10+ inches of reach. Double-basin sinks demand special attention—position your faucet between basins and ensure the reach extends to each basin’s center. Most standard double-basin configurations need 9-10 inch reaches, but if you regularly fill both sides simultaneously, consider a faucet with extended reach or a separate pot filler.
Island sinks present unique challenges since the faucet mounts on narrow counter space while serving a sink positioned away from surrounding cabinetry. These setups often require 10-12 inch reaches combined with high-arc designs for proper clearance. Wall-mounted faucets solve this problem by freeing counter space and allowing optimal positioning regardless of sink location.
Finding the Ideal Spout Height
Spout height—the vertical distance from mounting base to water outlet—directly impacts your ability to fill large pots and minimize splashing. Standard spout heights range from 3-8 inches (low-arc), 8-12 inches (mid-arc), and 12-18 inches (high-arc or gooseneck designs). Pull-down faucets typically fall in the mid to high range to accommodate spray head movement.
Your tallest regular items—stock pots, vases, or serving platters—should dictate minimum spout height requirements. Always add 2-3 inches of clearance above your tallest vessel to prevent awkward tilting during filling. The relationship between spout height and sink depth is critical for splash prevention—maintain 4-6 inches between spout opening and sink rim for optimal water flow dynamics. Shallow sinks need shorter faucets to maintain this spacing, while deep sinks accommodate taller designs.
Windows behind your sink create special height considerations. Measure from sink rim to window frame bottom, then select a faucet that stays below this line when fully extended. Many homeowners in this situation choose pull-down faucets that provide height flexibility while tucking compactly out of view when not in use.
Overall Faucet Height and Clearance
Overall faucet height includes everything from mounting surface to highest point—including handles, soap dispensers, or extended spray heads. This measurement determines compatibility with overhead obstructions and affects both function and visual proportion.
Measure vertical clearance above your mounting location to cabinets, windows, or pot racks. Maintain 3-4 inches of buffer space between your faucet’s highest point and any obstruction to allow natural hand movement during operation. Pull-down faucets require special attention—measure both retracted height and fully extended spray head position to ensure adequate clearance in all configurations.
Wall-mounted faucets offer unique height flexibility since they’re not constrained by sink dimensions. These work exceptionally well for island sinks where countertop space is limited. However, they require plumbing access within the wall cavity, which may involve additional installation complexity.
Match Faucet Size to Sink Dimensions
The visual and functional relationship between faucet and sink size makes or breaks your kitchen’s aesthetic harmony. An undersized faucet looks trivial over a large sink and struggles to reach all areas, while an oversized model overwhelms compact sinks and creates splashing problems.
For standard single-basin sinks (22-24 inches wide, 18-21 inches deep), choose mid-arc faucets with 8-10 inch reaches and 6-10 inch spout heights. These proportions deliver water effectively while maintaining visual balance—the faucet should dominate the sink area without consuming it. Compact sinks under 18 inches wide need low-arc or compact mid-arc faucets (4-6 inch reaches, under 10 inches tall) to avoid disproportion.
Large farmhouse sinks or commercial-style prep sinks accommodate substantial faucets with 10-12+ inch reaches and 12-16 inch spout heights. These bold designs enhance the sink’s statement-making potential rather than appearing undersized. Double-basin sinks require careful reach calculation—ensure your faucet can deliver water to the center of either basin when positioned between them.
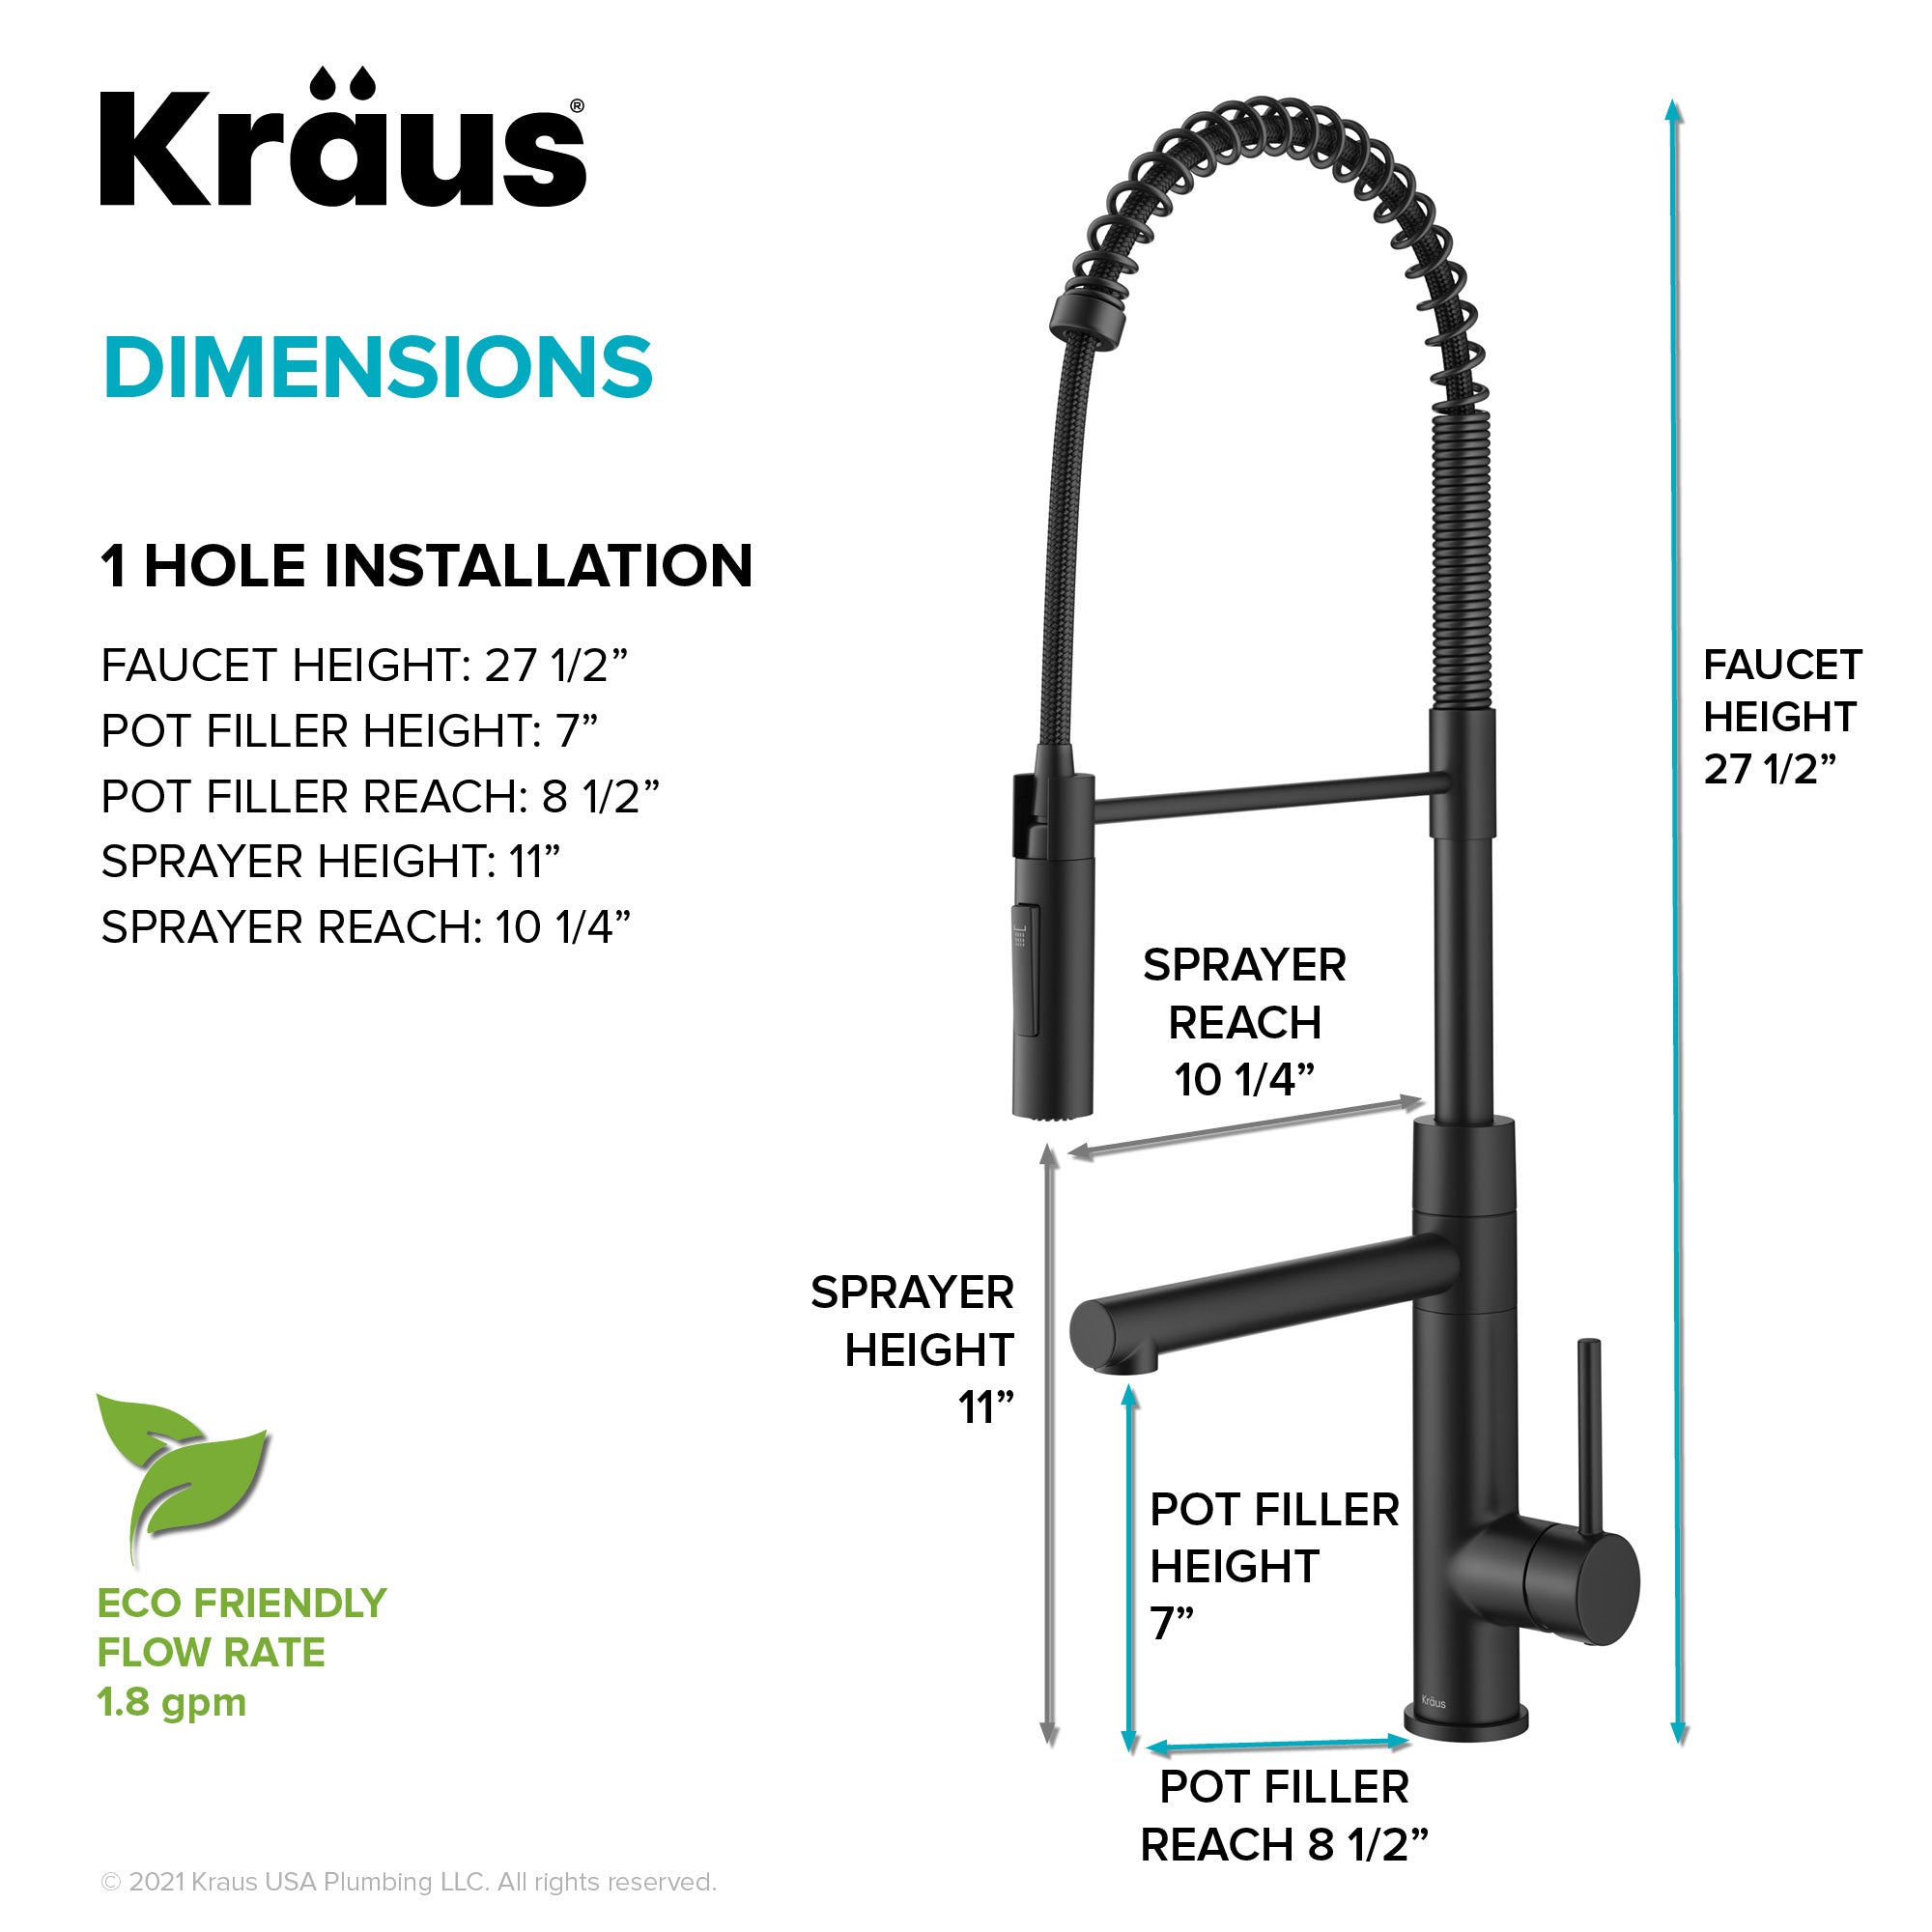
Faucet Types and Their Dimensions

Different faucet types inherently offer distinct size profiles that suit particular installations:
- Single-hole faucets combine all components into one mounting point, typically measuring 5-8 inches tall with 4-6 inch reaches—ideal for compact sinks or minimalist aesthetics
- Centerset faucets feature a spout centered between handles on a single base plate spanning 6-8 inches—perfect for standard three-hole sink configurations
- Widespread faucets with separate spout and handle components allow flexible spacing (6-12 inches between handles), accommodating larger designs with greater reaches
- Wall-mounted faucets free countertop space and offer maximum size flexibility since they’re not constrained by sink dimensions
Pull-down faucets deserve special attention—their retracted height (typically 14-18 inches) must accommodate both static position and spray head extension during use. Hose length (20-30 inches standard) determines practical reach beyond the sink basin.
Avoiding Common Sizing Mistakes
Most faucet returns happen due to preventable sizing errors. The most frequent mistake is selecting insufficient reach for your sink configuration—water won’t reach all areas, forcing manual rinsing of corners. Always calculate minimum reach requirements before shopping.
Equally common is choosing excessive height without verifying overhead clearance. Homeowners discover too late that spray heads hit cabinet bottoms or faucets obstruct windows. Measure before you buy—account for full motion range, not just static height.
Ignoring spout height relative to sink depth causes splash problems: tall faucets over shallow sinks create waterfall effects, while short faucets over deep sinks require awkward tilting. Maintain that critical 4-6 inch space between spout and sink rim.
Failing to account for handle space leads to interference with backsplashes or adjacent items. Evaluate the faucet’s full footprint—including handles in all positions—before purchasing.
Making Your Final Selection
Synthesize your measurements to establish non-negotiable requirements: minimum reach, maximum height, and handle clearance. Filter options to include only faucets meeting these fundamentals—no aesthetic appeal compensates for improper fit.
Prioritize dimensions based on your specific needs: spout height matters most if you frequently fill large stockpots, while reach takes precedence for double-basin sinks. View potential faucets in person to test handle operation and observe scale relative to your body—images can’t capture how a faucet feels in daily use.
Consider long-term adaptability—kitchen needs change as families grow or cooking habits evolve. A slightly more versatile faucet (like a pull-down model) provides valuable flexibility for future requirements. Balance current needs with potential future scenarios to ensure your investment serves you well for years to come.
Installation Considerations
Your chosen faucet must match your sink’s mounting configuration. Standard sinks have pre-drilled hole patterns: one hole for single-hole faucets, three holes for centerset models, or four holes for widespread configurations. Mismatched configurations require deck plates or additional modifications.
Plumbing access determines feasible installations—wall-mounted faucets need supply lines within wall cavities, while deck-mounted models require accessible lines beneath countertops. If existing plumbing doesn’t accommodate your preferred configuration, factor modification costs into your budget.
When in doubt, consult a professional kitchen designer or licensed plumber. Their expertise prevents costly mistakes and ensures proper installation. For DIY installations, follow manufacturer instructions precisely—these detail required hole spacing, connections, and necessary tools to maintain warranty coverage.


