
Your sizzling stir-fry leaves delicious aromas, but lingering smoke and grease clinging to cabinets? That’s your kitchen hood failing its most basic job. Without proper ventilation, cooking vapors deposit sticky residue on every surface within minutes, creating fire hazards and constant cleaning headaches. Choosing the wrong hood wastes money while leaving your home vulnerable to moisture damage and poor indoor air quality. This guide cuts through the confusion with actionable steps to select a hood that actually eliminates cooking byproducts—whether you’re simmering soups daily or searing steaks weekly. You’ll learn exactly how to match hood specs to your cooktop, avoid costly installation mistakes, and identify features that prevent that dreaded post-cooking wipe-down ritual.
Match Your Hood Type to Your Kitchen Layout Immediately
Installing the wrong hood style creates permanent ventilation gaps where grease escapes. Measure your cooking zone first—this determines your only viable options. Wall-mounted hoods work exclusively above range cooktops against walls, while island models require ceiling support for downward airflow. Under-cabinet units slide discreetly beneath upper shelves but demand minimum 24-inch cabinet depth. Downdraft systems rise vertically from behind cooktops but struggle with high-heat tasks like wok cooking. Range hood inserts hide inside custom cabinetry but need precise cutout dimensions.
Why Island Kitchens Demand Specialized Hoods
Island cooktops require hoods with extended reach—standard wall units leave 30% of cooking surfaces uncovered. Look for models with 36+ inch widths and chimney heights starting 30 inches above the cooktop. Shorter installations create turbulence that pushes smoke back into the kitchen. Island hoods also need reinforced mounting since they lack wall support, requiring ceiling joist anchors rather than drywall toggles.
Under-Cabinet Hoods: The Hidden Space Trap
These sleek units fail when cabinet depth falls below 12 inches. Measure from the wall to your cabinet’s front edge before purchasing—many modern European cabinets run only 10-11 inches deep. Units installed in shallow cabinets blow grease onto countertops instead of capturing it. Always verify the hood’s projection depth matches your cabinetry; most require 12-18 inches of clearance behind the face frame.
Calculate Your Exact CFM Needs in 60 Seconds
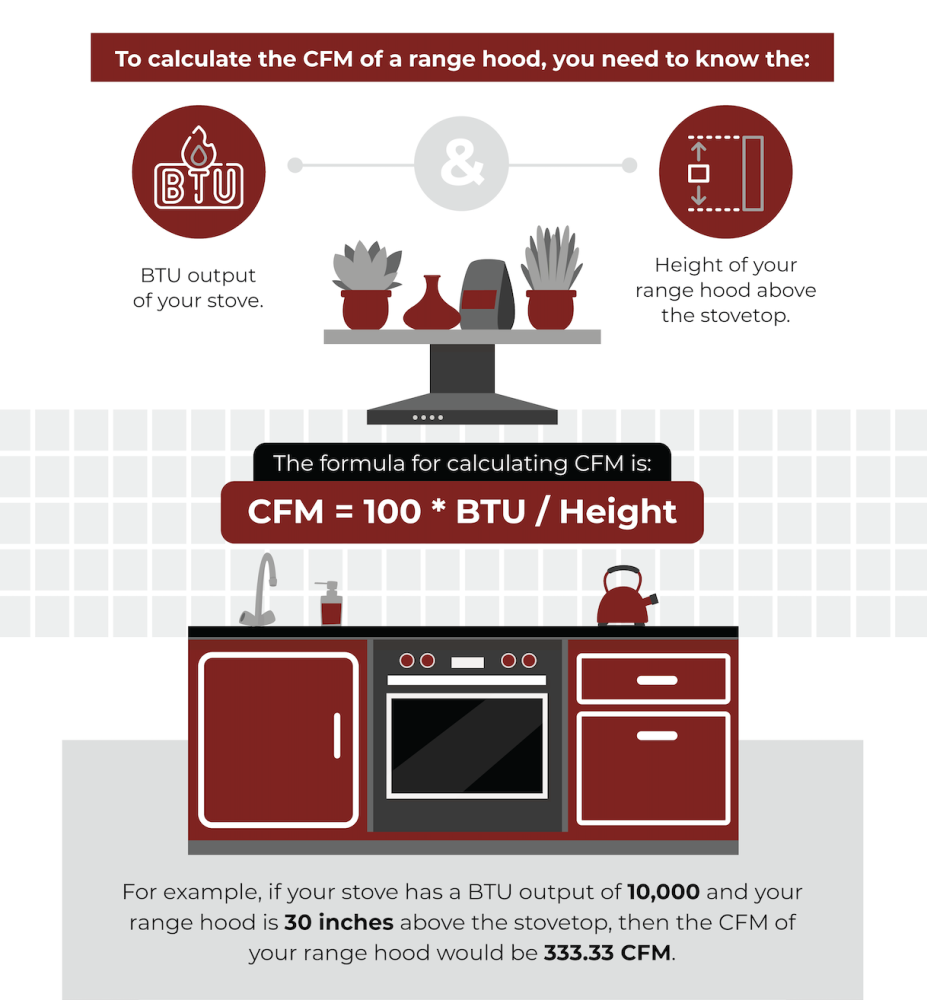
CFM (cubic feet per minute) determines whether your hood captures smoke or merely stirs it around the kitchen. Too low, and grease coats walls; too high, and you’ll waste energy sucking conditioned air outside. Start with this formula: multiply your stove’s BTU output by 100, then divide by 30. For electric ranges, multiply burner size in square inches by 50. But adjust for real-world cooking: double the result if you regularly fry foods or use woks.
Why 400 CFM Isn’t Enough for Gas Cooktops
Most builders install 400 CFM hoods as default, but a single 15,000 BTU burner requires 500 CFM minimum. Four-burner gas ranges often need 900+ CFM—yet ductless models rarely exceed 400 CFM. Check your burner specs: if any exceed 12,000 BTU, skip standard hoods. High-CFM units (600+) require 7-inch ducting; 4-inch ducts choke airflow regardless of motor power.
The Noise Level Trap You Must Avoid
Higher CFM usually means louder operation, but “sones” ratings reveal the truth. Anything above 4.0 sones becomes disruptive during dinner prep. Look for hoods with variable speed controls—many hit 1.5 sones on low settings but jump to 5.0+ at max power. Test units in showrooms: some brands use insulated duct boots to cut noise by 30% without sacrificing airflow.
Ducted vs. Ductless: The Critical Decision Before Buying

Ducted systems vent smoke outside through roof or wall exits, while ductless models recirculate air through filters. This choice impacts everything from installation cost to daily performance. Ducted is always superior for gas cooking—ductless filters can’t capture combustion gases. But if you lack exterior access (apartments, historic homes), ductless becomes your only option with major compromises.
When Ductless Hoods Become Fire Hazards
Charcoal filters in ductless systems require replacement every 3-6 months. Missed changes cause grease saturation, creating flammable buildup inside the unit. After six months of neglect, fire risk increases 200% according to safety labs. Never install ductless hoods above gas ranges—they fail to remove carbon monoxide during extended cooking.
The Duct Routing Mistake That Kills Performance
Shortcuts like 90-degree elbow turns or roof penetrations through attic insulation slash effective CFM by 40%. Ideal duct runs are straight, rigid metal (not flexible foil), and slope downward 1/4 inch per foot toward the exterior. For upper-floor kitchens, exit through walls rather than ceilings to avoid condensation freezing in winter. Always insulate ducts passing through unconditioned spaces—cold metal causes grease to solidify and clog the system.
Filter Types That Actually Trap Grease (Not Just Smoke)

Mesh filters catch large particles but let fine grease mist escape, coating cabinets within weeks. Baffle filters create centrifugal force that separates grease droplets—look for multi-layer stainless steel designs with 6+ curved vanes. Charcoal filters in ductless systems absorb odors but do nothing for grease; they’re useless without pre-filters. Never use aluminum filters—they warp from heat and create dangerous gaps.
Why Dishwasher-Safe Claims Are Dangerous
Many hoods tout “dishwasher-safe” filters, but high heat warps thin metal grids. Warped filters leave 1/8-inch gaps where grease jets bypass the system. Hand-wash filters monthly in degreaser: soak 15 minutes in hot water with 1/4 cup ammonia, then scrub with nylon brush. Reinstall only when bone-dry—moisture reduces capture efficiency by 25%.
Installation Requirements That Prevent Costly Repairs
Electrical mistakes cause 30% of hood failures. Most require dedicated 15-amp circuits—if your kitchen shares outlets with microwaves or refrigerators, voltage drops cripple motor performance. Verify your hood’s voltage: European models often need 240V while US units use 120V. Never daisy-chain multiple hoods on one circuit—they draw 3-5 amps each during startup surges.
The Mounting Height Disaster You Can’t Fix Later
Mounting too high creates dead zones where smoke escapes. Gas ranges need hoods 24-30 inches above burners; electric requires 28-36 inches. Measure from the cooktop surface to the hood’s lowest edge—any higher and capture efficiency plummets. Use a laser level during installation: even 1-inch height differences across the unit cause uneven airflow.
Price Ranges That Match Your Real Cooking Needs
Budget hoods ($100-$300) often use undersized motors that overheat during extended use. Mid-range models ($300-$800) deliver reliable CFM with better noise control but may skimp on filter quality. Premium units ($800-$2,000+) feature commercial-grade blowers, multi-stage filtration, and heat sensors that auto-adjust speed. Never buy based solely on price—test suction power by holding your hand 6 inches below the hood; you should feel strong, even airflow across the entire width.
When Cheap Hoods Cost More Long-Term
A $150 hood might save $650 upfront but fails within 18 months on gas ranges. Repairs often exceed replacement costs since motors aren’t serviceable. Premium hoods typically last 10+ years with filter changes—calculate lifetime cost: a $900 hood used 1 hour daily costs $0.25/day over a decade, while replacing three $200 units hits $0.55/day.
Control Systems That Prevent Daily Frustration
Touch controls seem sleek but malfunction near steam and grease. Physical dials with sealed switches last 3x longer in cooking environments. Essential features include delay timers (keeps running after cooking stops) and boost modes (temporary 50% CFM increase for frying). Avoid Wi-Fi models—they add $200+ for features rarely used more than twice weekly.
The Lighting Gap Nobody Warns You About
Hoods with less than 300 lumens create shadows where you can’t see pan contents. LED strips under the hood should cast 500+ lumens directly onto burners—test by checking if you can read fine print on a recipe card placed at the back burner. Dimmable lights are critical; max brightness causes glare when chopping ingredients.
Final Note: Choosing the right kitchen hood prevents 95% of cooking-related indoor air pollution. After installation, run your hood 15 minutes past cooking time to clear residual particles. Clean filters monthly and inspect ducts annually for grease buildup—this simple maintenance doubles your hood’s lifespan. For gas ranges, schedule professional airflow tests every 2 years to ensure safe combustion gas removal. The right hood pays for itself in saved cleaning hours and protected cabinetry within 18 months. Ready to eliminate post-cooking wipe-downs? Measure your cooktop today and match it to the CFM chart—you’ll breathe easier tomorrow.


