

Transforming your kitchen with a custom island featuring a breakfast bar creates the ultimate culinary command center, providing dedicated workspace, casual dining, and entertainment space all in one. This comprehensive project delivers significant value to your home while reflecting your personal style and craftsmanship. Whether you’re an experienced DIYer or tackling your first major woodworking project, building a kitchen island with breakfast bar represents an achievable goal that enhances both functionality and visual appeal. The right approach ensures your finished piece withstands years of daily use while seamlessly integrating with your existing kitchen layout.
Measure Kitchen Space for Perfect Island Placement
Before purchasing materials or making your first cut, accurate measurements determine whether your island will enhance or hinder your kitchen’s workflow. The space surrounding your island must accommodate comfortable movement between cooking zones, requiring 36 to 48 inches of clearance from the island edges to surrounding countertops or walls. Increase this to 42 to 48 inches if the breakfast bar will experience regular traffic or need wheelchair access.
Determine Optimal Island Dimensions
Your island should occupy no more than 20 to 25 percent of your total kitchen floor space. For kitchens measuring 150 to 200 square feet, an island measuring 6 to 8 feet in length and 3 to 4 feet in depth provides adequate workspace without overwhelming the room. Smaller kitchens benefit from compact 4 to 5-foot islands, while larger culinary spaces can accommodate installations up to 10 feet in length. Measure your kitchen’s overall dimensions, noting locations of existing appliances, door swings, and architectural features like windows and vents.
Verify Breakfast Bar Clearance Requirements
The breakfast bar overhang requires special attention to ensure comfortable seating. Plan for a 10 to 12-inch overhang when using standard bar stools with footrests, increasing to 14 to 15 inches if using stools without built-in footrests. This overhang must be properly supported through decorative corbels or extended countertop support systems. Measure from the face frame’s outer edge to the countertop’s front edge to verify your overhang provides adequate knee clearance for seated diners.
Select Quality Materials for Durable Construction

Material selection significantly impacts your island’s longevity and appearance. The right choices balance durability, aesthetics, and budget while ensuring your island withstands years of daily use.
Choose the Right Lumber and Sheet Goods
The structural frame of your island should utilize quality lumber capable of supporting countertop weight and daily use. 2×4 dimensional lumber serves as the standard for island framing, providing excellent strength. For the main structure, select lumber that is straight, dry, and free of large knots or warping. Some builders prefer 2×6 lumber when additional strength is needed or when running utilities through the interior cavity.
Use 3/4-inch plywood for cabinet sides, shelves, and back panels, while 1/2-inch plywood works adequately for backing panels and drawer bottoms. Baltic birch plywood offers superior edge finish and durability, making it an excellent choice for visible interior components. Countertop materials require careful consideration based on your budget and intended use—butcher block offers warmth and practicality, while granite and quartz provide exceptional durability.
Assemble Essential Tools for Precision Work
Power tools accelerate construction while improving accuracy. A circular saw or table saw enables accurate rip cuts and crosscuts in lumber and plywood. A cordless drill with bit set handles pilot holes and screw driving, while an impact driver provides additional torque for dense hardwoods. A random orbit sander prepares surfaces for finishing, and a jigsaw cuts notches and curves for sink installations.
Hand tools complement power equipment throughout the process. A quality tape measure accurate to 1/16 inch ensures precise measurements. A carpenter’s square verifies 90-degree angles during assembly. A level confirms plumb and positioning during installation. Clamps in various sizes hold pieces during glue drying, and a pocket hole jig creates strong, hidden joints for cabinet construction.
Build a Solid Base Frame for Long-Term Stability
The base frame forms the structural foundation of your kitchen island and must be constructed with precision to ensure stability throughout its lifespan.
Cut and Assemble Frame Components Correctly
Begin by cutting your framing lumber to the designed dimensions using a circular saw. Ensure all cuts are square and accurate, as measurement errors at this stage propagate through subsequent construction steps. Lay out the perimeter pieces and attach them at the corners using 3-inch wood screws driven through pre-drilled pilot holes. The pilot holes prevent the wood from splitting, particularly near board ends.
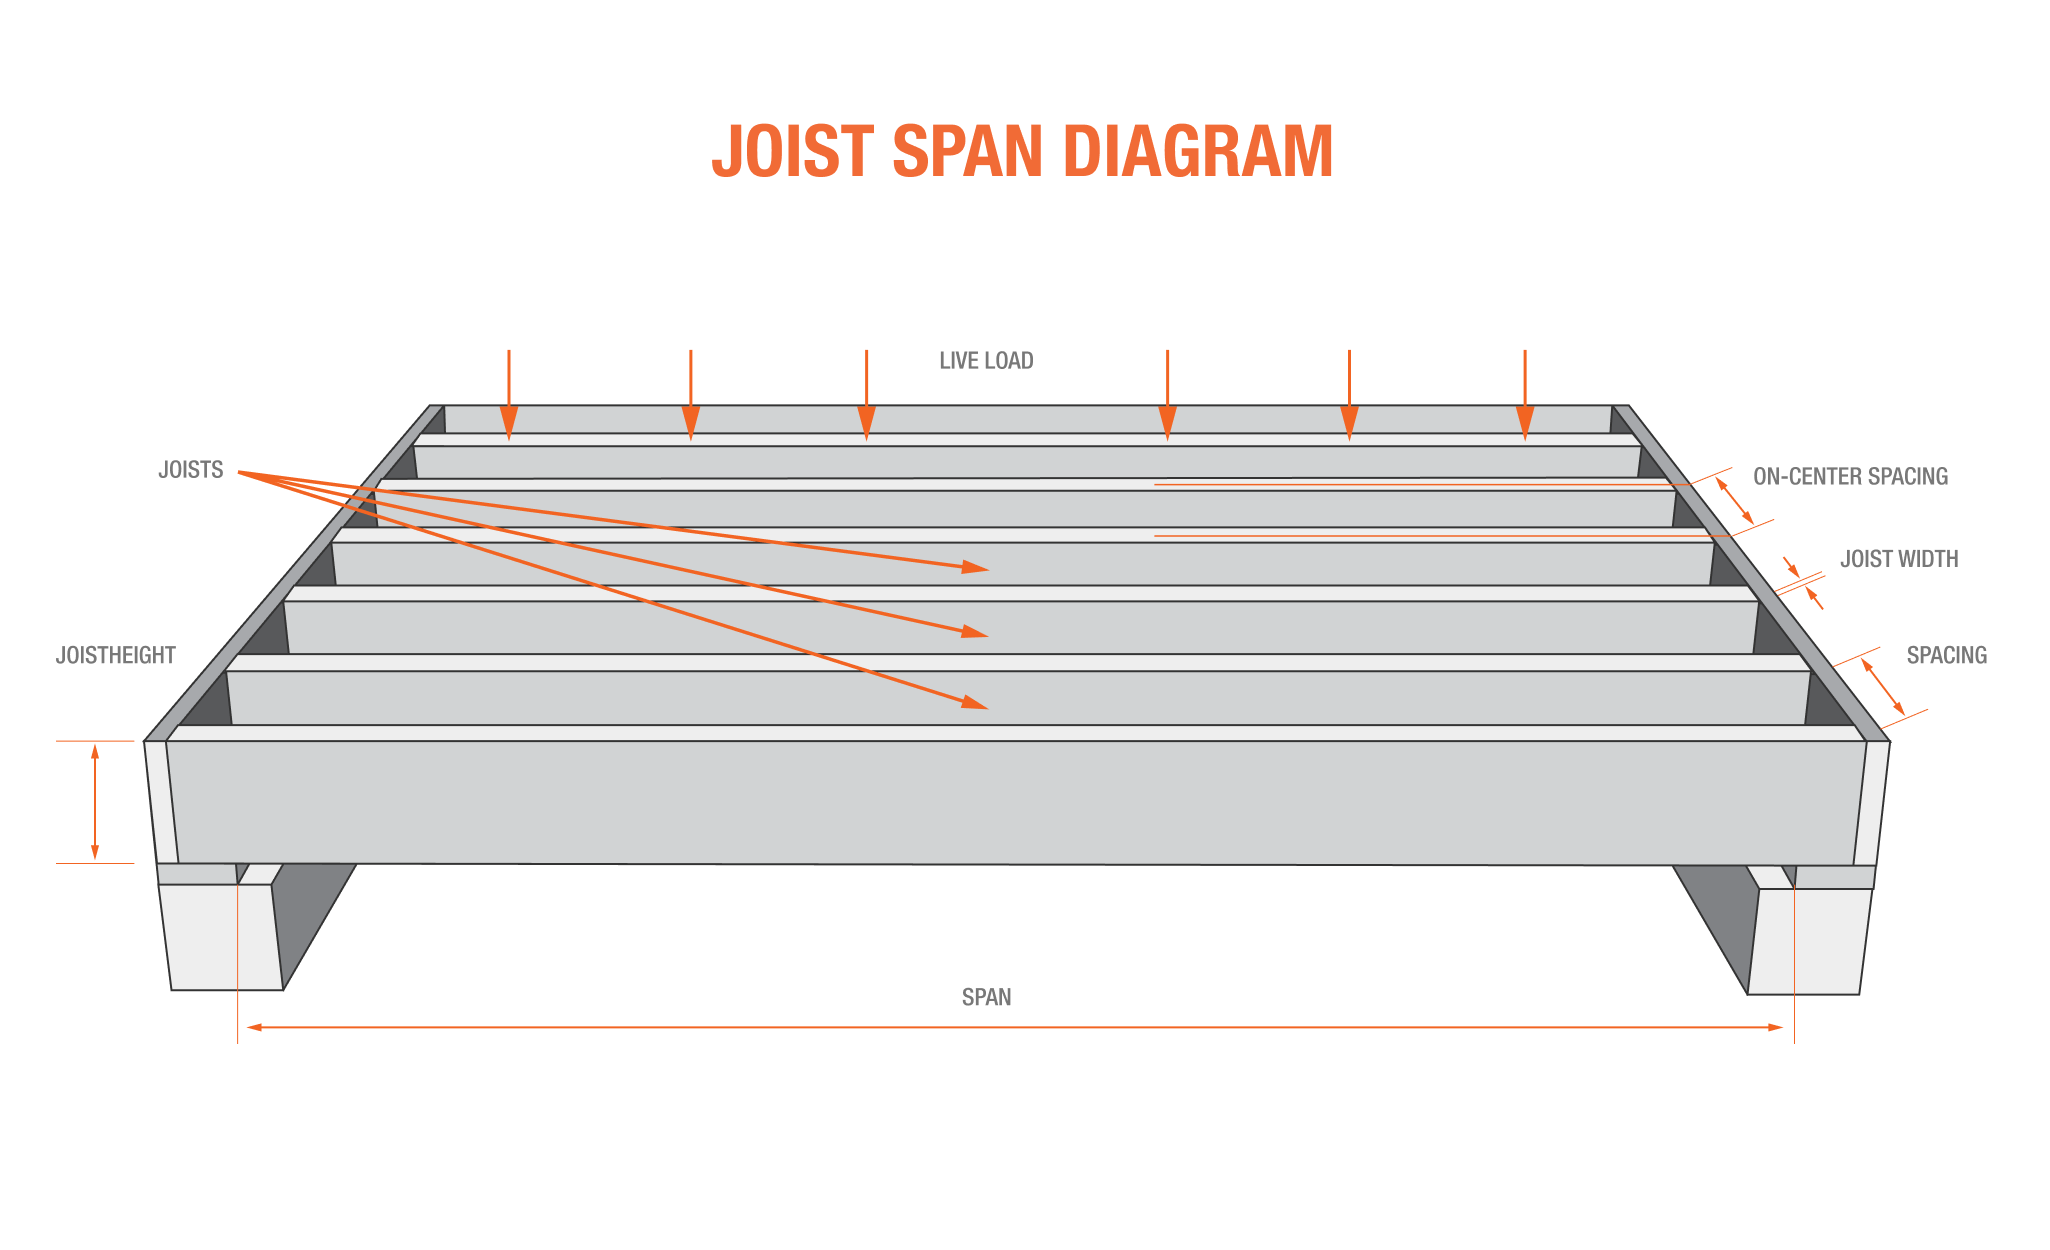
Install cross-members between the front and back frame members at regular intervals to create a rigid platform structure. Space these joists 16 inches on center, matching standard floor joist spacing, which provides uniform support for the cabinet box above. For islands supporting heavy countertops, reduce spacing to 12 inches on center for increased load capacity.
Create Functional Toe-Kick Space
The toe-kick area requires careful attention to both aesthetics and functionality. Cut toe-kick boards from 1×4 or 1×6 lumber to match the island’s perimeter, installing them to create a recessed area typically 3 to 4 inches deep and 4 inches high. This recess allows comfortable seating at the breakfast bar by providing space for feet and shins.
The toe-kick can be finished with paint, stain, or matching cabinet material. Install a thin strip of baseboard or trim along the bottom edge to create a clean transition between the toe-kick and the floor. This detail prevents items from rolling under the island and conceals any gaps between the island and floor coverings.
Construct the Cabinet Box with Professional Techniques
The cabinet box sits atop the base frame and houses storage compartments, appliances, or plumbing connections. Construct this component using 3/4-inch plywood with appropriate joinery techniques that balance strength with visual appeal.
Build with Pocket Hole Joinery for Strength
Pocket hole joinery creates strong, hidden joints ideal for cabinet construction. Using a pocket hole jig, drill pocket holes in all joining pieces according to the jig’s specifications. Apply wood glue to mating surfaces before joining pieces—the glue significantly increases joint strength and provides moisture resistance at the joint.
Clamp pieces together using appropriate clamps, driving pocket hole screws through the pre-drilled holes. This technique produces joints stronger than the surrounding wood while remaining invisible from exterior surfaces. Construct the cabinet box with a back panel, two side panels, and a bottom panel, with the bottom panel sitting flush with the bottom edges of the side panels.
Install Storage Shelves for Versatile Organization
Adjustable shelves provide versatile storage options for your island cabinet. Install shelf standards in pairs along cabinet side walls, positioning them at regular intervals to allow shelf height adjustment. Standard spacing places standards at 6-inch intervals from the bottom of the cabinet.
Cut shelf boards from 3/4-inch plywood to fit within the cabinet interior, providing approximately 1/16 inch clearance for easy insertion and removal. The shelves should extend from the face frame to the back panel, resting on shelf pins inserted into the standards at your desired heights.
Create a Stable Breakfast Bar Overhang
The breakfast bar overhang requires careful engineering to support the extended countertop while maintaining visual appeal. This structural challenge can be addressed through several proven approaches.
Install Support Brackets for Safety
Decorative corbels or solid wood brackets provide visible support beneath the extended breakfast bar surface. Install these supports at 16 to 24-inch intervals along the breakfast bar length. Each bracket should attach securely to the cabinet face frame or base frame structure using screws long enough to penetrate into solid wood members.
Position brackets so the top edge aligns with the planned countertop height. The bracket’s upper surface provides direct support for the countertop substrate, while the angled or decorative lower portion adds visual interest. Select bracket styles that complement your cabinet design, from simple angled cleats to ornate carved corbels.
Ensure Complete Structural Integrity
Verify that all support connections can handle anticipated loads. A seated adult places significant downward pressure on the breakfast bar surface, particularly when leaning or pushing up from a seated position. Test your construction by having several adults apply weight to the overhang before installing the countertop.
Add diagonal bracing between cabinet frame members if any wobble or flex is detected. This bracing eliminates movement that could loosen joints over time and provides confidence in the structure’s integrity.
Install Countertop with Proper Techniques
Countertop installation methods vary significantly based on material selection, requiring different techniques and hardware.
Mount Butcher Block Countertops Correctly
Apply a thin bead of silicone caulk between the countertop and cabinet top to prevent moisture infiltration while allowing slight wood movement with humidity changes. Leave a 1/16 to 1/8-inch expansion gap at walls or backsplashes, which can be covered with matching trim or color-matched caulk.
Seal the butcher block with food-safe mineral oil before use, reapplying monthly to maintain the surface and prevent drying or cracking. Initial curing may require several oil applications over a week or two before the countertop reaches full water resistance.
Add Essential Electrical and Plumbing Features
Kitchen islands frequently incorporate electrical outlets for small appliances or task lighting. Plan electrical requirements early to allow proper wiring during construction.
Run Electrical Wiring Before Closing Walls
Current electrical codes typically require outlets within 4 feet of any point along the island edge. Run NM-B cable through holes drilled in cabinet frame members, maintaining 1-1/4 inch clearance from outer edges or using protective nail plates where closer installation is unavoidable. All electrical work should comply with local building codes, with permits and inspections typically required.
Install Pop-Up or In-Drawer Outlets
Pop-up outlets provide a clean, unobtrusive appearance when not in use, rising from the countertop surface when needed. These require precise cutouts in the countertop and careful waterproofing around the mechanism. In-drawer outlets install inside drawers or cabinet cavities, providing power for charging devices while keeping cords hidden.
Apply Professional Finishing Touches
The finishing phase transforms your construction from a functional framework into a polished kitchen centerpiece. Attention to detail during this phase significantly impacts the final appearance.
Paint or Stain for Lasting Beauty
Proper surface preparation determines paint adhesion and finish quality. Sand all surfaces with 120 to 150-grit sandpaper to create texture the paint can grip. Fill any holes or imperfections with wood filler, sanding smooth when dry. Apply quality primer appropriate for your paint type, allowing full drying before topcoats.
Natural wood finishes highlight grain patterns and add warmth to kitchen spaces. Pre-stain wood conditioner helps achieve even stain penetration, particularly on soft woods. Apply stain with a brush or rag, working in the direction of the grain, then wipe excess after 2 to 5 minutes for desired color intensity.
Maintain Your Kitchen Island for Longevity
Ongoing maintenance preserves the appearance and functionality of your kitchen island for years of reliable service. Simple regular care prevents most common problems and extends the life of your investment.
Implement Surface-Specific Care Routines
Wood surfaces require regular oil applications to maintain their beauty and resistance to moisture. Food-safe mineral oil applied monthly prevents drying and cracking. Immediately clean acidic spills like lemon juice or tomato products to prevent etching. Avoid placing hot pots directly on wood surfaces, using trivets instead.
Stone countertops clean with pH-neutral cleaners specifically formulated for natural or engineered stone. Avoid abrasive cleaners that can dull the surface. Reseal granite and other natural stone annually to maintain stain resistance. Laminate surfaces clean with mild soap and water, avoiding harsh abrasives that can scratch the surface.


