
Tired of wasting that empty kitchen corner while struggling with limited dining space? A custom-built corner kitchen table solves both problems by transforming dead space into functional seating. This project delivers a sturdy, attractive dining solution tailored precisely to your room dimensions and style preferences—without the premium price tag of store-bought furniture. Building your own corner table costs significantly less than purchasing a comparable retail piece while giving you complete control over materials, dimensions, and finish.
Most pre-made corner tables force you to compromise on size or style to fit your space. By constructing your own, you’ll create a perfectly proportioned piece that maximizes seating capacity while complementing your kitchen’s aesthetic. This guide walks you through every critical step of building a professional-quality corner table with intermediate woodworking skills and basic tools. You’ll complete this project in a single weekend, gaining the satisfaction of gathering around a table you crafted yourself.
Essential Tools for Corner Table Construction
Gathering all necessary tools before starting prevents frustrating mid-project interruptions and ensures clean, professional results. For this corner table project, you’ll need specific tools that most DIY enthusiasts either own or can easily access.
Must-Have Power Tools include a circular saw with a fine-tooth blade for precise lumber cuts, a drill/driver with multiple drill bits and screwdriver bits, an orbital sander with 80, 120, and 220-grit sandpaper, and at least four bar clamps for secure assembly. A pocket hole jig significantly simplifies base construction for beginners, while a router becomes essential if adding decorative edge treatments.
Critical Hand Tools encompass a 25-foot measuring tape, combination square for verifying 90-degree angles, carpenter’s pencil for marking cuts, bubble level to ensure even assembly, and a rubber mallet for gentle adjustments during fitting. Don’t overlook a shop vacuum—keeping your workspace clean improves both safety and cut accuracy.
Material Checklist contains 2×4 lumber for legs and structural supports, 1×12 pine boards for the tabletop (quantity depends on your dimensions), 2.5-inch and 1.25-inch wood screws, wood glue, wood filler, sandpaper in multiple grits, and your choice of finish. Purchase lumber a few days before building to allow acclimation to your workshop’s humidity, preventing post-construction warping.
Design Planning for Your Specific Space
Skipping proper planning leads to tables that don’t fit your space or meet your functional needs. Corner kitchen tables require precise measurements to maximize both seating capacity and traffic flow.
Measuring Your Corner demands attention to detail—measure from both walls to the farthest point you want the table to extend (typically 36-48 inches), then measure the height from floor to desired tabletop (standard is 29-30 inches). Account for at least 36 inches of clearance around the table for comfortable movement, and verify chair placement won’t interfere with nearby cabinets or appliances.
Choosing Your Configuration depends on your space and needs: L-shaped tables work best for standard 90-degree corners and seat 4-6 people comfortably; pie-shaped designs maximize legroom in tight spaces but require more complex joinery; wraparound designs with built-in benches maximize seating but limit furniture flexibility. For first-time builders, the L-shaped design offers the best balance of functionality and construction simplicity.
Creating a Full-Scale Template prevents costly mistakes—cut cardboard or foam board to your planned dimensions and position it in your corner. This reveals potential conflicts with baseboards, outlets, or traffic patterns before you cut any wood. Adjust your design based on these real-world observations, then transfer final measurements to your cutting list.
Precise Wood Cutting Techniques

Accurate cuts determine whether your table assembles smoothly or becomes a frustrating puzzle of gaps and misalignments. Taking extra time during this phase prevents problems later.
Preparing Your Lumber begins with inspecting each board for warping, cracks, or large knots. Select the straightest boards for legs and structural components, saving slightly imperfect pieces for hidden elements. Arrange boards with grain patterns flowing in the same direction for visual consistency across the tabletop.
Cutting the Tabletop requires the most precision. For an L-shaped table, cut two pieces at 90-degree angles using a circular saw with a straight-edge guide. Measure twice and cut once—always cut slightly oversized (by 1/8 inch) to allow for final sanding adjustments. Mark the visible face of each piece to maintain consistent grain orientation during assembly.
Preparing Structural Components includes cutting four legs to identical lengths (29.5 inches allows for final height adjustment), aprons to connect between legs, and corner supports for added stability. Use a stop block on your saw for identical leg cuts, and label each piece as you cut to prevent assembly confusion later.
Building a Rock-Solid Base Structure
The base structure bears all weight and stress, making strong joinery essential for a wobble-free finished table. Pocket hole joinery provides the best balance of strength and accessibility for DIY builders.
Pocket Hole Construction creates invisible, incredibly strong connections. Drill pocket holes at both ends of each apron piece using a jig, then apply wood glue to joint surfaces before securing to legs with 2.5-inch pocket screws. This technique allows for minor adjustments during assembly while creating joints stronger than the wood itself.
Ensuring Perfect Squareness prevents frustrating wobble in the finished table. After connecting three legs to aprons, measure diagonally from corner to corner—both measurements must be identical. If not, gently twist the assembly while checking measurements until they match, then secure the fourth leg. Use clamps to hold the structure square while driving final screws.
Adding Corner Bracing significantly increases stability in corner tables. Install triangular wooden braces at the inside corner where the two apron sections meet, securing with glue and screws. This prevents racking forces from distorting the table over time, especially important for the open corner design.
Attaching the Tabletop Properly
Improper tabletop attachment causes cracking, warping, or separation as wood naturally expands and contracts with humidity changes. Specialized fastening techniques accommodate this movement.
Creating the Corner Joint requires precise alignment. Position both tabletop sections on the base, then clamp them together at the corner point. Drill through the bottom into a corner bracket or metal tie plate, securing with screws through the tabletop from below. Apply wood glue along the seam before final tightening for maximum strength.
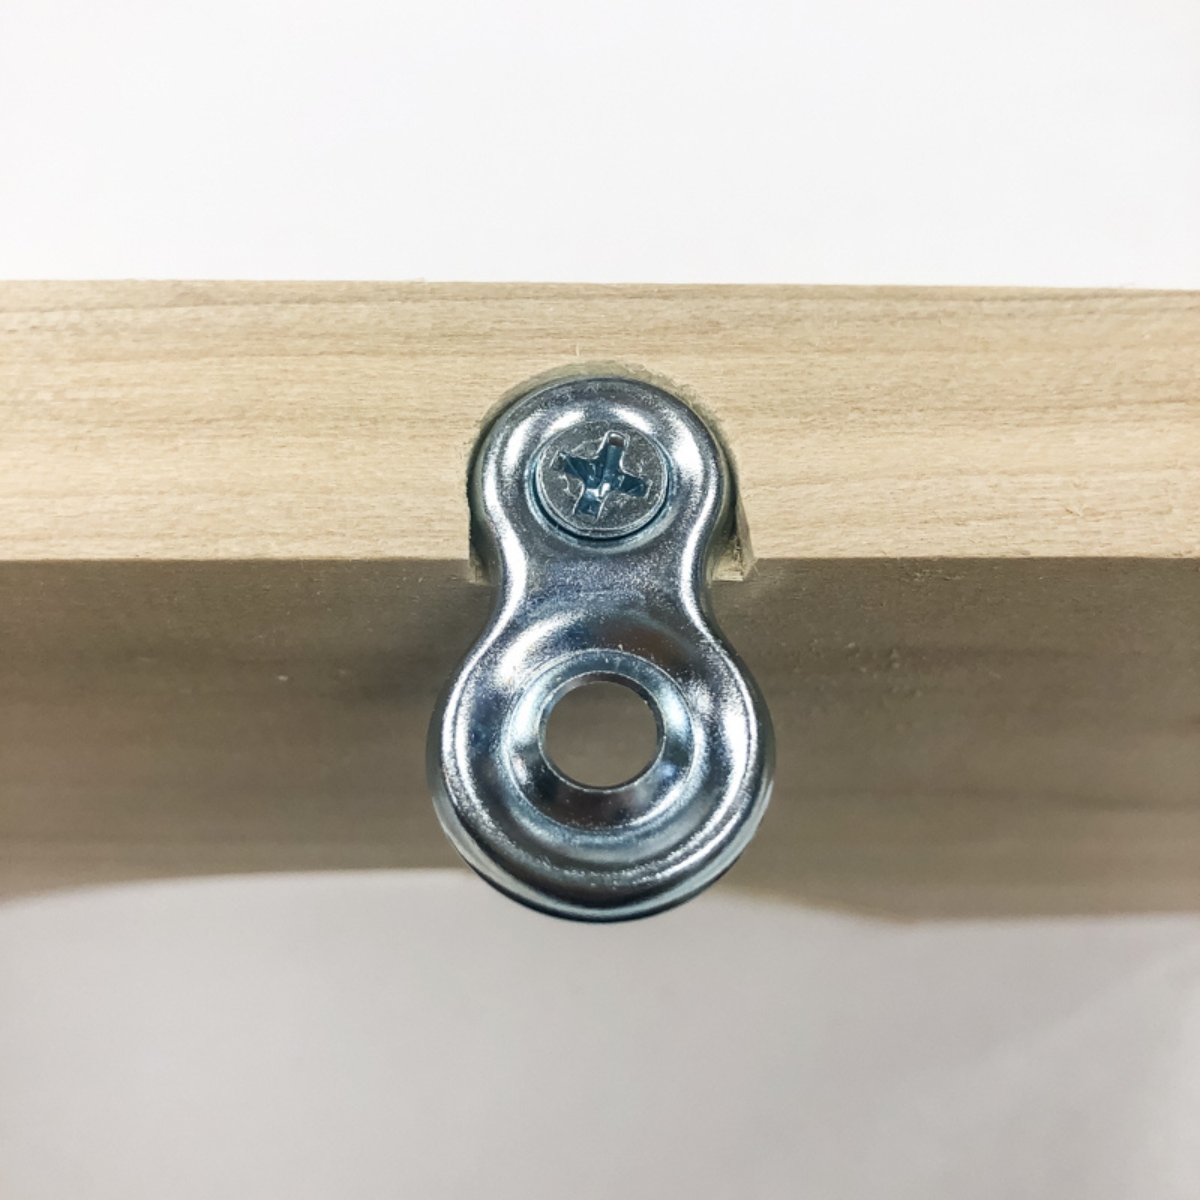
Using Tabletop Fasteners allows for natural wood movement. Install figure-eight fasteners or Z-clips every 12-18 inches along the apron edges, securing them to the tabletop first before attaching to the base. These specialized connectors permit the wood to expand across its width without stressing the structure.
Checking for Level and Stability before finalizing prevents future frustration. Place a level across the tabletop in multiple directions, adjusting leg length if necessary. Test stability by applying pressure to each corner—any movement indicates loose joints that need reinforcement before finishing.
Professional-Quality Finishing Touches
Minor details distinguish amateur work from professional results. Invest time in these finishing steps to elevate your corner table from functional to beautiful.
Smoothing All Edges prevents splinters and creates comfortable seating. Round over sharp tabletop edges with 120-grit sandpaper, then progress to 220-grit for a silky finish. Pay special attention to the corner point where the two tabletop sections meet—this area receives frequent contact and should feel smooth to the touch.
Filling Imperfections creates a flawless surface for finishing. Apply wood filler to all screw holes and minor surface defects, allowing it to dry completely before sanding flush. For pine tables, consider using a wood grain filler to minimize the prominent grain pattern before staining.
Applying Protective Finish requires patience for best results. Start with a pre-stain wood conditioner on softwoods like pine to prevent blotchiness. Apply stain with a clean cloth, wiping excess after 3-5 minutes, then wait 24 hours before applying two thin coats of polyurethane. Sand lightly with 220-grit paper between coats for maximum smoothness.
Daily Maintenance for Long-Term Beauty
Protect your investment with simple habits that preserve your table’s beauty for years. Kitchen tables face significant wear, requiring specific care to maintain their appearance.
Immediate Spill Cleanup prevents permanent damage—wipe up liquids immediately, especially acidic substances like coffee, wine, or tomato products that can stain finishes. Use coasters under all beverages and hot pads under cookware to prevent heat rings and water marks.
Regular Cleaning Routine maintains the finish without damaging it. Mix mild dish soap with warm water, dampen a soft cloth (never saturate), and wipe the surface following the wood grain. Dry immediately with a clean towel—never allow water to pool on the surface.
Seasonal Maintenance extends your table’s lifespan significantly. Apply furniture wax or polish every 3-6 months to replenish protective oils in the finish. Check all joints twice yearly for any loosening, and tighten screws or re-glue connections as needed before problems worsen.
Building your own corner kitchen table transforms wasted space into functional dining area while showcasing your craftsmanship. The skills you develop during this project transfer to countless future woodworking endeavors, making this an excellent investment of your time and creativity. Your family will enjoy meals at this custom piece for years to come, with every gathering reminding you of the practical solution you created with your own hands. Start measuring your corner space today—you could be dining at your new table by next weekend.


