
Your KitchenAid stand mixer represents a significant investment in your kitchen, and getting the most out of it requires proper maintenance and adjustment. One of the most critical yet often overlooked aspects of mixer care is ensuring the beater-to-bowl clearance is correctly set. When this height adjustment is off, you may notice your mixer struggling during use, ingredients failing to incorporate properly, or even scratching on your mixing bowl. Fortunately, learning how to adjust KitchenAid mixer height is a straightforward process that any owner can master with the right guidance. This complete guide walks you through every step of the adjustment process, from initial preparation to final verification, ensuring your mixer delivers peak performance for years to come.
Fix Uneven Mixing: Why KitchenAid Beater Height Is Critical
Proper beater-to-bowl clearance affects everything your mixer does, from whipping delicate egg whites to kneading thick bread dough. When the height is correctly set, the beater comes close enough to the bowl’s surface to effectively scrape and incorporate ingredients during mixing, yet maintains enough distance to avoid any contact that could cause damage. KitchenAid designs their mixers with a specific clearance specification in mind—approximately the thickness of a standard dime—which allows the beater’s edge to pass close enough to pick up ingredients along the bowl’s sides and bottom without actually touching the bowl itself.
Incorrect clearance creates a cascade of problems throughout your mixing experience. If the beater sits too low and makes contact with the bowl, you’ll hear an unpleasant grinding or scraping sound during operation. This metal-on-metal contact gradually scratches both the beater and bowl surfaces, creating areas where ingredients can lodge and bacteria can grow. Beyond the cosmetic damage, a beater that’s too low forces the motor to work harder, generating excess heat and potentially shortening the mixer’s lifespan over time. Conversely, if the clearance is too large, the beater fails to reach ingredients along the bowl’s edges and bottom, leaving unmixed pockets and requiring frequent manual scraping to achieve consistent results.
Essential Safety Steps Before Adjusting Your Mixer Height

Before attempting any adjustment, you must prioritize safety by completely disconnecting your mixer from all power sources. Unplug the power cord from the electrical outlet and ensure no one else could accidentally turn the mixer on while you’re working on it. This precaution prevents devastating injuries that can occur if the beater starts spinning while your hands are in or near the mixing area.
With the power safely disconnected, position your mixer on a stable, level surface with adequate workspace around it. Place your mixing bowl on the mixer’s base, lowering it onto the base plate until the locking mechanism engages fully. Some models feature specific alignment requirements—consult your manual if you’re uncertain about proper bowl seating for your particular mixer. The bowl must be completely stable and properly positioned because an improperly seated bowl will cause uneven clearance throughout the rotation path.
Next, attach the flat beater to the mixer shaft. This specific attachment type serves as your adjustment reference because its flat bottom surface provides an even, consistent reference point for measuring the gap to the bowl. Align the flat side of the beater’s attachment point with the corresponding flat surface on the shaft, then push upward firmly until you hear or feel the beater click and seat securely. A partially attached beater will sit at an angle and create uneven clearance, rendering your adjustment attempts ineffective.
Perform the Dime Test: Your Precision Measurement Tool
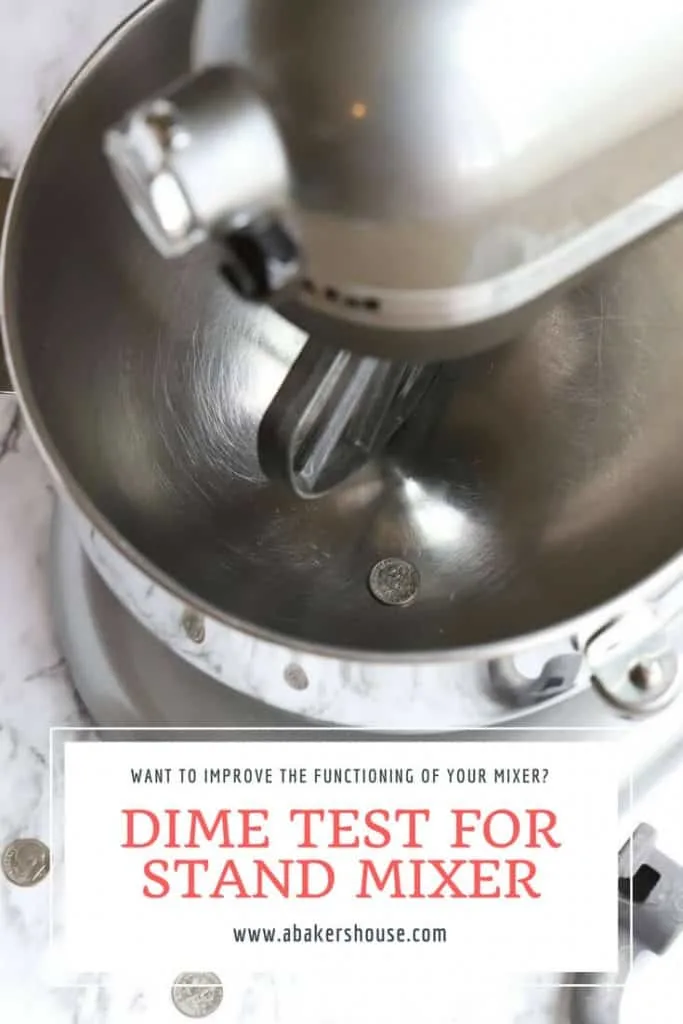
The dime test represents the industry-standard method for verifying proper beater-to-bowl clearance, and it earns this status because the thickness of a standard United States dime—approximately 1.35mm—closely matches KitchenAid’s ideal clearance specification. This simple test requires nothing more than a regular dime from your pocket or coin jar, making it accessible and reproducible regardless of your location or equipment.
How to Properly Conduct the Dime Test
To conduct the dime test, simply slide a dime between the bottom surface of the attached flat beater and the interior bottom surface of your mixing bowl. Once positioned, rotate the beater slowly by hand in its normal direction of rotation—the same direction it spins during operation. As you rotate, pay close attention to how the dime moves through the gap. A properly adjusted mixer allows the dime to slide in and out with minimal resistance, indicating that sufficient clearance exists while still maintaining the close proximity necessary for effective mixing.
Interpreting Your Dime Test Results
Interpreting your test results requires understanding what each outcome indicates. If the beater rubs against the bowl or the dime cannot be inserted without applying force, your clearance is too tight and the beater sits too low. This condition requires raising the beater relative to the bowl. If the dime moves with excessive looseness or falls through a visibly large gap, your clearance is too loose and the beater sits too high. This condition requires lowering the beater toward the bowl. The goal is finding that sweet spot where the dime slides freely but with just enough resistance to confirm the gap matches its thickness precisely.
Locate & Use the Height Adjustment Screw on Your Mixer
The adjustment mechanism for bowl-lift KitchenAid stand mixers consists of a single dedicated screw located on the side of the mixer’s head, positioned near where the beater shaft exits the mixer body. This placement keeps the adjustment protected from accidental changes during normal use while remaining accessible when you need to make corrections. The screw is typically recessed slightly within its housing, which prevents it from being bumped out of adjustment during routine operation or cleaning.
Identify Your Specific Adjustment Screw Type
Your screw may require different tools depending on your model’s age and design. Most KitchenAid mixers feature a Phillips head adjustment screw, requiring a standard Phillips screwdriver to turn. Some newer or specific models use a slot-head screw that accepts a flathead screwdriver, while others feature a hex-head screw requiring an appropriately sized hex key or Allen wrench. Examine your screw head before selecting your tool to ensure proper fit and avoid damaging the screw head itself.
Understand Adjustment Direction for Precise Results
Understanding the direction of adjustment is absolutely critical to achieving the correct setting. Turning the adjustment screw clockwise causes the beater to lower toward the beater to bowl, thereby reducing the clearance gap between them. Turning the adjustment screw counterclockwise raises the beater away from the bowl, thereby increasing the clearance gap. This relationship can initially seem counterintuitive—many people expect clockwise to mean “tighten” in the sense of reducing space, which aligns with the screw’s effect on lowering the beater. Remember that clockwise lowers the beater and reduces clearance, while counterclockwise raises the beater and increases clearance.
Precision Adjustments: Perfecting Your Mixer Beater Clearance
_STEP2.jpg)
Making effective adjustments requires patience and incremental changes. Begin by making small turns of the adjustment screw, typically quarter-turns or less, then recheck the clearance using the dime test before making any additional changes. This conservative approach prevents overshooting the optimal setting, which is particularly easy to do given the sensitivity of the adjustment mechanism. A single full turn can dramatically change the clearance, potentially moving from too tight to too loose in one swift motion.
Step-by-Step Adjustment Process
- Make a quarter-turn of the adjustment screw in the appropriate direction
- Reinsert the dime and check the clearance
- Rotate the beater by hand to verify consistent clearance throughout the rotation
- Repeat the process until the dime slides with minimal resistance
- Perform a final operational verification at low speed
After each adjustment, reinsert the dime and test the clearance before considering the adjustment complete. Continue this iterative process of adjusting and testing until the dime slides in and out smoothly with only minimal resistance. The goal is not zero resistance—the dime should move freely—but rather a sensation that confirms the gap matches the dime’s thickness precisely. Once you achieve this feeling, you’re ready for the final operational verification step.
Fix Common KitchenAid Mixer Height Adjustment Problems
Sometimes the adjustment process doesn’t go as expected, and understanding common pitfalls helps you diagnose and resolve problems efficiently. If you consistently struggle to achieve proper clearance despite careful adjustments, first verify that you’re using the correct type of beater for your adjustment test. The flat beater provides the most reliable reference surface because its bottom is completely flat and parallel to the bowl’s bottom surface. Other attachments like the dough hook or wire whip have different geometries that may make them appear to have different clearance requirements even when the underlying adjustment is correct.
Verify Proper Bowl and Beater Seating
Check that your mixing bowl is properly seated and locked in place on the mixer’s base. An improperly positioned bowl can cause the clearance to vary as the beater rotates, creating an inconsistent gap that makes proper adjustment impossible. Remove the bowl completely, inspect the base plate and bowl bottom for any debris or damage, then reposition the bowl according to your model’s instructions, ensuring the locking mechanism fully engages before proceeding.
Verify that your beater attachment is fully engaged on the mixer shaft. A partially attached beater may sit at an angle rather than sitting perfectly parallel to the bowl’s bottom surface, which creates uneven clearance across its rotation path. Remove the beater completely, inspect both the beater’s attachment point and the mixer shaft for any debris or damage, then reattach by pushing upward firmly until you feel or hear a definitive click indicating full engagement.
Long-Term Maintenance: Keeping Your Mixer Height Perfect
Establishing the correct clearance is only half the battle—maintaining that setting over time requires awareness of factors that can affect the adjustment. Regular rechecking of clearance is recommended, particularly after moving or transporting your mixer, after changing bowl attachments, or if you notice changes in mixing performance or unusual sounds during operation. Even normal vibration during use can gradually affect the adjustment over months and years of operation.
Proper clearance delivers compounding benefits throughout your mixing activities. Ingredients incorporate more thoroughly and evenly, reducing the need for manual scraping and ensuring consistent results across recipes. Your mixer operates more efficiently without the strain of pushing a beater against a bowl, potentially extending the motor’s operational lifespan. Both your beater and bowl maintain their pristine condition without scratches that can harbor bacteria and detract from your kitchen’s appearance.
Taking the time to learn how to adjust KitchenAid mixer height properly pays dividends in every batch of cookie dough, every loaf of bread, and every batch of whipped cream you prepare. The entire adjustment process requires only a few minutes when you understand the procedure, yet the benefits continue throughout the life of your mixer. By following the dime test method and verifying your adjustment through careful observation, you ensure your KitchenAid stand mixer continues delivering the performance and reliability that made it the centerpiece of your kitchen for years to come.


