
Kitchen cabinets often lack the finished, custom look that truly elevates a space. Adding trim can transform basic builder-grade cabinets into something that appears professionally installed and custom-designed. Whether you’re installing crown molding across the top, adding decorative panels to flat cabinet doors, or applying scribe molding to hide gaps between cabinets and walls, the right trim creates visual interest and architectural detail that makes your kitchen feel complete. This guide covers the essential steps for successfully adding trim to kitchen cabinets, helping you achieve that high-end look without the custom cabinet price tag.
Essential Trim Types for Kitchen Cabinets
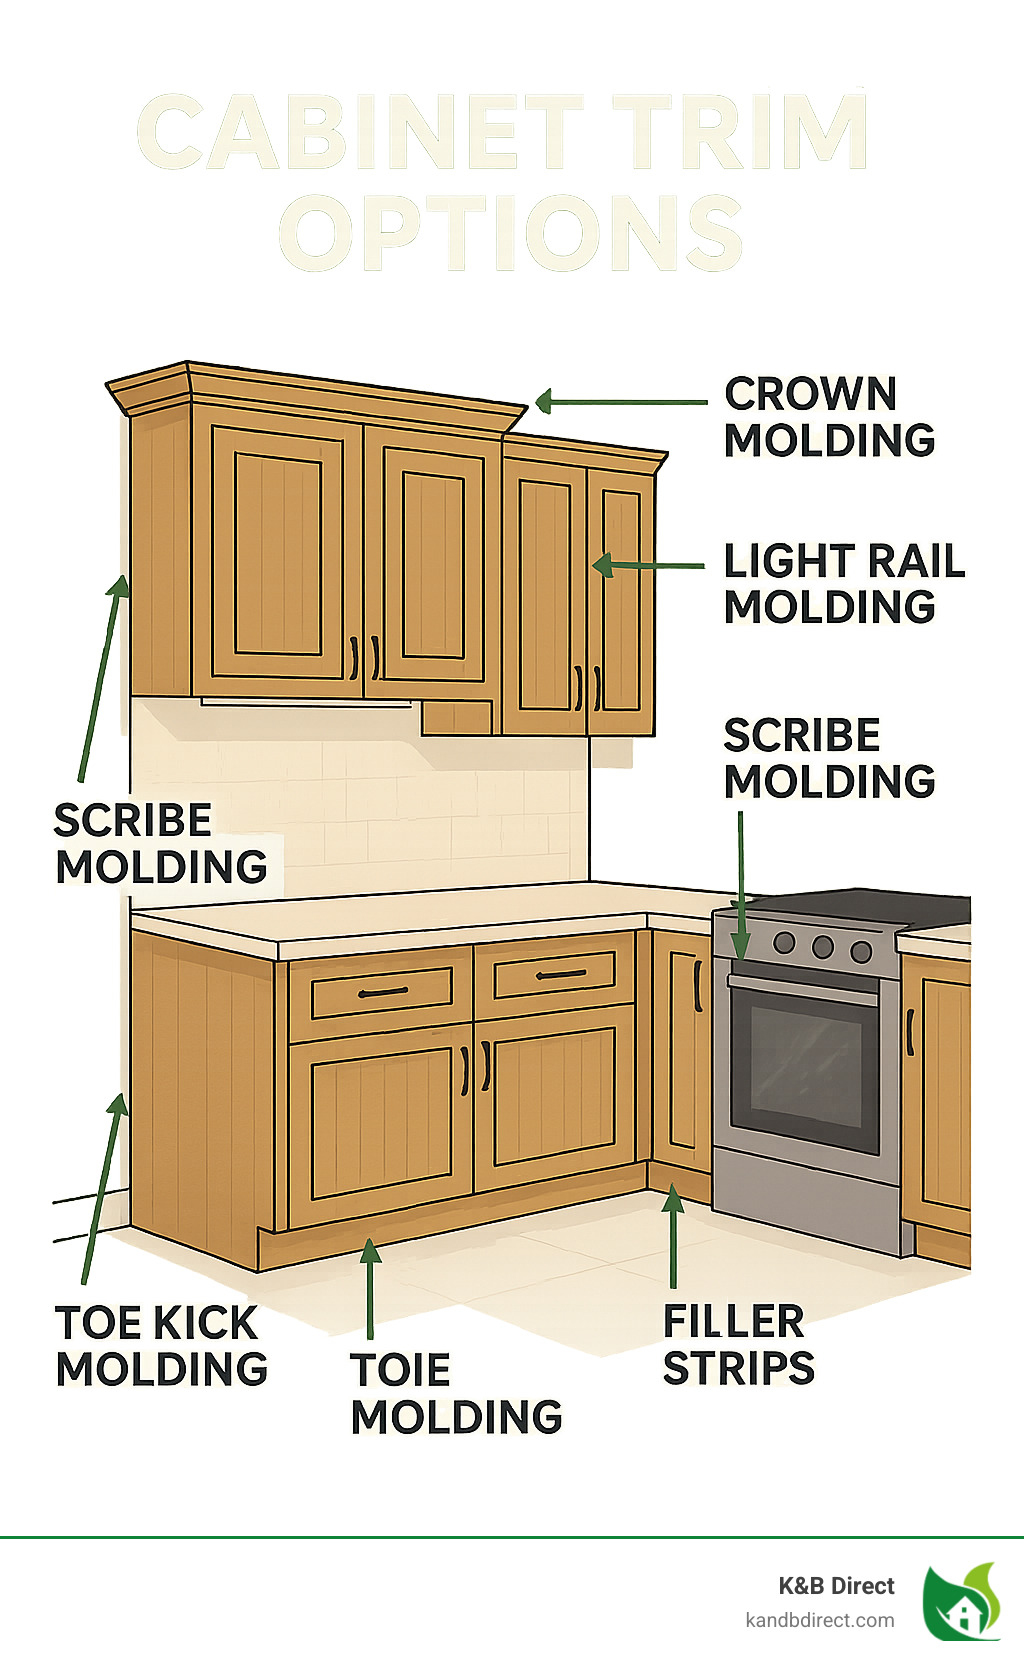
Crown Molding Installation for Upper Cabinets
Crown molding creates an elegant transition between your upper cabinets and the ceiling. For standard 8-foot ceilings with 12-18 inch upper cabinets, 3-6 inch crown molding typically works best. Begin by measuring the entire perimeter where molding will be installed, adding 10% for waste. Cut your first piece for a corner using a miter saw set to 45 degrees. When installing, position the molding upside down in the saw to ensure proper inside and outside corner cuts.
How to Cut Perfect Inside Corners
Inside corners require precise 45-degree miter cuts. Hold the molding in the “crown position” (as it will be installed against both wall and cabinet) when cutting. For inside corners, the long point of the molding should face upward. Dry fit each piece before securing to verify the fit. If gaps appear, use a coping saw to fine-tune inside corners for tighter joints than miter cuts alone provide.
Securing Crown Molding Properly
Use 2-inch finish nails every 12-16 inches along the cabinet top and wall contact points. Apply construction adhesive to the back of the molding for added security, especially with larger profiles. Start installation in one corner and work your way around the room, checking alignment with a level after each section. Fill nail holes with matching wood putty before finishing.
Scribe Molding for Problem Walls
Scribe molding solves the common issue of uneven walls that create gaps between cabinets and the wall surface. Unlike standard trim, scribe molding follows the contour of your wall.
Measuring and Cutting Scribe Molding
Place the molding against the wall gap, then run a pencil along the wall edge to transfer the irregular shape to the molding. Use a jigsaw or coping saw to carefully cut along this line. Test fit frequently during cutting to ensure proper alignment. This technique works best with thinner molding profiles (1/2-1 inch thick).
Installing Scribe Molding Correctly
Apply a thin bead of construction adhesive to the back of the scribe molding before positioning. Hold firmly in place for 30 seconds to ensure initial adhesion. Add finish nails through the face of the molding every 8-12 inches, countersinking them slightly below the surface. The goal is to create a seamless transition that hides wall imperfections while maintaining a clean line.
Tools and Materials Checklist

Must-Have Cutting Tools
A 10-12 inch miter saw delivers the most accurate cross-cuts for trim work. For inside corners, keep a coping saw on hand for fine adjustments. A quality miter box works for hand-cutting when power tools aren’t available. Always use a sharp, fine-tooth blade (100+ teeth) to prevent tear-out on finished molding.
Essential Installation Supplies
Gather 1-1/2 to 2 inch finish nails, construction adhesive, wood filler matching your trim, and appropriate sandpaper (120-220 grit). For painted trim, use primed MDF or pine. For staining, select hardwood like poplar that accepts stain well. Don’t forget painter’s tape, drop cloths, and safety glasses for protection during installation.
Step-by-Step Trim Installation Process
Surface Preparation Before Installation
Remove cabinet hardware and clean all surfaces thoroughly. Fill any dents or holes in existing cabinets with wood filler. Lightly sand cabinet edges where trim will attach to ensure proper adhesion. Wipe away all dust with a tack cloth before beginning installation. This preparation prevents future issues with adhesion and finish.
Measuring and Layout Techniques
Mark reference lines on walls and cabinets using a laser level for perfectly straight installation. For crown molding, measure from the ceiling down rather than from the cabinet up for consistent results. Label each piece of cut molding with its specific location to avoid confusion during installation. Double-check measurements before cutting—trim wood is expensive and mistakes add up quickly.
How to Handle Outside Corners
Outside corners require special attention. Options include:
– Coping one piece for a tighter fit
– Using a corner block for added stability
– Installing a mitered corner with reinforcement
For most kitchen applications, a coped joint provides the most seamless appearance. Cut one piece square, then cope the mating piece to follow the profile of the first piece. This technique accommodates minor wall imperfections better than mitered corners alone.
Attachment Methods Compared

Nailing provides immediate holding power but requires careful placement to avoid splitting. Construction adhesive offers strong, invisible bonding but needs time to cure. The best approach combines both methods—apply adhesive to the back of the trim, then secure with finish nails every 12-16 inches. For heavy crown molding, add support blocks between the molding and cabinet top.
Common Mistakes to Avoid
Inconsistent Nail Placement
Inconsistent nail spacing causes trim to warp or develop gaps over time. Create a template with nail positions marked every 12 inches to maintain uniform spacing. Always pre-drill holes near molding ends to prevent splitting. Countersink nails slightly below the surface for proper filling and finishing.
Ignoring Wood Movement
Wood expands and contracts with humidity changes. Failing to account for this leads to cracked joints and popped nails. Leave small expansion gaps at corners and long runs. Use flexible caulk rather than rigid filler at joints to accommodate movement. Install trim when humidity levels are moderate (40-50%) for best results.
Finishing Touches for Professional Results
Seamless Joint Treatment
Fill nail holes and minor gaps with flexible wood filler that matches your trim. For larger gaps at corners, use painter’s caulk rather than wood filler. Sand filled areas smooth with fine-grit sandpaper before applying finish. The key to invisible joints is proper sanding and multiple thin coats of finish rather than one thick coat.
Painting and Staining Best Practices
For painted trim, apply a coat of primer first, especially on porous woods like pine. Sand lightly between coats for ultra-smooth results. When staining, test on scrap pieces first to ensure desired color. Apply wood conditioner before staining softwoods to prevent blotchiness. Always finish all sides of the trim before installation to prevent warping.
Maintenance and Troubleshooting
Addressing Gaps That Develop Over Time
Seasonal wood movement can create small gaps at joints. Rather than re-cutting trim, use matching colored caulk to fill these gaps. Remove any loose material first, then apply a thin bead of paintable caulk. Smooth with a wet finger and repaint the area. This simple fix maintains the professional appearance without major rework.
When to Call a Professional
Consider professional help if you encounter significant wall irregularities, complex architectural features, or if your first attempts at trim installation result in multiple visible gaps. Professionals have specialized tools for difficult cuts and experience working with challenging layouts. For most standard kitchen layouts, however, adding basic trim is well within the capabilities of a careful DIYer.
Adding trim to kitchen cabinets transforms ordinary cabinetry into custom-looking features that elevate your entire kitchen design. By selecting appropriate trim styles, using proper installation techniques, and paying attention to finishing details, you can achieve results that appear professionally installed. The investment in time and materials pays off through increased visual appeal and home value. Start with one section to practice your technique before tackling the entire kitchen, and don’t rush the finishing process—those final details make the difference between DIY and professional results.


