
Water continuously flowing from your kitchen faucet when it should be off creates more than just an annoying drip—it’s a genuine household emergency. A Delta kitchen faucet that won’t turn off can waste hundreds of gallons daily, spike your water bill, and potentially cause water damage. The good news is that most cases stem from a handful of common, fixable issues that don’t require professional plumbing expertise. This guide reveals exactly why your Delta faucet refuses to shut down completely and provides step-by-step solutions to stop the water flow for good.
That sinking feeling when you turn your faucet off but water keeps flowing is all too familiar for many homeowners. Instead of panicking or immediately reaching for the phone to call an expensive plumber, understand that Delta’s design makes most repair components accessible to DIYers. Whether it’s a steady stream or just a persistent drip, the problem likely comes down to one of three culprits: a worn cartridge, damaged valve seats, or mineral buildup from hard water—all of which you can address with basic tools and minimal experience.
Pinpoint Your Delta Faucet’s Failure Point
Before grabbing tools, identify exactly why your Delta kitchen faucet won’t turn off completely. The symptoms reveal the specific component causing trouble, preventing wasted effort on unnecessary repairs. Most Delta kitchen faucets that won’t shut off fall into three distinct failure categories, each requiring different solutions.
How do you know if your cartridge has failed? When water continues flowing steadily after turning the handle to the off position, especially if you notice reduced water pressure or inconsistent temperature control beforehand, your cartridge is likely the culprit. The cartridge’s internal seals wear out over time, preventing it from creating a complete seal even when fully closed.
What signs indicate valve seat problems? If water leaks around the base of your faucet handle in addition to the spout continuing to flow, worn valve seats are probably to blame. These small rubber or metal components create the critical seal between the cartridge and faucet body—when they crack or wear down, water seeps through regardless of handle position.
How does mineral buildup cause faucet failure? Homes with hard water frequently experience faucets that won’t shut off due to calcium and lime deposits accumulating inside the faucet mechanism. If your faucet has been running slower than usual or requiring more force to operate before developing the “won’t turn off” problem, mineral deposits are likely preventing the cartridge from seating properly.
Immediate Fixes That Might Save You a Full Repair
Before disassembling your faucet, try these three quick troubleshooting steps that solve minor issues in minutes without special tools or replacement parts. Nearly 30% of “Delta kitchen faucet won’t turn off” cases resolve with these simple checks.
Force the handle to its full off position by applying firm, deliberate pressure counterclockwise (for most Delta models). Many homeowners don’t realize their handle hasn’t traveled its complete range, leaving the cartridge partially open. Push until you feel definite resistance, then check if water flow stops completely.
Check the cartridge retaining clip after shutting off water at the valves under your sink. Remove the handle by prying off any decorative cap and loosening the set screw with an Allen wrench. Inspect the small plastic or metal clip that holds the cartridge in place—if it’s broken or dislodged, water won’t shut off properly until replacement.
Verify your shutoff valves are fully open by turning both hot and cold supply valves counterclockwise under the sink. Partially closed valves create inconsistent pressure that mimics internal faucet failure. Test your faucet again after ensuring valves are fully open—this simple fix resolves many apparent faucet malfunctions.
Replace Your Delta Faucet Cartridge in 5 Steps
When quick fixes fail, cartridge replacement becomes necessary—this solves 70% of Delta kitchen faucet won’t turn off issues. The entire repair takes 30-60 minutes with basic tools and costs $15-$40 for the replacement part, saving you $150+ in plumber fees.
-
Shut off water supply completely at the valves under your sink, then open the faucet to release pressure and drain remaining water. Place a towel in the sink to catch small parts and protect the finish.
-
Remove the handle by locating and loosening the set screw (often hidden under a decorative cap). Some Delta models require a specific size Allen wrench—typically 1/8 inch for newer models or 5/64 inch for older ones.
-
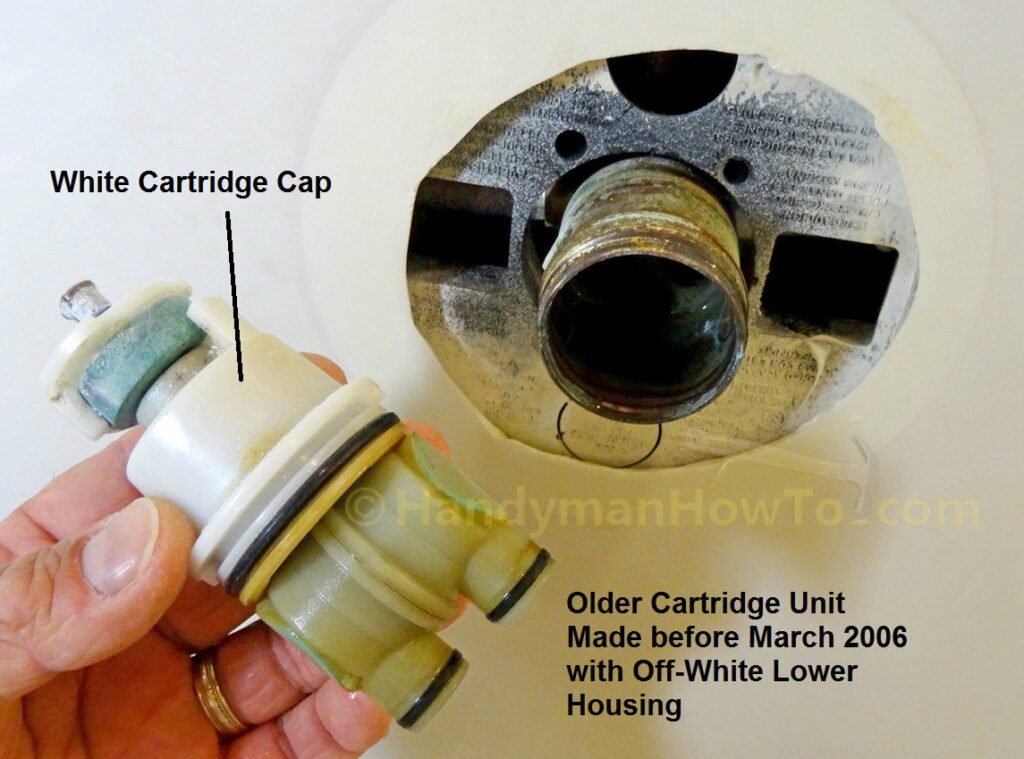
Extract the retaining nut using adjustable pliers or a Channel-lock wrench. Turn counterclockwise until loose, then lift straight out. You’ll see the cartridge beneath—gently rock it side-to-side while pulling upward for removal.
-
Clean the cartridge housing with white vinegar and a soft brush to remove mineral deposits before installing the new cartridge. Note the exact orientation of the old cartridge (take a photo) since Delta cartridges have specific alignment requirements.
-
Install the new cartridge by pushing it straight down until fully seated, then reinstall the retaining nut (hand-tight first, then snug with pliers—never overtighten). Replace the handle, restore water supply slowly, and test through multiple on-off cycles.
Repair Valve Seats When Water Leaks Around Handles

If your Delta faucet still won’t turn off after cartridge replacement, or if you notice water seeping around the handle base, valve seats need attention. These small components create the critical seal between cartridge and faucet body—when damaged, they allow water to bypass the cartridge’s shut-off position.
Use a specialized valve seat wrench (sold by Delta for $8-$15) to remove the old seats. Insert the wrench into each hex-shaped socket inside the faucet body and turn counterclockwise. Inspect seats for cracks, tears, or excessive compression—if present, replacement is necessary. For mineral-coated seats, soak in white vinegar for 30 minutes followed by gentle brushing with an old toothbrush.
Install new seats by threading them clockwise with the valve seat wrench until snug—overtightening risks stripping threads or cracking the seat. Reassemble faucet components in reverse order of disassembly, taking care to maintain proper cartridge alignment during reinstallation.
Eliminate Hard Water Buildup That Prevents Proper Sealing
Severe mineral accumulation requires more aggressive cleaning than standard maintenance. When hard water deposits prevent your Delta kitchen faucet from turning off completely, follow this deep-cleaning protocol to dissolve stubborn limescale.
Remove the cartridge as described in the replacement section, then submerge it in undiluted white vinegar for 4-6 hours (or overnight for severe cases). Simultaneously, fill small plastic bags with vinegar, place them over the faucet body openings, and secure with rubber bands to allow vinegar penetration into internal passages.
After soaking, scrub both cartridge and faucet interior with a soft brush to remove loosened deposits. Before reinstalling, flush the faucet body by briefly turning on water supply with cartridge removed—this clears dislodged debris that could cause immediate re-clogging. Regular quarterly vinegar soaks prevent future buildup in hard water areas.
Know When Professional Help Becomes Necessary
While most Delta faucet issues are DIY-friendly, certain situations warrant professional assistance to prevent further damage or safety hazards.
Call a plumber immediately if you cannot locate or operate the shutoff valves under your sink—frozen or corroded valves require specialized tools to address without breaking pipes. In this emergency, shut off your home’s main water supply first.
Seek professional service when DIY repairs fail to stop the water flow, indicating potential problems like a cracked faucet body, improper installation, or issues with your home’s plumbing system rather than the faucet itself. Professional repairs typically cost $150-$350 depending on complexity.
Contact Delta customer service first if your faucet remains under warranty—attempting self-repair might void coverage. Have your proof of purchase and model information ready, as Delta often provides free replacement parts and sometimes professional service for covered issues.
Prevent Future Faucet Failures With Simple Maintenance
Extend your Delta faucet’s lifespan and prevent “won’t turn off” emergencies with these three simple maintenance habits that take minutes monthly.
Exercise handles regularly by moving your faucet through its full range of motion at least once monthly. This prevents mineral deposits from bonding components together and maintains smooth operation—especially crucial in hard water areas.
Inspect supply lines annually for corrosion, leaks, or stiffness. Replace aging braided supply lines before failure (typically every 5-7 years), and exercise shutoff valves twice yearly by turning them fully closed and open to prevent seizing.
Install a water softener if hard water causes recurring problems. While representing a $500-$2,500 investment, softeners extend the life of all plumbing fixtures and appliances while improving water quality throughout your home.
A Delta kitchen faucet that won’t turn off doesn’t have to become a costly emergency. By understanding the common causes and following these systematic repair steps, most homeowners restore full function without professional assistance. Regular maintenance prevents recurrence, keeping your faucet operating reliably for years to come while saving hundreds in potential repair costs.


