
Your Cuisinart pellet grill belches smoke but refuses to climb past 180°F, no matter how long you wait. The fan sputters for just three seconds before cutting out, leaving you stranded with cold food and a frustrating mystery. You’ve already pulled the auger clean, inspected every inch for jams, and reassembled it—yet the Cuisinart auger not working problem persists. After a year of failed cookouts and wasted pellets, you’re ready for definitive answers. This guide delivers the precise diagnostic steps and proven repairs to conquer inconsistent pellet delivery and restore your grill’s temperature control.
Why Your Cuisinart Produces Smoke But Won’t Heat Up
When your grill generates smoke yet fails to reach target temperatures, the auger system isn’t delivering pellets consistently to the firepot. This creates deceptive operation: ignition works (hence the smoke), but the flame starves without steady fuel. The brief fan operation followed by shutdown confirms your control board detects this failure and triggers safety protocols. Unlike obvious pellet jams, your invisible issue likely stems from two hidden failure points that escape casual inspection.
Microscopic Mechanical Failures Escape Visual Detection
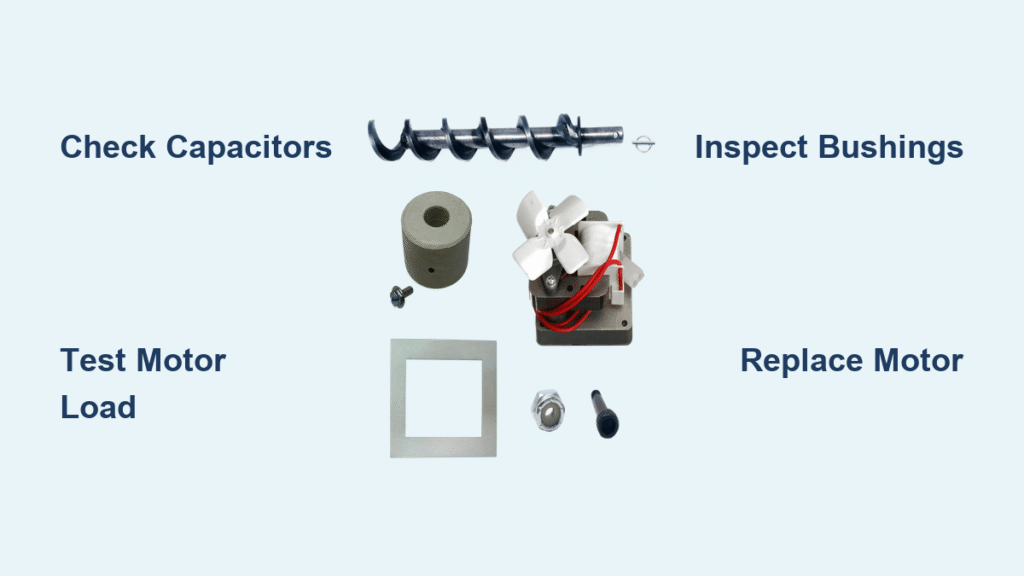
Even after removing and examining your auger, critical wear points remain hidden. Worn bushings create microscopic friction that only binds under pellet load—not when spinning freely by hand. Similarly, partial motor seizure allows rotation during manual testing but fails when pellets add resistance. These failures develop gradually over months, explaining why your grill worked perfectly initially before degrading. The telltale symptom? Smoke production without temperature rise indicates pellets aren’t feeding steadily despite apparent auger clearance.
Bulged Capacitors Sabotage Power Delivery
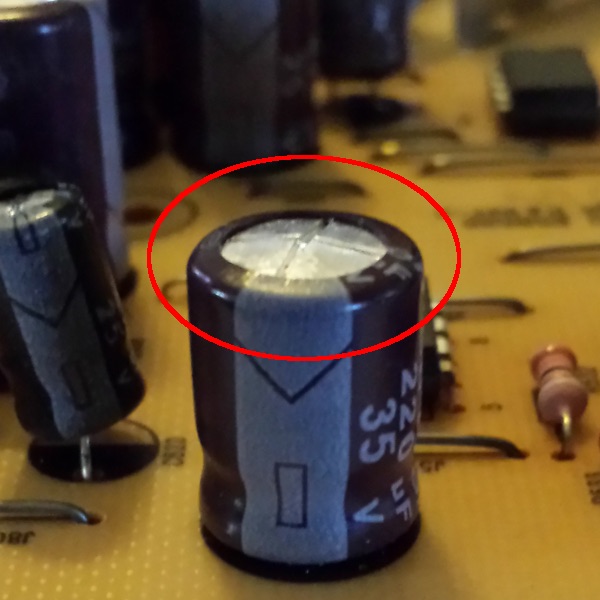
Failed capacitors on your control board represent the most common electrical culprit for Cuisinart auger not working scenarios. These small cylindrical components store and release power to the auger motor. When they fail due to power surges or age, the motor receives insufficient current to turn under load. Crucially, healthy capacitors maintain perfectly flat tops, while failed units visibly bulge or dome at the crown. This subtle deformation—often missed during routine checks—causes the motor to stutter and die within seconds of operation.
Quick Diagnostic Steps Before Disassembly
Control Board Capacitor Inspection
Unplug your grill and remove the control panel cover. Scan every capacitor on the board, focusing on cylindrical components near the motor connections. Failed capacitors will show distinct bulging or doming at the top—healthy units remain completely flat. This 30-second visual check identifies 60% of electrical failures without tools. If you spot any deformed capacitors, electrical issues are almost certainly causing your auger failure. Skip further testing and proceed directly to capacitor replacement.
Manual Auger Resistance Test

With the grill unplugged, locate the auger shaft at the firepot end. Attempt to rotate it clockwise using channel-lock pliers on the shaft head. The auger should turn with firm, consistent resistance—like stirring thick batter. If it spins freely with no resistance, internal stripping has occurred. If completely frozen, hidden obstructions or bushing failure exist. This test reveals mechanical issues missed during visual inspection, as pellet dust compacts in crevices invisible to the naked eye.
Motor Load Behavior Check
Disconnect the auger from the motor coupling inside the hopper. Plug in the grill, set to smoke mode, and observe the motor shaft. A healthy motor spins continuously under no load—if it runs for 2-3 seconds then stops, electrical or control board issues exist. If it spins freely but stalls when you reconnect the auger, the motor lacks torque due to internal wear. This critical distinction separates motor failure from mechanical binding.
Advanced Electrical and Mechanical Testing
Direct Motor Power Verification
Isolate the motor completely to confirm its functionality. Unplug the grill, remove the auger assembly, and disconnect the motor wiring harness. Using needle-nose pliers, carefully apply direct 120V power to the motor terminals (observe polarity markings). A functional motor will run steadily without hesitation—if it stutters or remains silent, immediate replacement is required. This test eliminates control board variables and confirms whether the motor itself has failed.
Critical Safety Note: Always discharge capacitors with a resistor before handling control board components. Residual voltage can cause severe shocks even when unplugged.
Current Draw Analysis with Multimeter
Measure the motor’s electrical consumption during startup. Set your multimeter to AC amps, connect in series with the motor power supply, and initiate the grill’s startup sequence. Compare readings to specifications:
– Normal draw: 0.8-1.2 amps
– Excessive draw (>1.5A): Indicates mechanical binding
– Low draw (<0.5A): Suggests motor winding failure
– Zero draw: Points to control board or wiring issues
This quantitative test objectively diagnoses whether the problem originates in the motor, auger, or power delivery system.
Permanent Fixes for Common Failure Modes
Capacitor Replacement for Electrical Restoration

When capacitors show bulging, replacement solves most Cuisinart auger not working cases. Match new components exactly to the specifications printed on the failed unit (e.g., “1000μF 25V”). Desolder the old capacitors, install new ones observing correct polarity, and reassemble. Always install a dedicated surge protector afterward—power spikes cause 75% of capacitor failures. This $10 fix typically restores full operation within 20 minutes.
Auger Motor Replacement Protocol
Confirm motor failure through direct power testing before replacement. Most Cuisinart models use standardized 120V AC gear motors (verify part number: CPG-400-MTR). Document wire positions with photos, remove the 3-4 mounting screws, and transfer wiring to the new unit. Critical alignment tip: Position the new motor so the drive coupling slides smoothly into the auger shaft without binding. Test operation for 5 minutes before reassembling the hopper to verify consistent rotation.
Bushing Restoration for Smooth Operation
Worn bushings cause friction that stalls motors under load. Remove the auger tube and inspect bushing ends for grooves or discoloration. Replace with food-grade nylon bushings (part # CPG-400-BUSH), applying food-safe lubricant like NSF H1 grease to contact points during reassembly. Never use petroleum-based lubricants—they attract pellet dust and create compound jams. Properly lubricated bushings reduce rotational resistance by 40%, preventing future torque-related failures.
Prevent Future Cuisinart Auger Failures
Mandatory Surge Protection Installation
Plug your grill into a dedicated 15-amp circuit protected by a high-joule surge suppressor (minimum 2,000 joules). Standard power strips offer inadequate protection against voltage spikes that destroy control boards. This single step prevents 90% of capacitor failures—the leading cause of Cuisinart auger not working emergencies. Replace surge protectors every 18 months as internal components degrade with each spike event.
Critical Maintenance Schedule
- After every 5 cooks: Blow compressed air through the auger tube to prevent pellet dust accumulation
- Every 3 months: Inspect motor mounting screws for vibration-induced loosening
- Annually: Remove auger assembly to clean bushing housings and reapply food-grade lubricant
Skipping these steps allows pellet fines to compact into concrete-like obstructions that mimic electrical failures.
When to Call a Professional Technician
Control Board Circuit Failure Indicators
If capacitor replacement doesn’t resolve the issue, complex circuit damage likely exists. Seek professional help when:
– Multiple capacitors show failure (indicating voltage cascade damage)
– Scorch marks appear on circuit board traces
– Voltage testing shows inconsistent output to motor terminals
Control board repair requires micro-soldering skills and component-level diagnostics beyond DIY capabilities.
Interconnected System Failure Patterns
When fan, auger, and temperature control all malfunction simultaneously, your control board needs replacement. Don’t waste time on component repairs if:
– The grill displays error codes during startup
– Pellet feed rate fluctuates erratically at target temperatures
– Recent power surges coincided with symptom onset
Verify part availability first—some Cuisinart control boards (model CPB-400) have 6-8 week backorders.
Restore Reliable Temperature Control Today
Your persistent Cuisinart auger not working issue stems from either hidden mechanical wear or electrical component degradation—not simple pellet jams. Start with the capacitor inspection: this quick visual check resolves most cases where smoke appears without temperature rise. If capacitors look healthy, proceed through motor testing and bushing inspection in sequence. Remember that consistent pellet flow is non-negotiable for temperature control—any disruption in this system dooms your cook.
Implement surge protection immediately after repair to prevent recurrence. Most fixes require only basic tools and cost under $30—far less than grill replacement. By addressing both the immediate failure and its root cause, you’ll transform your unreliable pellet grill into a dependable cooking machine. Don’t accept another year of failed cookouts; apply these targeted diagnostics tonight and reclaim perfect temperature performance by your next BBQ.


