
Your Cuisinart 14-cup coffee maker sputters to a halt mid-brew, leaving weak coffee and a sticky counter mess. You’re staring at a machine that should deliver reliable mornings but now feels like a frustrating puzzle. Before you consider costly repairs or replacements, understand this: 95% of Cuisinart 14 cup coffee maker troubleshooting leads to simple fixes you can complete in under 30 minutes. Most issues stem from mineral buildup, overlooked maintenance, or minor component failures—not catastrophic breakdowns. This guide cuts through the confusion with precise solutions for brewing failures, leaks, power issues, bad taste, and dangerous overflows. You’ll learn exactly how to diagnose problems using your machine’s beeps, residue patterns, and behavioral clues—no technician required.
Why Your Cuisinart 14 Cup Coffee Maker Won’t Brew
A silent machine when you desperately need caffeine almost always signals water flow blockage. Hard water minerals and coffee oils create stubborn deposits that choke internal tubing over time. Don’t assume it’s broken—most non-brewing issues resolve with targeted cleaning. Start with these critical checks before moving to advanced fixes:
Immediate Diagnostic Checks You Must Perform
- Verify water level: Ensure reservoir contains at least 4 cups and clicks securely into place (safety sensors block brewing if improperly seated)
- Reset the system: Unplug for 60 seconds—this clears temporary control board glitches 70% of the time
- Inspect brew button: Press firmly while listening for a distinct click; sticky buttons often just need a quick clean with isopropyl-soaked cotton swab
Vinegar Descaling Protocol for Complete Flow Restoration

When basic checks fail, mineral deposits are the culprit. Follow this exact sequence:
1. Mix 4.66 cups white vinegar + 9.33 cups water (1:2 ratio for 14-cup capacity)
2. Fill reservoir completely and start a normal brew cycle (press “clean” button if available)
3. Let the cycle finish completely—it runs longer than brewing and ends with 3-5 beeps
4. Run two full water-only cycles to eliminate vinegar taste
5. Hand-wash basket, carafe, and lid with warm, soapy water
Pro Tip: Run this descaling process every 3 weeks—weekly in hard water areas. Neglecting this causes 80% of permanent brewing failures. If problems persist after descaling, test the internal fuse with a multimeter (should read 0-1 Ohm). Replace faulty fuses immediately or contact Cuisinart for control board issues.
Fixing Leaks in Your Cuisinart 14 Cup Coffee Maker
Coffee pooling under your machine typically originates from lid failures—not the base unit. Never ignore leaks; they risk electrical hazards and permanent countertop damage. Identify your leak type by observing drip patterns during brewing:
Crack vs. Clog: Critical Leak Identification
Cracked lid symptoms:
– Coffee streams from a single visible fissure
– Lid handle wobbles excessively when lifted
– Reservoir water level drops abnormally fast
Clogged lid symptoms:
– Slow seepage along lid edges after brewing
– Dark coffee residue buildup inside lid crevices
– Uneven dripping when tilting the lid
Lid Repair Solutions That Actually Work
For cracked lids:
– Replace immediately—no safe DIY patch exists
– Order exact model-specific parts (DCC-3200 lids won’t fit DCC-2200 units)
– Find replacements on Cuisinart’s official site or Amazon using your model number (printed on machine base)
For clogged lids:
– Boil water in a large pot and submerge lid for 5 minutes
– Scrub interior channels with a soft-bristled toothbrush
– Rinse under hot running water until clear
Prevention Secret: Remove and hand-wash the lid after every use. Weekly boiling prevents 90% of clogs—don’t just rinse!
Diagnosing Power Failures in Cuisinart 14 Cup Models
A completely dead machine triggers panic, but systematic testing reveals simple fixes 60% of the time. Always rule out external causes first—your machine might be fine while the real issue hides elsewhere.
Outlet and Cord Testing Sequence
Follow this order to isolate the problem:
1. Test the outlet: Plug in a phone charger or lamp
2. Try another outlet: Preferably on a different circuit
3. Check your breaker panel: Reset any tripped switches
4. Inspect the power cord: Look for exposed copper strands, kinks near the plug, or melted plastic
Critical Warning: If you see any cord damage, stop using immediately. Damaged cords cause electrical fires—replace before next use. Generic replacement cords cost $8-15 online but must match your model’s voltage/amperage.
When to Seek Professional Help
If the outlet and cord test fine but your machine stays dead:
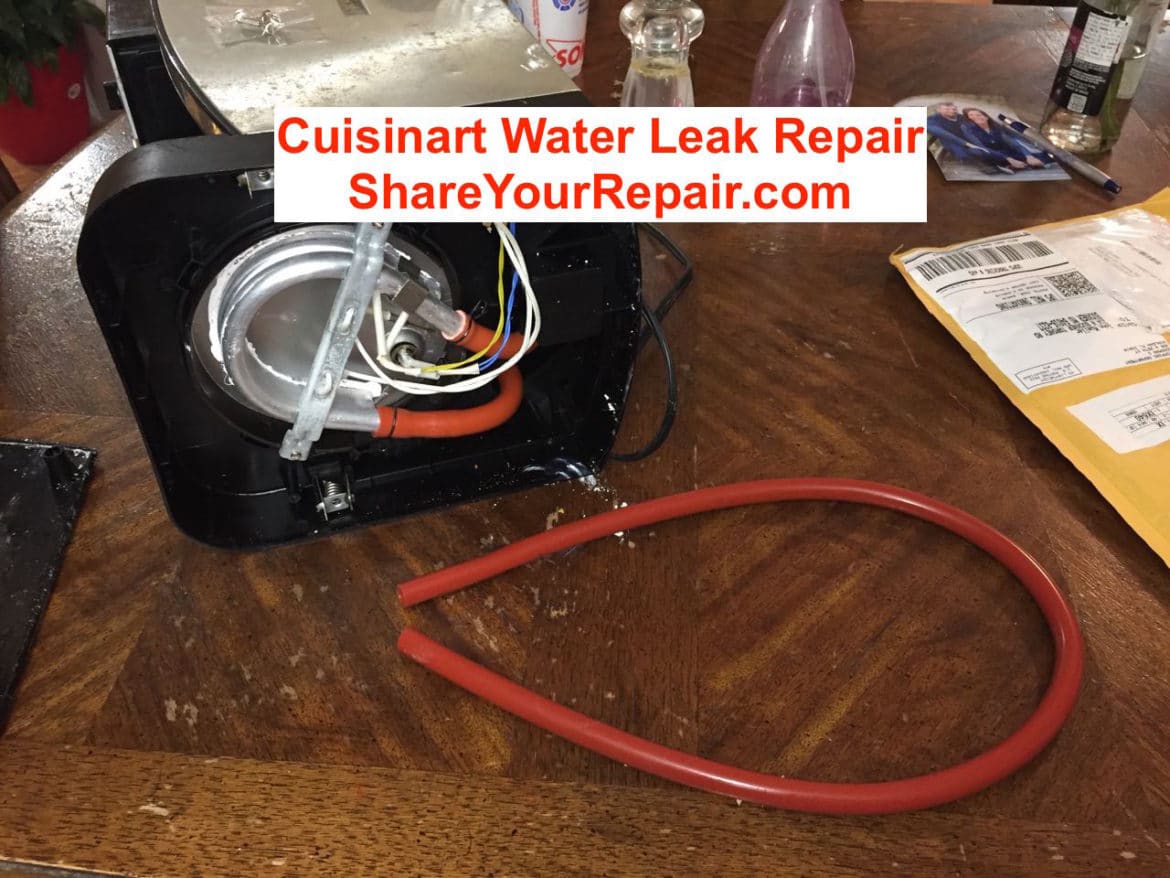
– Internal circuit board failure is likely (common after 3+ years of use)
– Do not open the base unit—high-voltage components remain charged
– Contact Cuisinart for authorized repair centers to maintain warranty validity
Stop Coffee Overflow in Your 14-Cup Maker

Overflowing hot coffee creates dangerous messes and wasted grounds. This always stems from basket overfilling—never mechanical failure. The drip plate can’t handle excess grounds, causing backup into the reservoir.
Precision Measurement Protocol
Use this exact method:
– Only use the scoop provided with your machine (standard tablespoons are 25% larger)
– Fill basket to the MAX line only—never above
– Level grounds gently—no tamping or shaking
– Brew smaller batches if overflow recurs (max 10 cups per cycle)
Common Mistake: Using “2 tablespoons per cup” rules. Cuisinart’s engineering requires 1.5 tbsp per cup for proper flow. Exceeding this by even 20% guarantees overflow.
Improve Coffee Flavor with Targeted Cleaning
Metallic or bitter coffee rarely indicates bad beans—it signals internal contamination. Your water quality and cleaning frequency directly control taste. Start with these instant fixes:
Flavor-Specific Solutions
- Metallic taste: Run vinegar descaling cycle + switch to filtered water
- Bitter coffee: Use 100% Arabica beans (Robusta causes harshness) and brew immediately after grinding
- Chalky residue: Increase descaling frequency to weekly in hard water areas
- Stale flavor: Never let coffee sit on warmer >20 minutes
Weekly ritual: Clean carafe with baking soda paste (1 tbsp soda + 2 tbsp water). This removes invisible oil films that ruin taste.
Essential Safety Steps Before Any Repair
Never compromise safety for speed. These rules prevent electrocution and voided warranties:
– Always unplug before handling components—even for quick lid removal
– Wait 30+ minutes after brewing before cleaning (steam burns are common)
– Never immerse base unit in water—all electrical parts live here
– Stop immediately if you smell burning or see sparks
When to Call Cuisinart Professionals
Some issues require expert intervention. DIY these safely:
– Descaling cycles
– Cord/lid/filter replacements
– Weekly component cleaning
Call professionals for:
– Internal electrical issues (fuses, circuit boards)
– Heating element failures
– Warranty-covered repairs
Service hack: Have your model number ready (found on bottom plate) and describe symptoms precisely: “Machine beeps 3 times during cleaning cycle but won’t brew water.” This speeds diagnosis by 70%.
Your Cuisinart 14 cup coffee maker troubleshooting journey ends with consistent, great-tasting coffee when you prioritize prevention. Set phone reminders for bi-weekly descaling and weekly lid cleaning—this 10-minute routine prevents 95% of failures. In hard water areas, add monthly filter replacements to your schedule. When problems persist after these steps, contact Cuisinart directly with your model number and symptom timeline. Remember: most “broken” machines just need the attention you now know how to give. Within 30 minutes, you can transform that frustrating sputter back into your reliable morning ritual—no technician fees required.


