
Your laminate kitchen cabinets have started looking dull, sticky, and worn—even though you clean them regularly. That frustrating film that won’t wipe away? It’s likely the result of using improper cleaning methods that damage laminate surfaces over time. Unlike wood cabinets, laminate features a synthetic top layer that reacts poorly to harsh chemicals, excessive moisture, and abrasive tools. Many homeowners unknowingly accelerate wear by reaching for the same cleaners they use on countertops or floors. The good news is the best way to clean laminate kitchen cabinets requires only simple household items and proper technique—no expensive specialty products needed. This guide reveals exactly how to restore that factory-fresh shine while protecting your cabinets from irreversible damage.
Most laminate cabinet issues stem from basic misunderstandings about their construction. That glossy or matte surface you see isn’t solid material—it’s a thin decorative layer bonded to particleboard with resin. When exposed to wrong cleaning methods, this protective layer scratches, discolors, or peels away, leaving cabinets looking older than they are. By learning the right approach, you’ll extend your cabinets’ lifespan significantly while keeping them looking pristine. Whether you’re dealing with daily fingerprints, cooking grease buildup, or stubborn stains, this complete system delivers professional results without professional costs.
Why Laminate Needs Special Care
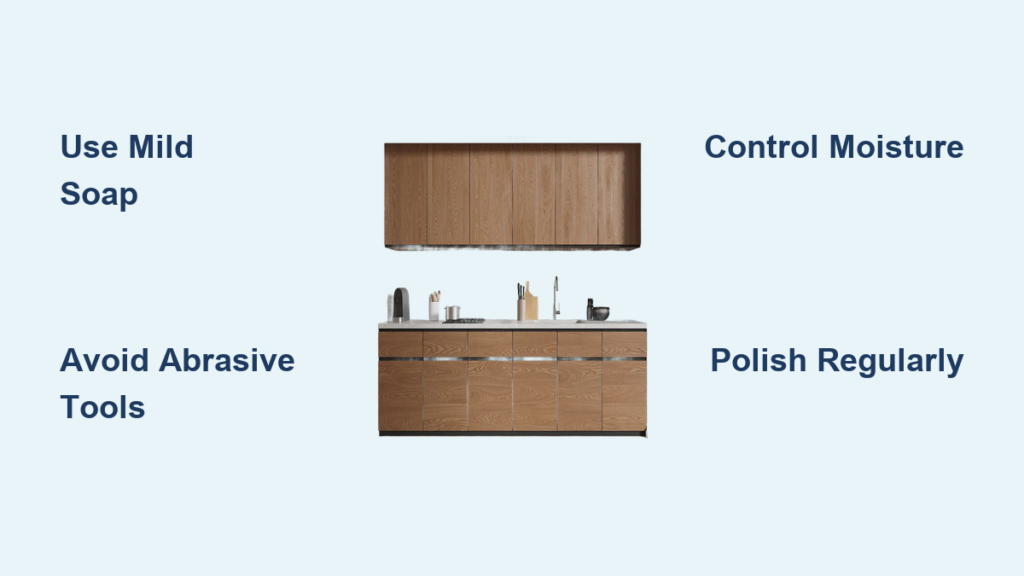
Laminate cabinets consist of decorative paper or fabric layers fused with resin under high heat and pressure, topped with a protective wear layer. This construction makes them moisture-resistant compared to wood, but creates unique vulnerabilities requiring specific cleaning approaches. The protective top layer deteriorates when exposed to abrasive scrubbers that create microscopic scratches, harsh chemicals that break down adhesives, or excessive moisture that seeps into edges causing bubbling.
You must recognize these three critical vulnerabilities to prevent permanent damage. Abrasive tools like steel wool or stiff-bristled brushes leave fine scratches that scatter light, creating a permanently dull appearance. Harsh chemicals including bleach, ammonia, and oven cleaners discolor surfaces and weaken the bond between layers. Standing water or steam penetrates seams where the laminate meets edges, causing separation and warping that requires replacement.
Your cabinet’s finish type further determines your cleaning approach. High-gloss finishes show every fingerprint and scratch, demanding frequent gentle cleaning with immediate drying. Matte and textured surfaces hide dirt better but trap grime in their patterns, requiring occasional deeper cleaning with attention to detail. Regardless of finish, the core principles remain consistent: use mild cleaners, minimize moisture exposure, avoid abrasion, and dry surfaces immediately after cleaning.
Gather Your Cleaning Supplies
Assembling the right supplies before cleaning prevents mid-process interruptions and ensures effective results without damaging your cabinets. Most necessary items already exist in your cleaning arsenal, making proper cabinet maintenance both simple and affordable.
Essential supplies include soft microfiber cloths (at least three—one for applying cleaner, one for rinsing, and one for drying), a soft-bristled brush for grooves and hardware crevices, and a spray bottle for controlled solution application. For cleaning solutions, mild dish soap diluted in warm water serves as your everyday cleaner, while equal parts white vinegar and water creates an effective degreaser. Baking soda mixed with water forms a gentle paste for stubborn spots without harsh chemicals. Keep specialized laminate polish or microfiber polish on hand for restoring shine after deep cleaning sessions.
Never reach for these damaging items: steel wool, abrasive sponges, bleach-based cleaners, ammonia products, or steam cleaners. These common household items cause irreversible damage to laminate surfaces despite their effectiveness on other materials. Having your proper supplies ready ensures a smooth cleaning process that protects rather than harms your investment.
Daily Quick-Clean Method for Fingerprints and Light Grime
Establishing a two-minute daily cleaning routine prevents the buildup that leads to deep cleaning needs and keeps your cabinets looking fresh with minimal effort. This quick method works best as maintenance between thorough cleaning sessions.
Start by removing loose debris with a dry microfiber cloth to prevent grinding particles into the surface. Always spray your cleaner onto the cloth—not directly on cabinets—to control moisture application and prevent pooling at seams. Wipe each surface using gentle linear motions (not circular) to avoid streaking, paying special attention to high-contact areas like handles and edges near cooking surfaces. Immediately follow with a dry microfiber cloth to remove all moisture—this two-cloth method prevents water spots and moisture damage.
For glossy finishes, use a glass cleaner sparingly on a microfiber cloth for streak-free results, followed immediately by a dry cloth. This entire daily process takes approximately two minutes per cabinet door, making it easy to incorporate into your regular kitchen cleaning routine while preventing the sticky residue that develops from neglected maintenance.
Deep-Clean Sticky Grease Buildup on Cooking Surfaces
Cabinets near stoves develop stubborn sticky residue from airborne cooking oils that daily cleaning can’t remove. This greasy film requires a deeper cleaning approach that breaks down buildup without damaging laminate.
Create a degreasing solution of equal parts white vinegar and warm water in a spray bottle—the vinegar’s acidity cuts through grease while remaining gentle on laminate. Apply generously to affected areas and let sit for 2-3 minutes to penetrate the residue. Wipe using moderate pressure in the direction of the cabinet grain with a microfiber cloth. For particularly stubborn areas, apply baking soda paste (baking soda mixed with just enough water to form a spreadable consistency) and gently rub with a soft cloth.
Never soak cabinets or allow liquid to pool at seams and edges—this causes irreversible damage. After cleaning, wipe with a plain water-dampened cloth to remove any vinegar residue, then immediately dry thoroughly with a clean microfiber cloth. This method safely removes years of buildup without the harsh chemicals that degrade laminate surfaces over time.
Remove Stubborn Stains Without Damaging Surfaces
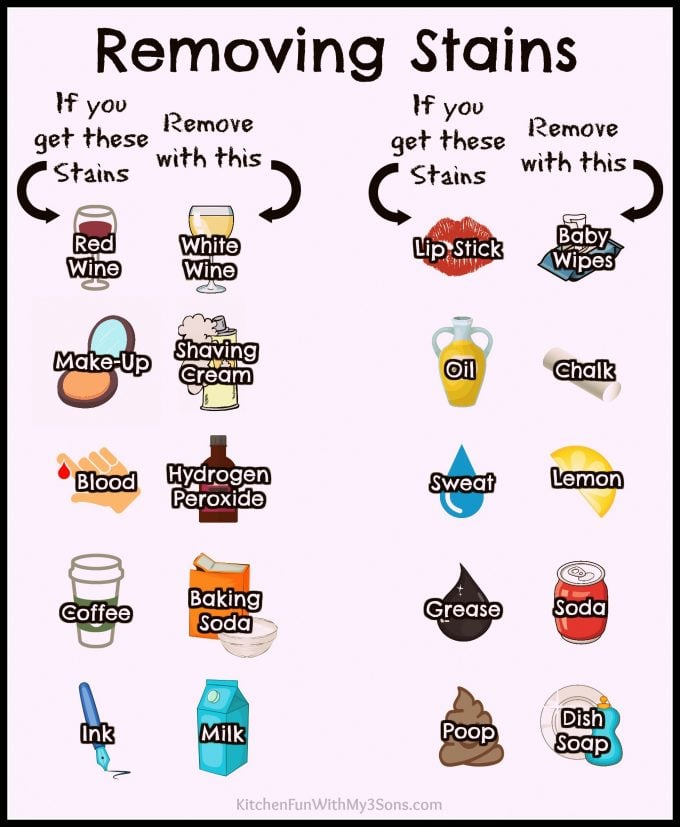
Different stain types require specific approaches, but always test solutions in an inconspicuous area first and act quickly for best results. For food and beverage stains, create a baking soda paste and apply directly to the stain with a soft cloth. Allow it to sit for 5-10 minutes for set-in stains, then wipe away with a damp cloth followed by immediate drying.
Ink and marker stains respond well to small amounts of rubbing alcohol dabbed gently with a cotton ball—never rub, as this spreads ink deeper. For stubborn ink that resists alcohol, try minimal nail polish remover containing acetone (test first in hidden area). Coffee, tea, and juice stains often disappear with a vinegar-water solution applied and left to sit briefly before wiping.
Never use bleach, abrasive cleaners, or scouring pads on stains—these cause permanent discoloration and surface damage that cannot be reversed. The gentlest effective method always produces better long-term results than aggressive approaches that compromise your laminate’s protective layer.
Polish and Restore Shine After Deep Cleaning
Deep cleaning often reveals a slightly dull surface once accumulated residue is removed—this is your actual laminate finish showing through. Proper polishing restores shine while creating a protective barrier against future buildup.
Apply a small amount of specialized laminate polish or a homemade mixture (1 part olive oil to 4 parts vinegar) to a soft microfiber cloth. Work in small sections using long, smooth strokes following the cabinet grain direction. Allow to dry to a light haze (1-2 minutes), then buff with a clean, dry microfiber cloth. For high-gloss finishes, finish with a glass cleaner applied to a cloth—not directly on cabinets—to achieve that showroom shine.
Avoid over-polishing, as excessive buildup attracts dust and creates a greasy feel. Light polishing every few weeks, or whenever cabinets begin looking dull, maintains appearance between deep cleaning sessions without creating maintenance problems of its own.
Avoid These Three Costly Cleaning Mistakes

Preventing damage begins with understanding practices that cause the most common—and expensive—problems. Many well-intentioned cleaning efforts actually harm cabinets over time.
Never use abrasive tools including steel wool, scouring pads, or rough cloths—even for stubborn residue. These create microscopic scratches that permanently dull the finish. Avoid harsh chemicals completely—bleach, ammonia, and oven cleaners strip protective layers causing irreversible discoloration. Minimize moisture exposure by never spraying directly on cabinets, always wringing cloths thoroughly, and drying immediately after cleaning. Standing water seeping into seams causes bubbling and peeling that requires cabinet replacement.
These mistakes compound over time, making cabinets look older than they are. The extra minute it takes to use proper technique saves hundreds in premature replacement costs.
Maintain Cabinet Beauty With Simple Daily Habits
Consistent maintenance prevents buildup that leads to deep cleaning needs and extends cabinet life significantly. Wipe high-contact areas every few days using your quick-clean method, even when they don’t appear dirty. Address spills immediately before they dry and harden. Inspect cabinets monthly for developing issues like peeling edges or bubbling surfaces.
Tighten loose hardware promptly to prevent damage from repeated stress. Ensure adequate kitchen ventilation during cooking to reduce airborne grease settling on cabinets. Perform thorough cabinet cleaning and inspection every two to three months depending on cooking frequency.
This simple maintenance system—daily quick cleaning, weekly spot treatment, and quarterly deep cleaning—keeps laminate cabinets looking new for decades rather than showing wear in just a few years. The investment of minutes each day prevents hours of difficult restoration work and delays expensive replacement significantly.


