
Your kitchen sink gurgles and drains slower each day. That unpleasant odor creeps up from the drain even when you haven’t washed stinky dishes. You’ve tried pouring boiling water down the drain, but the problem keeps coming back. Clogged kitchen sink pipes affect nearly every homeowner at some point, yet most people reach for chemical drain cleaners that damage pipes and fail to solve the root cause. This guide reveals the most effective methods to clean kitchen sink pipes using affordable household items, proper tools, and preventive techniques that keep your drainage system flowing smoothly for months.
Why Kitchen Sink Pipes Clog Faster Than Other Drains
Kitchen sink pipes face unique challenges compared to bathroom drains. Food particles, grease, coffee grounds, and starches from pasta and potatoes create stubborn blockages that accumulate over time. Unlike bathroom drains where hair is the primary culprit, kitchen clogs develop from multiple sources combining into a stubborn sludge that resists simple fixes.
The P-trap beneath your sink collects debris that eventually restricts water flow, while the horizontal section of pipe leading to your main drain line allows grease to cool and solidify. This combination creates recurring clogs that require more than temporary solutions. Understanding these specific challenges helps you select the right cleaning approach for long-term results.
Effective Non-Chemical Methods to Clean Kitchen Sink Pipes
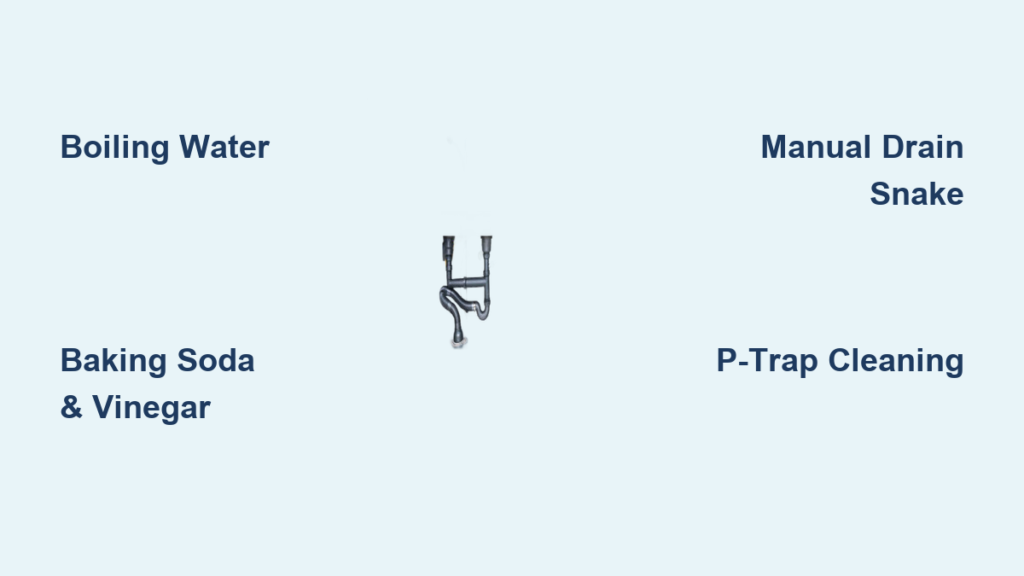
Boiling Water Technique for Mild Grease Buildup
Boiling water works best for minor grease accumulation in the early stages of clogging. Pour 4-6 cups of rapidly boiling water directly down your drain in three separate batches, waiting 30 seconds between each pour. This method melts light grease deposits without damaging pipes like chemical cleaners do.
Pro tip: For double sinks, plug the side you’re not treating to increase water pressure through the clogged side. Never use boiling water on PVC pipes older than 10 years as they may warp from extreme heat.
Baking Soda and Vinegar Drain Cleaning Process
The baking soda and vinegar reaction creates natural effervescence that breaks down organic matter without harming pipes. Start by pouring ½ cup of baking soda directly into your drain, followed by 1 cup of white vinegar. Cover the drain immediately with a plug to contain the reaction. After 15 minutes of bubbling action, flush with 4 cups of hot water.
What to look for: If water still drains slowly after this treatment, you likely have a more serious clog requiring mechanical removal. The baking soda and vinegar method works best as monthly maintenance rather than a cure for severe blockages.
Manual Drain Snake for Stubborn Clogs
When liquid solutions fail, a manual drain snake (also called a plumber’s auger) reaches clogs 15-25 feet into your pipe system. Insert the coiled end into your drain and crank the handle while applying gentle pressure. When you feel resistance, rotate the snake to grab the clog, then pull out the debris.
Common mistake: Many homeowners give up too soon—clogs often require multiple passes with the snake. Work slowly to avoid scratching your pipes. For kitchen sinks, focus on the P-trap area first where most food debris collects.
How to Remove and Clean the P-Trap Properly

Preparing Your Workspace Before Pipe Removal
Place a bucket under the P-trap to catch residual water and debris. Wrap old towels around the connections to absorb spills. Wear rubber gloves to protect your hands from bacteria and sharp edges. Turn off the water supply under the sink before starting to prevent accidental flooding.
Essential safety step: Never attempt to remove pipes while water is running. Confirm both hot and cold shutoff valves are completely closed by testing the faucet before proceeding.
Step-by-Step P-Trap Cleaning Procedure
- Loosen the slip nuts at both ends of the P-trap using an adjustable wrench (turn counterclockwise)
- Carefully lower the trap into your bucket, allowing trapped water and debris to drain out
- Use an old toothbrush to scrub the interior walls of the pipe, focusing on grease buildup
- Rinse thoroughly with hot water until it runs clear
- Inspect the rubber gaskets for cracks or wear that could cause leaks
- Reassemble the trap in reverse order, hand-tightening connections before using the wrench for a quarter-turn
Time estimate: Complete P-trap cleaning takes 20-30 minutes for first-time DIYers. Keep a flashlight handy to spot hidden debris in the curved sections of the pipe.
Preventing Future Clogs With Daily Habits
Proper Grease Disposal Techniques That Actually Work
Never pour cooking oil, bacon grease, or melted butter down your sink—even small amounts accumulate over time. Instead, pour cooled fats into an old coffee can or dedicated grease container and dispose of it in the trash once solidified. For small amounts of oil on dishes, wipe plates with paper towels before washing.
Pro tip: Keep a metal can near your stove specifically for grease collection. When full, place it in the freezer overnight to solidify contents before throwing away.
Sink Strainer Maintenance Schedule
Install a fine-mesh strainer that catches food particles larger than ⅛ inch. Empty this strainer after every meal preparation session, not just when it looks full. Rinse the strainer under running water to remove stuck particles that could slip through during disposal.
What to look for: If your strainer consistently collects potato peels, pasta, or rice grains, adjust your food preparation habits to dispose of these items directly in the compost or trash rather than risking pipe damage.
When to Call a Professional Plumber Immediately
Warning Signs of Serious Pipe Damage
Ignore these red flags at your peril: multiple drains backing up simultaneously, sewage odors throughout your home, water stains on ceilings below plumbing, or gurgling sounds when flushing toilets. These indicate problems beyond simple clogs that require professional video inspection.
Urgent consequence: Delaying professional help for main line clogs can lead to raw sewage backups that cause thousands in water damage and require hazardous material cleanup.
Cost Comparison: DIY vs Professional Service

Simple clogs cost $0-$50 to fix yourself versus $150-$250 for a plumber’s minimum service call. However, main line blockages requiring hydro-jetting cost $300-$600 professionally but could cause $5,000+ in water damage if mishandled by inexperienced DIYers.
Smart approach: Attempt DIY methods only for single-sink slow drainage. Call a plumber immediately for multiple affected fixtures or if you’ve tried three DIY methods without success.
Monthly Maintenance Routine for Clear Pipes
Baking Soda Flush Protocol
Once monthly, pour ¼ cup baking soda followed by 1 cup vinegar down your drain. Let it foam for 15 minutes, then flush with 4 cups of hot (not boiling) water. This natural treatment prevents grease buildup without damaging pipes.
Expert note: Skip this treatment if you’ve used chemical drain cleaners recently, as mixing chemicals creates dangerous fumes.
Hot Water Rinse Schedule
After each evening’s dishwashing, run hot water (120-140°F) for 30-60 seconds to clear residual grease. This simple habit prevents cooled fats from solidifying in your pipes overnight.
Time-saving shortcut: Combine this with your final kitchen cleanup—turn on hot water while wiping counters to build this into your existing routine.
Final Note
Regular kitchen sink pipe maintenance prevents 90% of clogs before they start. Implement the monthly baking soda treatment, install quality strainers, and properly dispose of grease to keep your drainage system flowing freely. When faced with stubborn clogs, the manual drain snake and P-trap cleaning methods solve most household blockages without chemical damage to your pipes. Remember that multiple slow drains signal serious issues requiring professional attention—don’t risk sewage backups by delaying expert help. With these techniques, you’ll spend less time battling clogs and more time enjoying your kitchen without plumbing worries.


