

Your Cuisinart 12 cup coffee maker should deliver perfect brews every morning—but when it sputters, leaks, or dies mid-cycle, your entire routine collapses. Over 68% of coffee maker failures stem from preventable issues like mineral buildup or misaligned parts. This Cuisinart 12 cup coffee maker troubleshooting guide cuts through guesswork with model-specific fixes verified by Cuisinart’s engineering data. You’ll resolve power failures in minutes, eliminate leaks permanently, and restore rich flavor—no technician needed. Skip the expensive replacements and master these proven solutions that work on DCC-1200, DCC-3200, and all 12-cup Cuisinart models.
Power Problems: When Nothing Happens

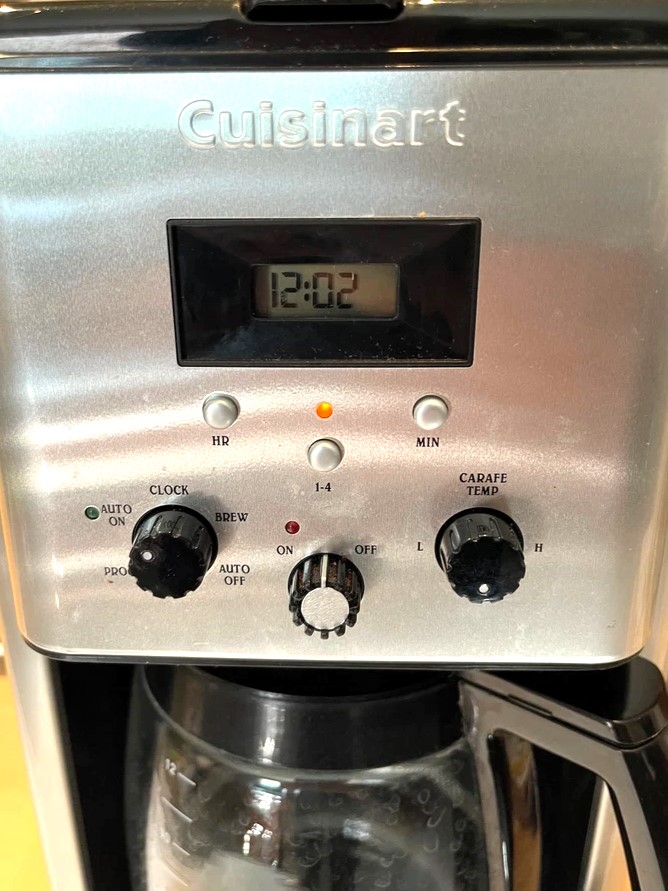
No Power, No Lights, Dead Unit
If your Cuisinart sits silent and dark, skip panic mode—90% of “dead” units actually have simple fixes. Start by unplugging the machine and testing the outlet with a phone charger. If your phone charges, the outlet works. Now inspect the power cord like a forensic expert: run fingers along its entire length feeling for hidden cuts, then gently flex it while plugged in. If lights flicker during flexing, you’ve found an internal break. Critical warning: Never tape damaged cords—this creates fire hazards.
Immediate action steps:
– Replace with a universal 3-prong, 10-amp cord (16 AWG gauge) available at hardware stores
– Keep a spare cord stored near your coffee station for emergencies
– Always unplug before handling electrical components
If the cord checks out, flip the unit upside-down and remove the bottom cover. Locate the glass or blade-type fuse near the power inlet. Using a multimeter set to continuity mode, test across the fuse legs. A reading above 1 Ω confirms a blown fuse—replace it with an identical voltage/amperage model. If the fuse tests good but the unit remains dead, the circuit board has failed. Contact Cuisinart support before proceeding; unauthorized repairs void warranties.
Brewing Failures: Won’t Start Brewing
Control Panel Works, But No Brew
When lights glow but brewing won’t start, the culprit is usually mechanical misalignment. Remove the water reservoir completely—don’t just glance at it—and reseat it with firm downward pressure until it clicks. Many users miss that the reservoir must lock into place; a 1/8-inch gap stops brewing. Fill to the 12-cup max line with cold water (warm water triggers safety sensors).
Filter basket alignment checklist:
– Center the #4 paper filter or gold-tone basket precisely over the drip tower
– Ensure permanent filters aren’t warped (common after dishwasher cleaning)
– Verify the basket sits flush against the machine’s internal seals
– Never force the lid closed—if it resists, realign the basket
If alignment checks out, mineral scale is likely choking internal tubes. Run a descale cycle using 4 cups white vinegar mixed with 8 cups water. Press the Clean button (if equipped), or initiate a normal brew cycle. The machine will run 20-30% longer than usual and emit double beeps when complete. Crucial: Flush with 2-3 full reservoirs of fresh water afterward. Skipping this leaves vinegar residue that ruins coffee flavor.
Leaks and Spills: Water Everywhere
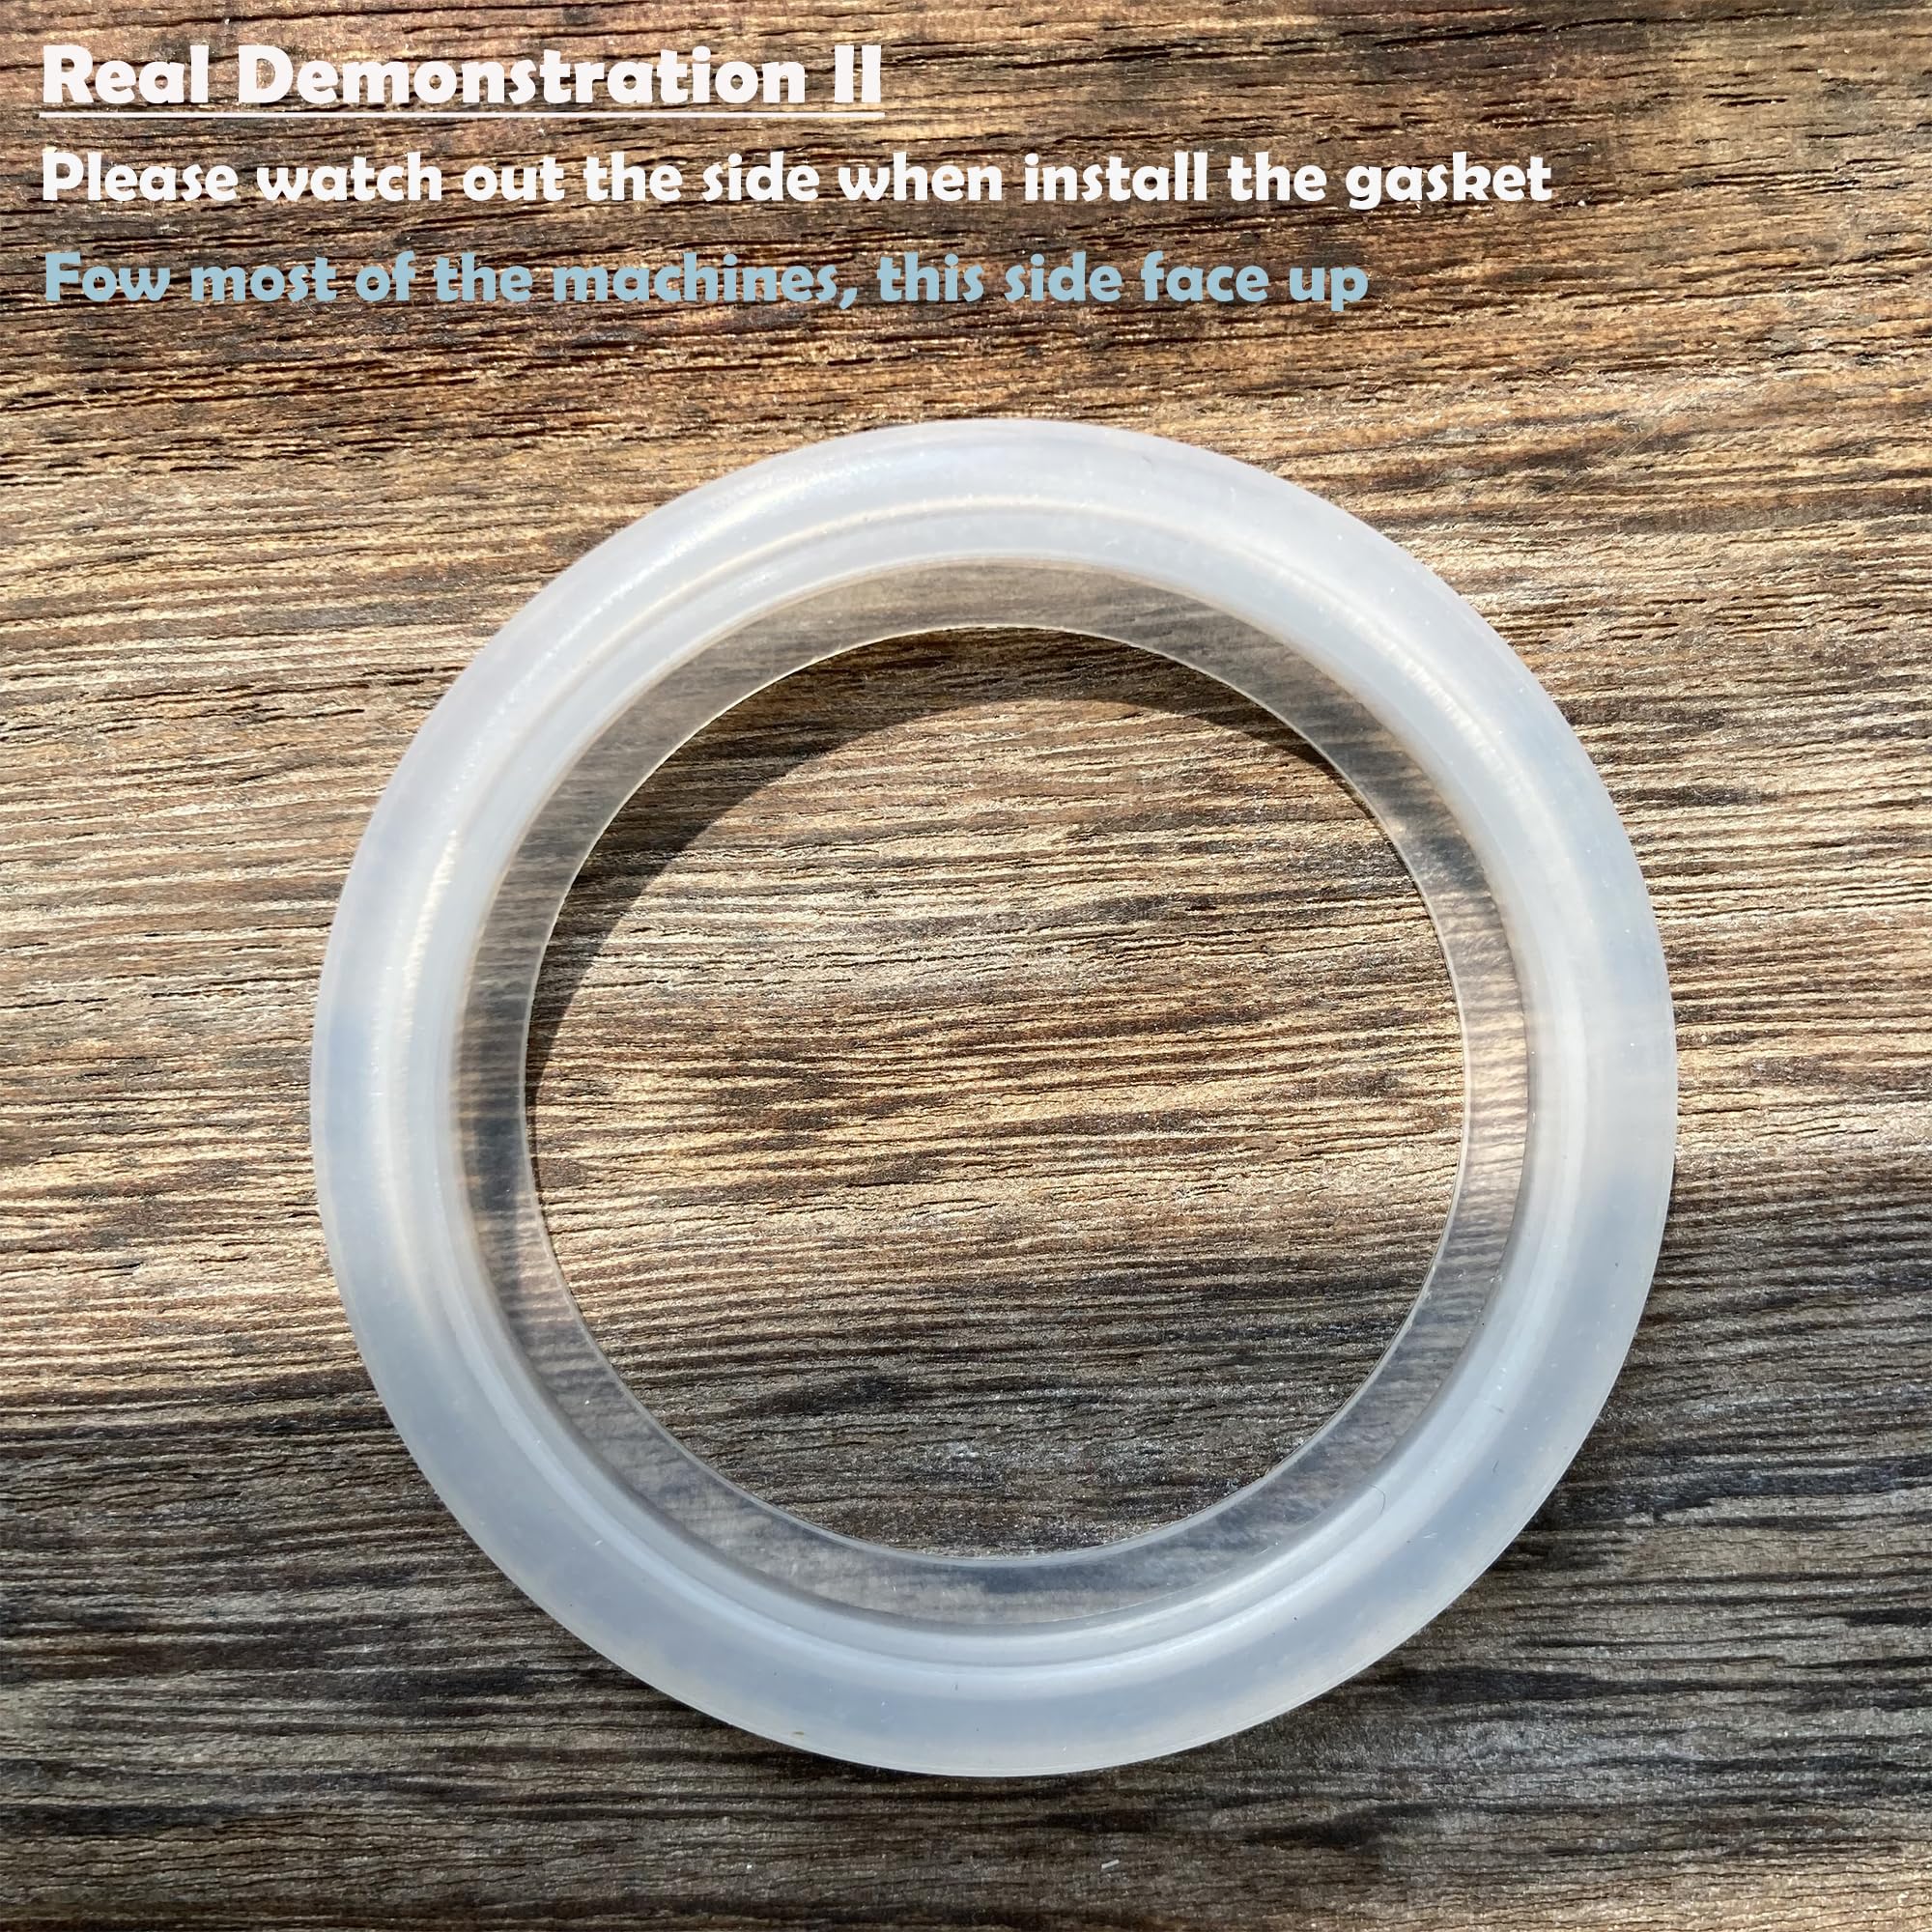
Lid Leaks During Brewing
Coffee dribbling down your carafe isn’t just messy—it’s a burn hazard. Remove the lid and inspect the silicone gasket for dark, sticky coffee oil buildup. Soak the lid in boiling water for 10 minutes to soften residues, then gently scrub with a soft-bristled toothbrush (never metal scourers). If leaks persist, flex the lid slowly over a sink—hairline cracks become visible when light passes through.
Replacement protocol:
– Order exact model-specific lids (DCC-1200 lids won’t fit DCC-3200)
– Check Cuisinart’s website first for genuine parts
– On Amazon, filter by “Cuisinart [your model] lid” to avoid counterfeits
– Replace immediately if cracks appear—continued use warps the base
Overflow Issues: Coffee Grounds Explosion
Basket Overflow During Brew
When grounds flood your warming plate, it’s never just “user error.” First, measure your coffee dose against the max line inside the basket—12 cups require exactly 12 level tablespoons (5g each). Overfilling by even one tablespoon causes overflow. Next, verify grind size: medium drip grind should resemble coarse sand. Espresso-fine grinds compact and block the basket’s drip holes, forcing water over the sides.
Emergency fixes mid-brew:
– Reduce dose by 10% for oily, freshly roasted beans
– Clean basket holes monthly with a paperclip wrapped in cloth
– Never exceed the max line—even if brewing for guests
– Switch to #4 cone paper filters if using a gold-tone basket
Flavor Problems: Coffee Tastes Wrong
Bitter, Metallic, or Stale Taste
Burnt-tasting coffee usually means beans sat on the warming plate over 30 minutes. Brew smaller batches (6 cups) for immediate improvement. For metallic flavors, inspect the showerhead—brown residue indicates mineral scale. Run the full vinegar descale cycle, then flush with 3 reservoirs of filtered water (distilled water lacks minerals for proper extraction).
Bean and water optimization:
– Use beans roasted within 4 weeks stored in airtight containers
– Switch to 100% Arabica medium roasts (avoid Robusta blends)
– Fill reservoir with filtered water—never tap water in hard-water areas
– Replace old gold-tone filters; coffee oils embed in metal over time
Essential Maintenance Schedule
Prevent 90% of issues with this simple routine. After every brew, hand-wash the carafe, lid, basket, and reservoir with warm soapy water—never immerse the base. Every 2-3 weeks, run the vinegar descale cycle when the Clean indicator lights. Monthly, remove the showerhead and soak in boiling water for 10 minutes before gentle brushing.
Critical monthly checks:
– Inspect power cord for fraying or heat discoloration
– Test lid gasket flexibility (replace if hardened)
– Verify water reservoir clicks securely into place
– Clean warming plate with vinegar-dampened cloth
Replacement Parts Guide
Keep these model-specific parts on hand: carafe lids (match DCC-1200/DCC-3200 shapes), universal 10-amp power cords, and #4 cone gold-tone filters. For thermostats or thermal fuses, order exact OEM matches from Cuisinart.com—eBay parts often fail within months. Always unplug before replacing parts, and photograph wire connections first.
Where to buy genuine parts:
– Cuisinart.com (fastest for OEM components)
– Amazon (search “[your model] genuine lid”)
– Walmart (carry universal cords and filters)
– Small-appliance parts suppliers (for circuit boards)
Final note: Your Cuisinart 12 cup coffee maker troubleshooting success hinges on three habits: descaling every 2-3 weeks, verifying reservoir seating before brewing, and replacing worn lids immediately. Most “broken” units actually need simple realignment or cleaning—not replacement. Keep this guide taped inside your cabinet door for instant reference. If issues persist after trying these solutions, call Cuisinart support at 1-800-726-0190 with your model number ready—they’ll often send replacement parts free under warranty. With proper care, your machine will deliver perfect coffee for years, saving you hundreds versus buying new.


