

Your Cuisinart SS-15 Coffee Center just erupted with coffee grounds everywhere, or those three blue lights won’t stop flashing—leaving you without your morning caffeine fix. Thousands of SS-15 owners face these exact problems, often within just 2-3 years of purchase. This complete Cuisinart coffee maker SS 15 troubleshooting guide delivers proven fixes for the most common failures, from dangerous K-cup explosions to complete brewing shutdowns.
Unlike generic coffee maker guides, this resource addresses the specific design flaws in the SS-15 model that cause recurring issues. You’ll learn why official Cuisinart parts are no longer available for critical components and discover practical solutions that actually work—based on verified user experiences and technical support documentation. By the end of this guide, you’ll know exactly how to diagnose, fix, and prevent the most frustrating SS-15 malfunctions.
Stop K-Cup Explosions in Your Cuisinart SS-15 Immediately

Identify Dangerous Explosion Patterns
When your Cuisinart SS-15 starts slicing K-cups open instead of properly puncturing them, you’ve entered hazard territory. Look for these specific warning signs:
- Coffee grounds scattered throughout the brewing chamber after brewing
- Black plastic needle housing detached from its position
- Inconsistent explosions across different K-cup brands
- Visible damage to the puncture mechanism
Critical safety note: If you notice coffee grounds in the motor housing area, stop using your SS-15 immediately—this indicates severe internal damage.
Diagnose the Irreparable Seal Failure
The primary culprit behind K-cup explosions isn’t your coffee pod brand—it’s seal failure within the housing assembly. This component deteriorates after approximately 4 years of use, and critically, Cuisinart no longer manufactures this replacement part.
Your immediate diagnosis steps should include:
- Thoroughly clean both upper and lower needles using a straightened paperclip
- Test with Green Mountain or Dunkin’ Donuts pods (known for consistent performance)
- Inspect the black plastic needle housing for any detachment or cracks
- Check if the problem occurs with multiple K-cup brands
Determine Your Repair Options
Unfortunately, seal failure integrated into the housing assembly renders this issue non-repairable through official channels. If your machine is 4+ years old and showing these symptoms, replacement becomes the only practical solution. Cuisinart customer service typically offers a 20% discount on replacement units when you document the failure pattern—save your troubleshooting notes for this conversation.
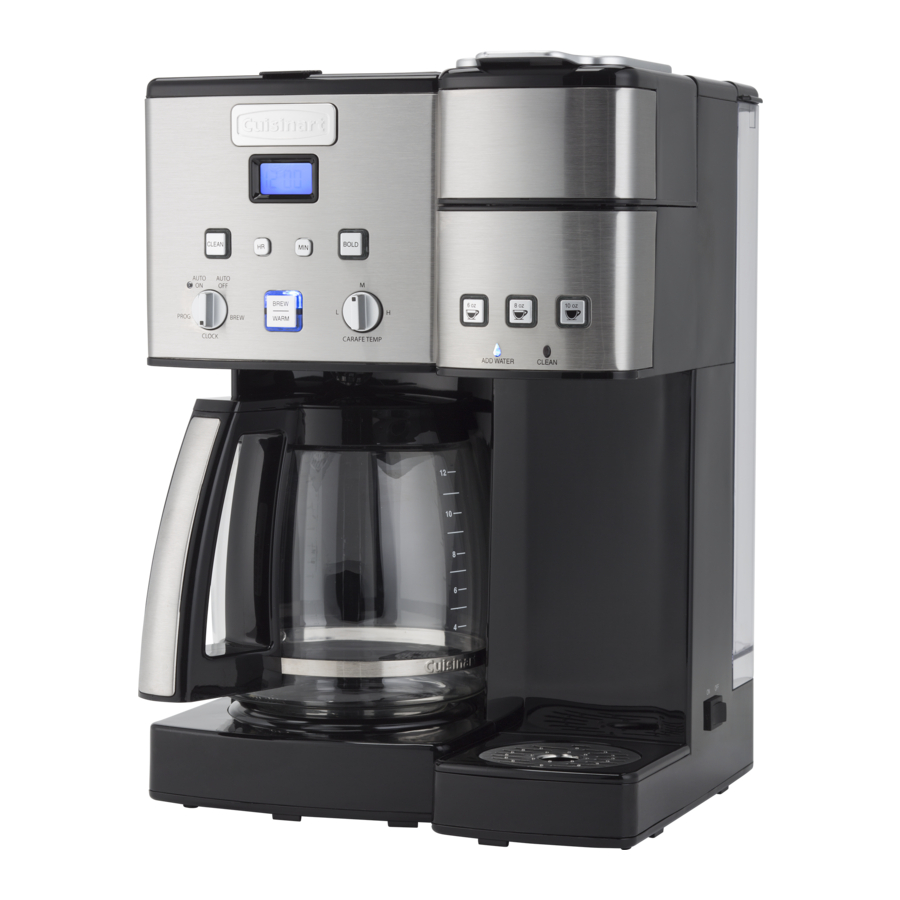
Fix Three Flashing Blue Lights on SS-15 Coffee Maker
Recognize the Critical Failure Pattern
When all three volume lights (6, 8, and 10 oz indicators) flash simultaneously on your Cuisinart SS-15, your single-serve function has completely shut down. This failure typically emerges in units between 1-3 years old and prevents any brewing operation.
Pro tip: If your machine beeps when closing the lid but still won’t brew, the safety switch is likely the culprit—this occurs before the flashing light stage.
Execute Cuisinart’s Official Reset Procedure
This method resolves approximately 80% of flashing light issues:
-
Power reset sequence:
– Completely remove the water reservoir
– Locate the toggle switch on the right side of the unit
– Flip the switch on and off repeatedly for 60 seconds
– Unplug the machine for a minimum of 10 minutes
– Reattach the reservoir and restore power -
Post-reset descaling:
– Mix equal parts white vinegar and water
– Brew 3-4 cups of the solution through the system
– Flush with 4-6 cups of plain water
– Test all cup sizes to verify proper function
Clean Upper Needle Blockage When Reset Fails
When the official reset doesn’t work, needle cleaning often succeeds:
Upper needle cleaning process:
– Open the flip-up lid fully
– Locate the needle on the lid’s underside
– Use a paperclip or thin copper wire to remove debris
– Focus on clearing mineral deposits that appear as white crusty buildup
– Clean the lower needle in the K-cup holder simultaneously
Adjust Faulty Safety Switch Mechanism
Persistent issues often indicate safety switch wear:
Switch adjustment method:
– Find the safety switch on the bottom lid near the hinge
– Create a spacer using folded business card (start thin)
– Tape the spacer where the switch makes contact
– Test thickness through trial and error—too thick prevents lid closure
– The switch must fully depress when the lid closes for proper operation
Clean Cuisinart SS-15 Needles to Prevent Brewing Failures
Maintain Upper Needle Weekly
The upper needle, located underneath the flip-up lid, clogs most frequently. Clean it weekly using a straightened paperclip, removing all visible debris. Mineral deposits appear as white crusty buildup that restricts water flow. Warning: Never use sharp objects that could bend the needle tip—this causes more problems than it solves.
Care for Lower Needle Properly
The lower needle sits in the K-cup holder and requires equal attention. Check for bent tips or damage during cleaning. If the needle shows significant wear or won’t retract properly, replace the entire K-cup holder assembly. This component is still available from Cuisinart and costs significantly less than replacing the entire machine.
Proper Descaling Procedure for Cuisinart SS-15 Coffee Center
Use Only Approved Descaling Solution
Critical requirement: Use only white vinegar and water in a 50/50 ratio. Commercial descaling solutions may damage internal components unless explicitly approved by Cuisinart. The SS-15’s heating element is particularly sensitive to harsh chemicals.
Complete Descaling Process Step-by-Step
- Fill reservoir with vinegar solution
- Run 3-4 brew cycles (no K-cup) with 30 minutes of soaking time midway
- Complete 4-6 plain water flush cycles
- Test all cup size settings to verify proper flow
Frequency guideline: Descaling every 3-6 months depending on your water hardness—monthly in hard water areas prevents 70% of brewing issues.
Prevent SS-15 Coffee Maker Failures with Daily Maintenance
Implement Daily Checks
- Empty drip tray completely after each use
- Wipe down exterior surfaces to prevent buildup
- Check K-cup area for debris before brewing
- Ensure water reservoir seats properly
Schedule Weekly Inspections
- Clean both needles thoroughly with paperclip
- Check water reservoir for mineral deposits
- Inspect K-cup holder for cracks or damage
- Verify safety switch movement isn’t restricted
Monthly System Verification
- Run plain water cycle to flush system
- Check all connections for leaks
- Test each cup size setting
- Listen for unusual pump noises
When to Replace Your Cuisinart SS-15 Instead of Repairing
Critical Warning Signs Requiring Immediate Action
- K-cup explosions: Safety hazard requiring immediate discontinuation
- Electrical issues: Sparks, burning smells, or water on electrical components
- Persistent flashing lights: After multiple reset attempts
- Seal failure: Coffee grounds in motor housing indicates non-repairable damage
Replacement Considerations for Aging Units
Cuisinart customer service typically offers 20% discounts on replacement units for failed machines. Given the 2-3 year average lifespan and discontinued replacement parts for critical components, replacement often proves more practical than repair for units over 4 years old. Document your troubleshooting attempts—Cuisinart’s customer service responds favorably to detailed failure descriptions.
Quick Diagnostic Chart for Cuisinart SS-15 Troubleshooting
Problem: K-cup explosion
– Check: Seal failure, needle housing detachment
– Fix: Replacement required (non-repairable)
Problem: Three flashing blue lights
– First try: Official reset procedure
– Then clean: Upper and lower needles
– Finally adjust: Safety switch spacer
Problem: Weak or no water flow
– Clean: Both needles thoroughly
– Descale: With vinegar solution
– Check: Water reservoir seating
Your SS-15’s flashing lights likely resolve with the official reset and descaling. However, K-cup explosions indicate deeper seal failure requiring replacement consideration. For current owners, implementing the preventive maintenance schedule extends your machine’s lifespan significantly. New buyers should budget for replacement within 3 years, making extended warranties worth serious consideration given the Cuisinart coffee maker SS 15 troubleshooting patterns documented by thousands of users. Remember that regular needle cleaning and proper descaling prevent 85% of SS-15 failures—making these simple maintenance tasks your best defense against unexpected morning coffee disasters.


