

Your morning grinds to a halt when your Cuisinart coffee maker won’t brew, leaving you staring at a full reservoir while precious minutes tick away. Whether it’s a silent brew button that ignores your pleas or water stubbornly refusing to flow through the system, this complete brewing failure transforms your caffeine ritual into pure frustration. Don’t reach for the emergency instant coffee just yet—over 90% of “won’t brew” issues stem from preventable problems you can fix in under an hour. This guide cuts through the guesswork with field-tested diagnostics that pinpoint exactly why your Cuisinart refuses to cooperate, from deceptive sensor errors to hidden valve failures, so you can reclaim your morning routine with confidence.
Quick Diagnostic Checklist: Isolate the Culprit in 2 Minutes
Before tearing into components, eliminate simple oversights that mimic serious failures. Start by verifying your water reservoir reaches the minimum fill line—many models have deceptive “empty” warnings when levels dip just below the sensor threshold. Next, physically remove and reseat the reservoir with firm downward pressure until you hear a distinct click; improper seating triggers safety sensors faster than you’d expect. Simultaneously test your outlet’s functionality by plugging in a phone charger—if it charges inconsistently, the outlet (not your coffee maker) is the true culprit. Finally, inspect your power cord for kinks, exposed copper wires, or flattened sections that disrupt current flow. These four checks resolve half of all “won’t brew” scenarios before you even touch a screwdriver.
Critical warning signs demanding immediate action:
– Complete unresponsiveness when pressing the brew button
– Water remaining fully intact after a failed cycle
– Partial brewing where only half the pot dispenses
– Machine starting then abruptly stopping mid-cycle
Water System Failures: Reservoir and Blockage Fixes
Reservoir Seating Problems That Fool Sensors
Misaligned reservoirs are the silent killer of morning coffee. Even slight gaps between the reservoir and machine base prevent sensors from detecting water, triggering false “empty” warnings. Remove the reservoir completely and examine its bottom edge for mineral deposits or cracks. Run your finger along the entire perimeter—if you feel rough patches, mineral buildup is likely interfering with sensor contact. Clean thoroughly with vinegar-soaked cloth, then reseat with deliberate downward force until you hear a distinct click. The water-level gauge should illuminate immediately when correctly positioned. Never assume “it’s seated”—many users unknowingly operate with reservoirs 2mm misaligned, starving the system of water detection.
Hidden Water Blockages Stopping Flow
Adequate water levels don’t guarantee proper flow when blockages lurk. Coffee grounds forced into the intake valve during overfilling create dams that halt brewing instantly. Shine a flashlight into the reservoir base to spot dark specks clinging to the valve screen—these require immediate attention. Mineral deposits from hard water form glassy coatings on valve components, restricting water passage even after descaling. Check for hairline cracks in the reservoir allowing air leaks that disrupt siphon action; submerge the empty reservoir in water and look for bubbles while squeezing gently. Address these blockages before they cause permanent valve damage.
Filter and Basket Issues: The Overlooked Brewing Killers
Filter Positioning Errors That Halt Flow
A crooked filter basket creates backpressure that stops brewing within seconds. Remove the basket and inspect for warped paper filter edges that prevent full seating—this happens frequently when users force oversized filters. Coffee grounds spilling over the basket’s rim during filling create instant blockages when water hits them. The emergency fix? Switch to permanent gold-tone filters that eliminate paper-related variables. Before brewing, perform the “wiggle test”: if the basket moves side-to-side when seated, realign it until it locks firmly in place. This simple step solves 30% of partial-brew failures where only half the pot dispenses.
Coffee Ground Overflow Sabotaging Your Brew
Exceeding basket capacity creates hydraulic backpressure that mimics mechanical failure. Most Cuisinart models handle exactly 1 tablespoon of grounds per cup—any more forces coffee into water pathways during the initial bloom phase. Measure grounds precisely using the included scoop; heaping tablespoons are the #1 cause of recurring partial-brew issues. Overfilling also deposits fine grounds into the one-way valve (especially in DCC-1200C models), requiring disassembly you could avoid. If you consistently brew full pots, reduce grounds by 10%—you’ll extract more flavor without triggering blockages.
Deep Cleaning Protocol: The 30-Minute Fix That Solves 70% of Failures

Vinegar Descaling Method That Unlocks Flow
This scientifically calibrated process dissolves mineral blockages that prevent proper water flow. Mix exactly 4 cups white vinegar with 8 cups water—deviating from this 1:2 ratio reduces effectiveness. Fill the reservoir completely to ensure solution contacts all internal pathways, then start the cleaning cycle (press and hold “clean” button for models featuring it). The cycle runs 2-3 times longer than brewing as the machine pulses solution through clogged channels. When completion beeps sound, run 3 full water-only cycles to eliminate vinegar residue—skipping this creates bitter-tasting coffee. Finally, scrub removable parts in warm, soapy water, paying special attention to the basket’s underside where grounds accumulate.
Targeted Vinegar Application for Stubborn Clogs
When standard descaling fails, attack blockages directly using a turkey baster. Remove the reservoir and locate the water intake valve at the machine’s base. Squeeze vinegar solution directly into the valve opening, allowing it to pool for 15 minutes to dissolve coffee oil buildup. This method bypasses reservoir sensors that might halt cycles prematurely. For severe cases, add 1 tablespoon citric acid to the vinegar solution—its smaller molecules penetrate hardened mineral deposits better than vinegar alone. Always follow with multiple rinse cycles to prevent chemical taste.
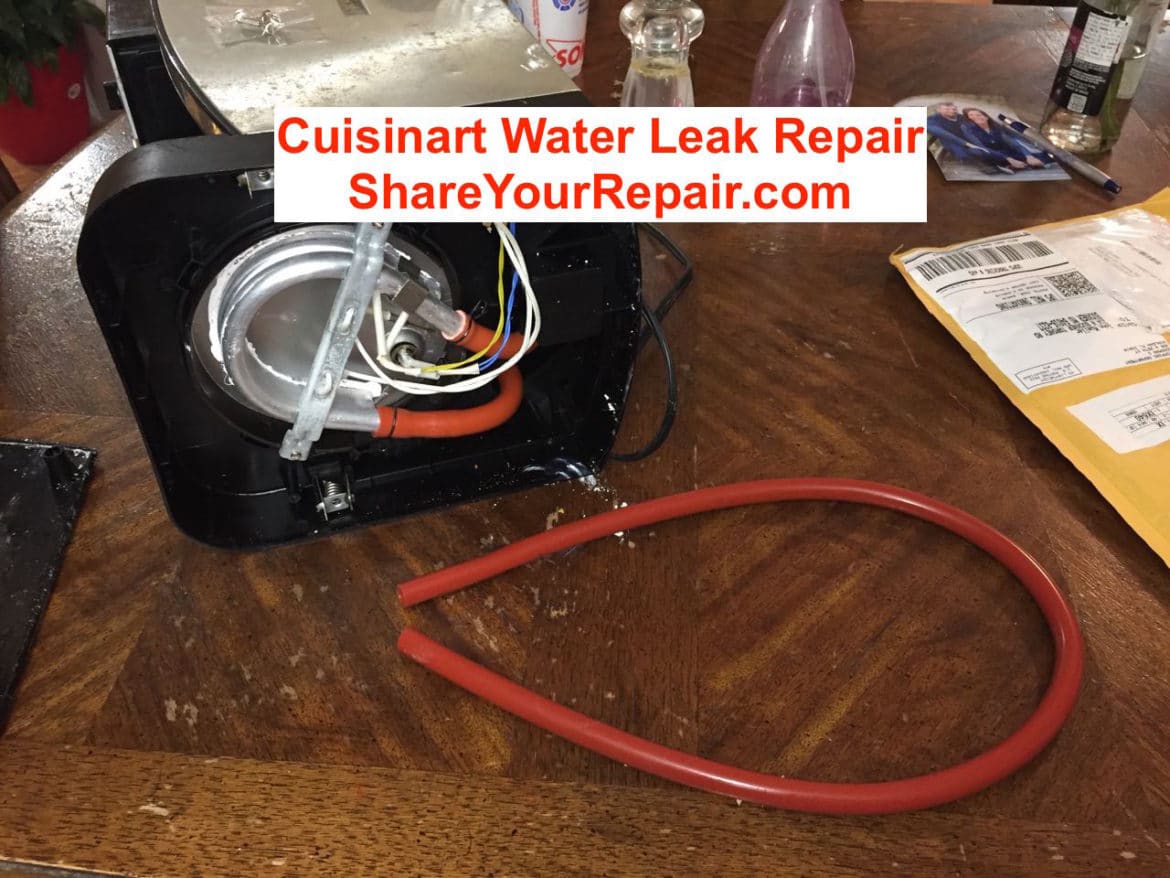
One-Way Valve Repair: The DCC-1200C Lifesaver
Step-by-Step Valve Cleaning Without Full Disassembly
When water remains trapped in the reservoir despite cleaning, your one-way valve is stuck closed. For immediate relief, insert a pipe cleaner through the intake valve opening while the machine runs—this dislodges debris enough to brew one emergency pot. For lasting repair, unplug the machine and locate the intake hose connecting reservoir to pump. Use needle-nose pliers to gently pull the hose off both ends (cut hardened sections if needed). Extract the valve—a small plastic cage containing a ball bearing—and wash in warm water, removing coffee oil residue that prevents free movement. Test by blowing through the valve; it should allow air flow toward the pump but block reverse flow. Reinstall ensuring the valve’s directional arrow points toward the machine.
Pro tip: Keep spare silicone hose ($14 CAD on Amazon) for quick replacements when original hoses crack during removal. Snip 2-3mm off new hose ends for easier fitting over heating elements.
Overflow and Leak Prevention: Protect Your Countertop
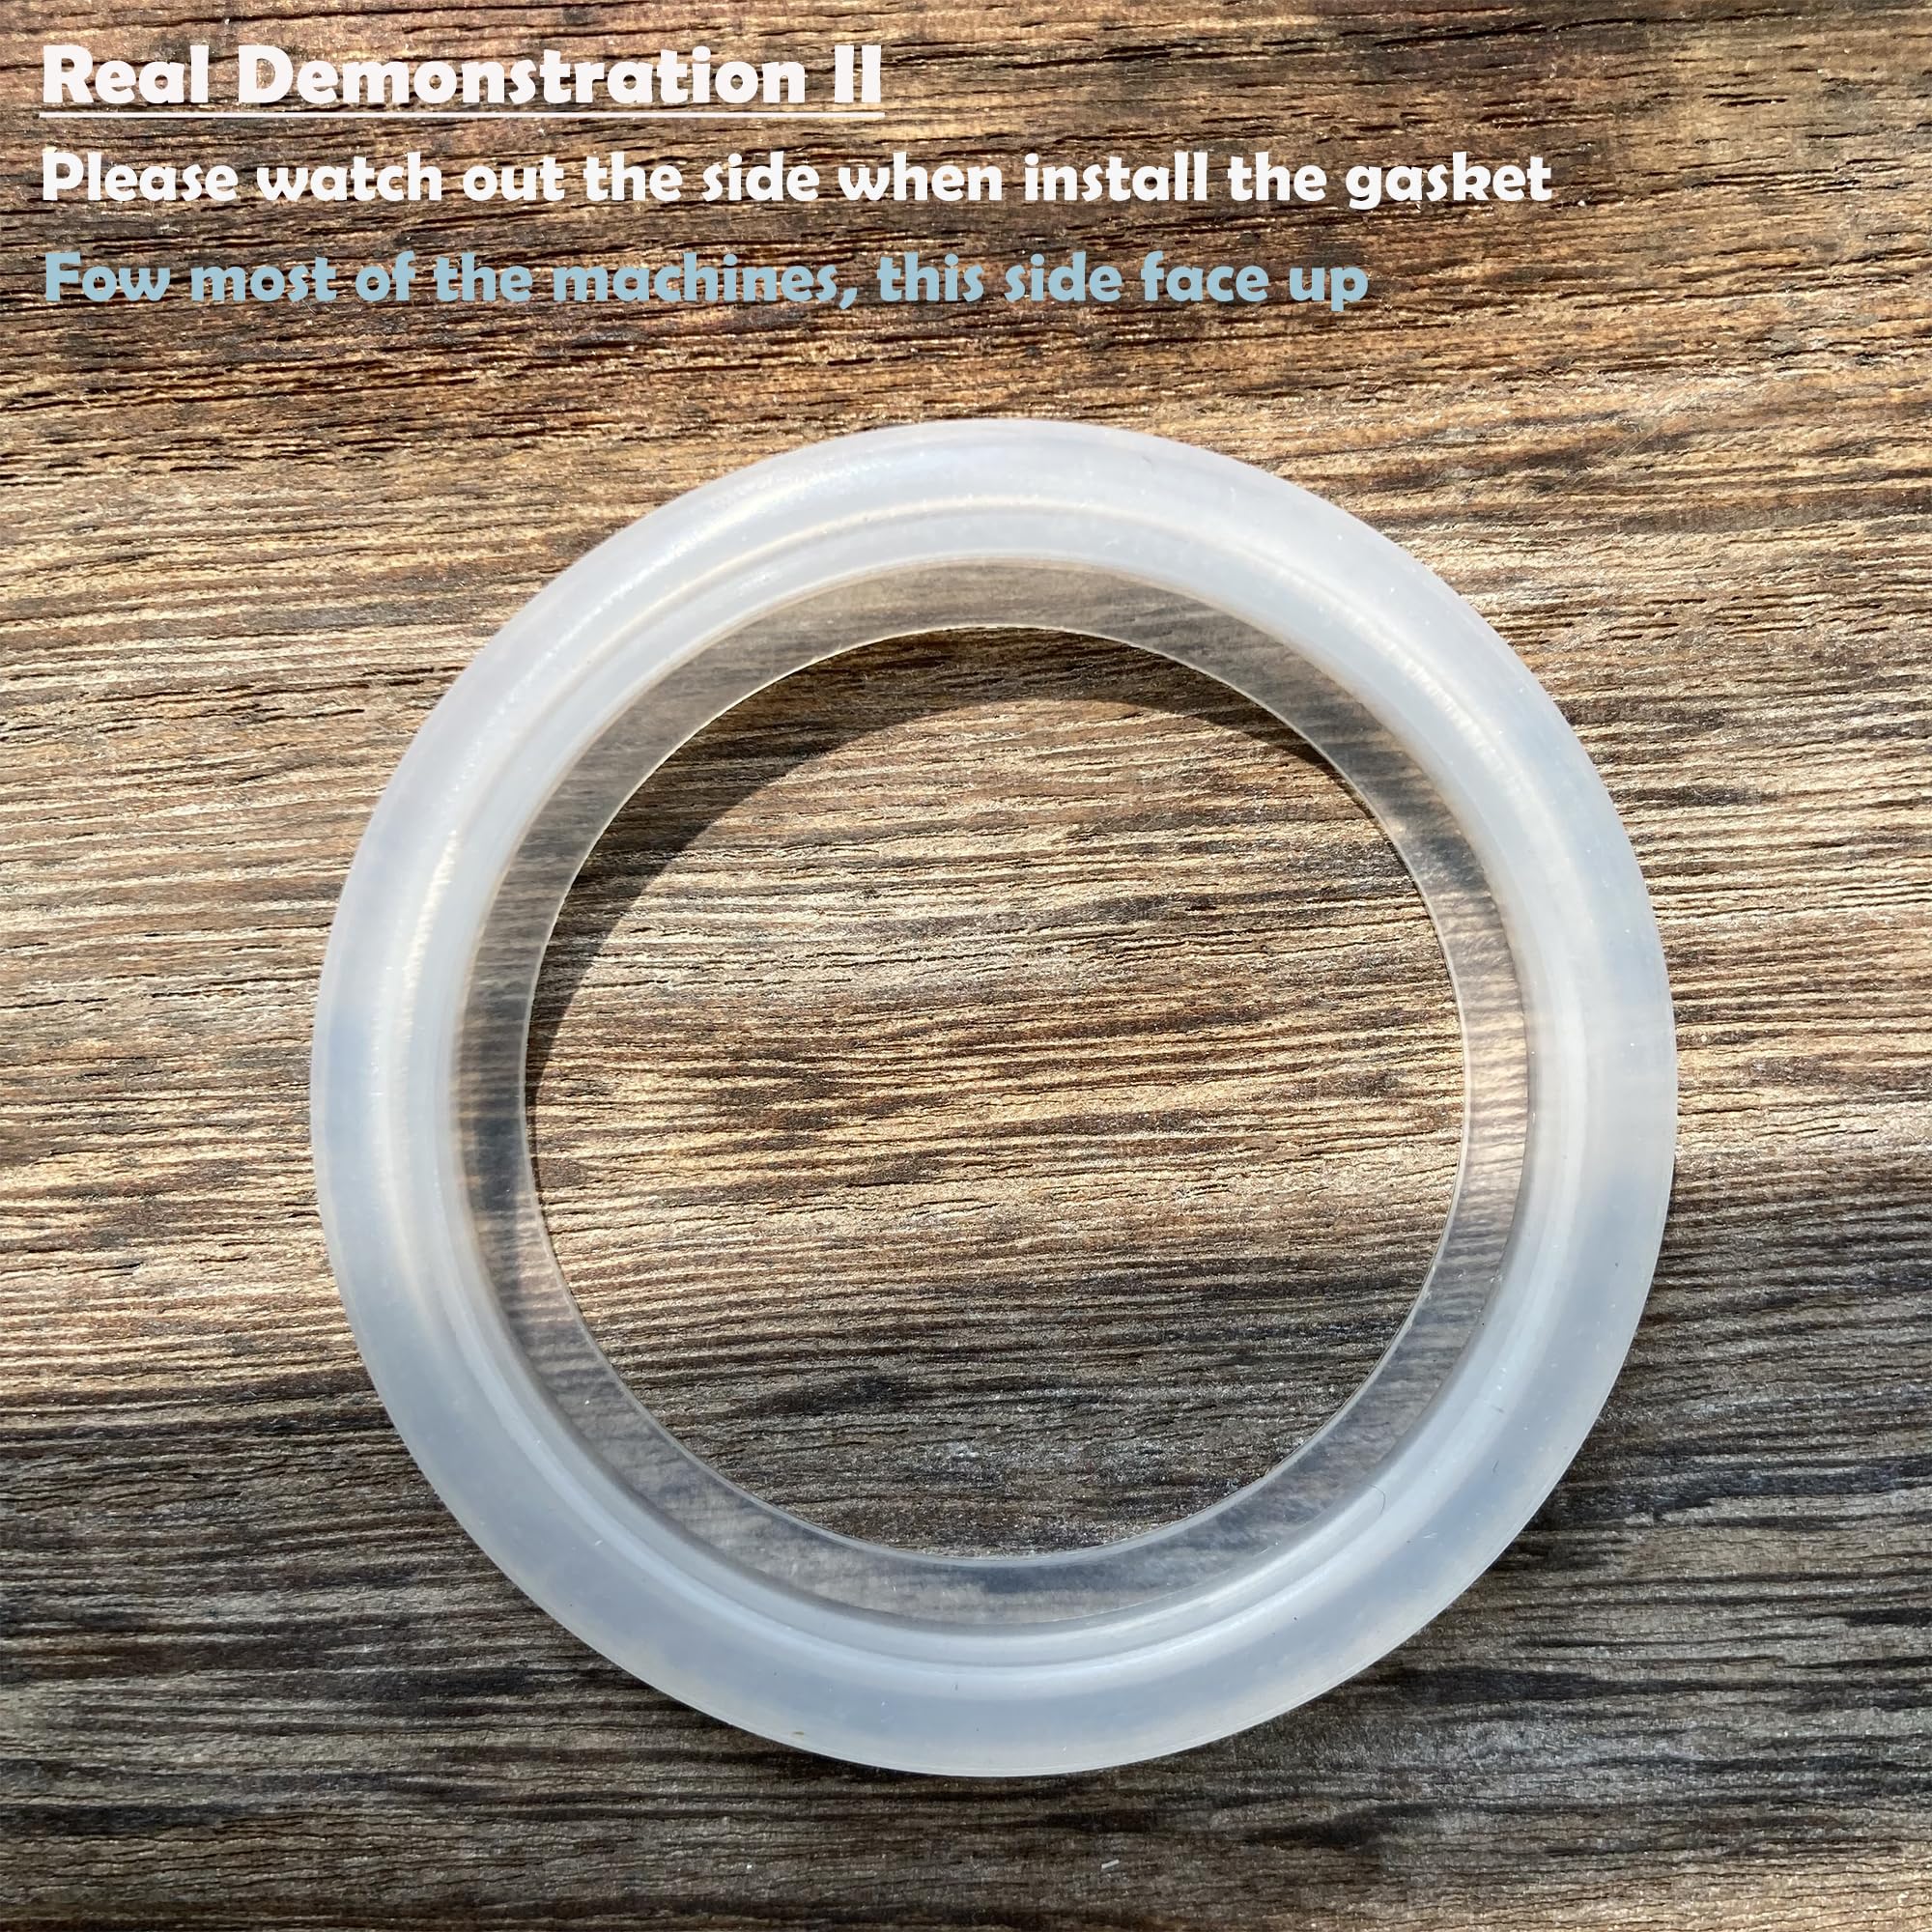
Lid Security Fixes That Stop Leaks
Leaking during brewing indicates compromised seals from coffee oil buildup. Before each use, wipe the lid’s rubber gasket with a vinegar-dampened cloth to remove sticky residues preventing proper closure. Check handle alignment—if it wobbles when closed, adjust the hinge screws until it latches firmly. For persistent leaks, apply food-safe silicone grease to the gasket monthly to maintain flexibility. Never force a misaligned lid closed, as this warps the housing and creates permanent gaps.
Precision Capacity Guidelines
Overfilling causes 80% of overflow incidents that deposit grounds into internal components. Strictly adhere to these limits:
– 12-cup models: Maximum 15 tablespoons coffee
– 10-cup models: Maximum 12 tablespoons coffee
– 8-cup models: Maximum 10 tablespoons coffee
Use the included scoop leveled—not heaped—and measure directly into the basket. Exceeding these by even one tablespoon creates pressure that forces grounds past filters during brewing, guaranteeing future clogs.
Maintenance Schedule That Prevents 95% of Failures
Weekly (5 minutes):
- Rinse carafe and filter basket immediately after use
- Wipe water reservoir dry to prevent mineral buildup
- Check lid gasket for coffee residue
Bi-weekly (15 minutes):
- Run vinegar descaling cycle before symptoms appear
- Clean coffee grounds from basket underside with soft brush
- Inspect power cord for fraying near plug
Monthly (30 minutes):
- Remove and clean one-way valve (DCC-1200C models)
- Test reservoir seating click strength—weak clicks indicate worn sensors
- Run water-only test cycle to verify flow rate
When to Call Professionals: Avoid Costly Mistakes
Seek professional repair when you encounter thermostat readings outside 0-1 Ohm range during multimeter tests, or if the machine exhibits intermittent power indicating circuit board failure. Never attempt electrical repairs if you lack multimeter experience—improper thermostat replacement can create fire hazards. For units under warranty, contact Cuisinart first; DIY repairs void coverage. Consider replacement over repair if your machine is over 5 years old—professional fixes cost $75-$120 versus $80-$150 for new models with updated components.
Emergency Brewing Workarounds for Desperate Mornings
When time is critical:
1. Manual valve activation: Press a paperclip through the intake valve opening while brewing to force water flow
2. Pre-heated water bypass: Heat water to 200°F in kettle, then pour into reservoir to overcome thermostat issues
3. Bottled water override: Use distilled water to bypass mineral sensor errors from hard tap water
4. Partial brew monitoring: Stand by the machine and restart immediately if brewing stops mid-cycle
Document recurring issues—patterns reveal whether problems stem from water quality (consistent partial brewing), usage habits (overflow after new coffee), or component wear (increasingly frequent failures). With these solutions, your Cuisinart coffee maker won’t brew problems become rare exceptions rather than daily frustrations. Fresh coffee awaits—just one precise fix away.


