
Your morning coffee starts tasting stale despite using premium beans. The culprit? A dirty burr grinder harboring old coffee oils and residue that sabotage every brew. Cleaning your Cuisinart burr coffee grinder isn’t just about hygiene—it’s the difference between mediocre and exceptional coffee.
This guide walks you through proven methods for every Cuisinart model, from quick daily maintenance to deep cleaning techniques that restore peak performance. Whether you own the popular DBM-8 or the sealed DGB-850, you’ll learn exactly how to eliminate buildup and protect your investment.
Why Regular Cleaning Matters
Coffee oils turn rancid within days, coating your burrs with bitter compounds that transfer to every grind. These residues also cause inconsistent particle sizes, leading to uneven extraction and weak or over-extracted coffee. Beyond taste, accumulated grounds create resistance that strains the motor. Regular cleaning extends your grinder’s lifespan while maintaining the precise grind settings that make Cuisinart burr grinders worth the investment.
Performance Impact Timeline:
– 1 week: Noticeable flavor degradation begins
– 2-4 weeks: Grind consistency suffers, motor works harder
– 2+ months: Risk of permanent burr damage or motor failure
Identify Your Cuisinart Model First
Different models require different approaches. Check your model number before proceeding:
DBM-8 Supreme Grind: 18 settings, fully removable burrs and hopper
CBM-18N Programmable: Conical burrs with digital timer, dishwasher-safe parts
DGB-850 Grind & Brew: Sealed grinder compartment, limited user access
Flip your unit over or check the bottom label to confirm your model. This determines whether you can fully disassemble or need specialized techniques. Most Cuisinart burr grinders allow user disassembly, while integrated models like the DGB-850 have restricted access requiring careful procedures.
Essential Safety Steps
Before touching any component:
- Unplug immediately – Never work on a plugged grinder
- Let burrs cool – Wait 10 minutes after last use
- Handle burrs like knives – The edges will slice skin easily
- Keep water away from the motor base at all times
- Document positions – Take photos before disassembly
Pro tip: Place a white towel on your counter to catch small parts and see dropped grounds clearly. Always check warranty terms before disassembly, as some procedures may void coverage.
Quick Daily Cleaning Method
Perfect for weekly maintenance without tools:
Basic Rice Cleaning Process
- Remove all beans from hopper
- Add ½ cup uncooked white rice
- Grind on finest setting for 15 seconds
- Discard rice and grounds
- Repeat once more
- Brush remaining dust from chute
Why rice works: The hard grains absorb oils while the grinding action dislodges stuck particles. Stale coffee beans work as an alternative, but rice is more effective and cheaper. Commercial cleaning tablets like Grindz offer another option—they’re made from food-grade ingredients with surfactants and mild abrasives safe for both steel and ceramic burrs.
Time required: 3-5 minutes total. Always run a small amount of regular coffee beans through afterward to purge any residue.
Complete Disassembly Guide

Removing Components Safely
Step 1: Empty hopper completely, save beans in an airtight container
Step 2: Remove hopper by turning counter-clockwise (DBM-8) or lifting straight up (CBM-18N)
Step 3: Lift grind chamber straight up – this catches all your ground coffee
Step 4: Pull upper burr assembly upward – it lifts out easily on most models
Step 5: Check lower burr – this stays in place but can be cleaned in position
Critical: Note the grind setting before disassembly. Return to this exact position when reassembling. For models with a grind selector dial, take a photo showing the current setting to ensure accurate reassembly.
Deep Cleaning Each Component
Hopper and Lid Cleaning
Dishwasher safe: Most Cuisinart hoppers are top-rack safe (verify your manual)
Hand washing method:
– Fill sink with warm, soapy water
– Use bottle brush for hopper interior
– Clean lid crevices with toothbrush
– Rinse completely, air dry 2+ hours
Warning: Any moisture left in the hopper will cause beans to stick and potentially mold. For stubborn buildup, denture cleaning tablets dissolved in warm water create an effective, food-safe cleaning solution.
Burr Cleaning Techniques
For removable burrs:
– Soak in warm, soapy water 10 minutes
– Scrub with stiff brush, avoid metal scrubbers
– Rinse thoroughly, dry completely
– Check for nicks or dull spots
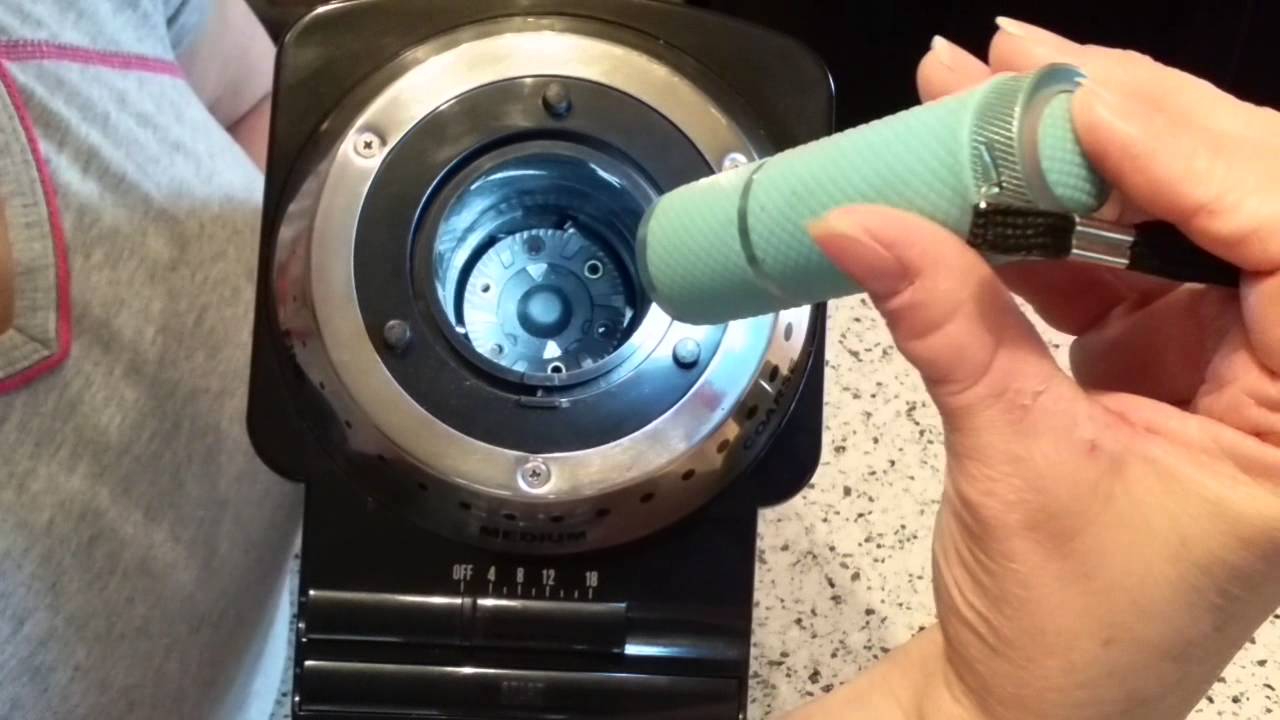
For non-removable burrs:
– Use dedicated grinder brush or stiff toothbrush
– Work in circular motions around both burrs
– Compressed air blasts away stubborn particles
– Never use water on non-removable parts
Grind Chamber Deep Clean
- Remove all loose grounds with dry cloth
- Wash with warm, soapy water and soft brush
- Use toothpick for grind release crevices
- Sanitize with 1:1 water-vinegar solution if desired
- Dry completely – moisture causes clumping
Special DGB-850 Cleaning Process
The sealed DGB-850 requires different techniques since disassembly voids warranty:
Compressed Air Method (Safest)
- Let any wet grounds dry 24 hours
- Insert 6mm vinyl tube under grinder dome
- Use short compressed air bursts
- Angle tube toward chute opening
- Repeat until no grounds emerge
Disassembly Warning
Only attempt if out of warranty and mechanically skilled. Requires:
– Phillips screwdriver
– Spudger tool
– Drill for screw plugs
– Hot-melt glue for reassembly
Risk: One wrong move destroys the entire unit. Contact Cuisinart support first at (800) 726-0190. For sealed models, compressed air is always the safest first option before attempting disassembly.
Reassembly Made Simple
After everything dries completely:
- Lower burr: Ensure it’s seated properly (shouldn’t wiggle)
- Upper burr: Drop in place, align notches
- Grind chamber: Slide in until it clicks
- Hopper: Turn clockwise until tight
- Test: Grind 10g beans, check consistency
Troubleshooting: If the hopper won’t turn, the lower burr isn’t seated correctly. Remove and reposition. If you notice inconsistent grind size after reassembly, double-check that all components are properly aligned and that burrs are clean and dry.
Create Your Cleaning Schedule
Daily (30 seconds):
- Empty grind chamber
- Wipe exterior with dry cloth
Weekly (5 minutes):
- Rice cleaning method
- Brush out hopper
Monthly (20 minutes):
- Full disassembly and cleaning
- Check burr sharpness
Quarterly (30 minutes):
- Deep clean with tablets
- Inspect for worn parts
Heavy users (3+ pounds weekly): Increase frequency by 50%. If you detect off-flavors in your coffee, increase cleaning frequency immediately—this indicates significant oil buildup.
Prevent Future Buildup
- Use fresh, dry beans only
- Avoid flavored coffees in primary grinder
- Store beans in airtight containers
- Keep grinder away from heat sources
- Clean immediately after flavored coffee use
Pro tip: Designate a separate cheap grinder for flavored beans to prevent cross-contamination. Moisture is your enemy—store your beans properly and avoid grinding damp or flavored beans in your primary grinder.
When to Replace vs. Clean
Replace burrs when:
– Visible nicks or chips appear
– Grind becomes inconsistent despite cleaning
– Coffee tastes metallic or burnt
Cuisinart parts availability:
– Contact (800) 726-0190 for genuine parts
– Amazon offers compatible burr sets ($20-40)
– Installation videos available online
If your grinder runs but produces no grounds, you likely have a chute blockage. Use compressed air for DGB-850 models or disassemble standard models to clear the obstruction.
Common Cleaning Mistakes to Avoid
Never do these:
– Use water on electrical components
– Reassemble while parts are damp
– Force stuck components
– Use metal tools on burrs
– Ignore the manual’s warnings
Red flags during cleaning:
– Rust on metal parts (replace immediately)
– Cracked plastic (stop using)
– Electrical smells (unplug and service)
Mayonnaise can help remove stubborn oil buildup—apply, let sit 10-15 minutes, then wipe clean—but always test any cleaning solution on a small area first to ensure it doesn’t damage materials.
Final Performance Check
After reassembly:
- Test with 20g medium roast beans
- Check grind consistency visually
- Brew a test cup and taste for off-flavors
- Listen for unusual noises during operation
- Verify all settings work correctly
Your Cuisinart burr coffee grinder should now deliver consistent, flavorful grounds. Mark your calendar for the next cleaning based on usage level.
Remember: Clean grinders make better coffee. This 20-minute investment pays dividends in every cup you brew. For best results, establish a regular cleaning schedule and stick to it—your taste buds will thank you.


