
Your Cuisinart sandwich maker isn’t just for grilled cheese—it’s a culinary powerhouse that transforms humble ingredients into restaurant-quality meals in minutes. Whether you’re rushing through breakfast or craving a quick dessert, these compact appliances deliver perfectly grilled paninis, sealed pastry pockets, and even waffle-style creations without the wait of conventional cooking methods.
With the right techniques, your Cuisinart Griddler or Sandwich Press can produce golden-brown exteriors with melted fillings every time. This guide reveals the exact temperatures, assembly methods, and ingredient combinations that prevent common pitfalls like soggy centers or cheese leaks. You’ll discover how to maximize your machine’s potential with 15 tested Cuisinart sandwich maker recipes that cover breakfast, lunch, dinner, and even dessert.
Perfect Mozzarella Tomato Basil Panini Every Time
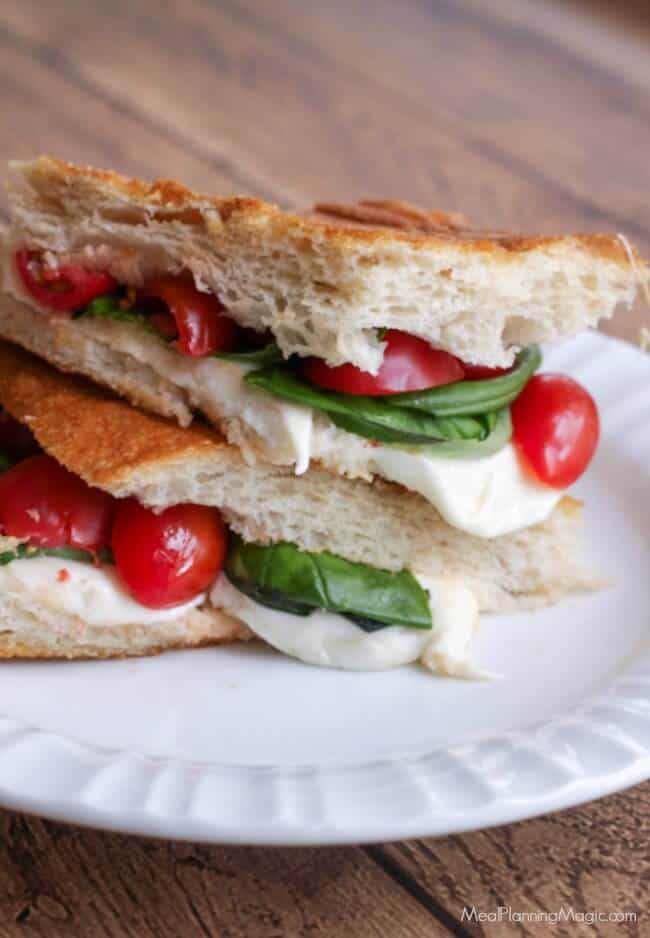
This Italian-inspired classic demonstrates exactly why your Cuisinart sandwich maker deserves counter space. The combination of fresh ingredients creates a restaurant-worthy meal ready faster than takeout.
Why this recipe works: The 375°F temperature melts mozzarella without burning the artisan bread, while the cheese layer acts as a moisture barrier against tomato slices. Your sandwich emerges with defined grill marks and fully melted cheese in just 4 minutes.
Step-by-Step Assembly Process
-
Prep ingredients: Slice tomatoes ¼-inch thick and pat dry with paper towels to remove excess moisture. Thinly shred 8-10 basil leaves by rolling them into a cylinder and slicing crosswise.
-
Prepare bread: Use ½-inch thick sourdough or ciabatta slices. Lightly brush one side of each slice with olive oil—this creates the perfect crispy exterior while protecting the non-stick plates.
-
Build correctly: Place un-oiled bread side down. Layer 2 oz fresh mozzarella, tomato slices, and basil shreds. Season lightly with salt and pepper. Top with second bread slice, oiled side facing up.
-
Grill precisely: Close the lid and press gently for 30 seconds to set the seal. Grill undisturbed for 3-4 minutes until golden brown and cheese flows when cut. Rest 1 minute before slicing for clean presentation.
Pro Tip: For extra flavor, substitute fresh smoked mozzarella or add a thin spread of pesto on the oiled bread side before grilling. This variation adds depth without increasing moisture that causes sogginess.
Breakfast Sandwiches That Beat the Drive-Thru
Skip expensive café breakfasts with these foolproof morning creations that cook faster than your coffee brews. The key is using pre-cooked proteins and moisture-controlled assembly.
Hash-Brown Breakfast Stack Technique
Transform frozen hash browns into a sturdy base that won’t collapse under fillings:
-
Preheat your Cuisinart to 350°F—the slightly lower temperature prevents burning delicate egg layers.
-
Place a ¼-inch hash-brown patty directly on the lower plate as your foundation.
-
Layer in this exact order: cheddar cheese → pre-cooked sausage patty (patted dry) → scrambled egg → second hash-brown patty.
-
Grill 3 minutes until the top layer crisps and cheese melts through all layers.
Critical Mistake to Avoid: Never add raw eggs directly to the sandwich maker. Pre-scramble and cook eggs separately to ensure food safety and even heating. Raw eggs will create steam pockets that make your sandwich soggy.
Pancake Sausage Sandwich Shortcut
Turn breakfast leftovers into handheld perfection:
- Use 4-inch pancakes as your “bread” for optimal size
- Place pre-cooked sausage patty and 1 oz American cheese between pancakes
- Grill at 350°F for exactly 2 minutes
- For sweet-savory fusion: Add ½ teaspoon maple syrup to the cheese layer before grilling
Visual Cue: The sandwich is done when steam stops escaping from the edges and the pancake exterior turns golden brown. Overcooking causes pancakes to harden instead of staying tender.
Dessert Creations That Impress in 6 Minutes

Your Cuisinart sandwich maker excels at handheld desserts that look complicated but require minimal effort. The sealed-edge function creates professional-looking pastries without baking expertise.
Foolproof Apple Pie Pockets
Assembly Method:
1. Cut puff pastry into 5-inch squares
2. Place 2 tablespoons apple pie filling in center
3. Sprinkle with cinnamon sugar (½ tsp per pocket)
4. Brush edges with egg wash using a pastry brush
5. Fold diagonally and press edges firmly with a fork
6. Grill at 360°F for 5-6 minutes until puffed and golden
Prevention Technique: Place assembled pockets on a parchment-lined tray and refrigerate 15 minutes before grilling. This chills the butter in the pastry, creating better flakiness when it hits the hot plates.
Chocolate-Hazelnut Pillow Cakes
These decadent treats require precise timing to prevent chocolate leakage:
- Cut thawed puff pastry into 4-inch squares
- Place exactly 1 tablespoon Nutella in center (more causes leaks)
- Fold diagonally and press edges with your fingertip—don’t use a fork as it creates weak points
- Grill at 350°F for 5 minutes, checking at 4 minutes
- Dust with powdered sugar immediately after removing
Warning: Never open the lid during cooking. The sudden temperature drop causes pastry to deflate. Wait until the full cooking time has elapsed before checking.
Temperature & Timing Cheat Sheet
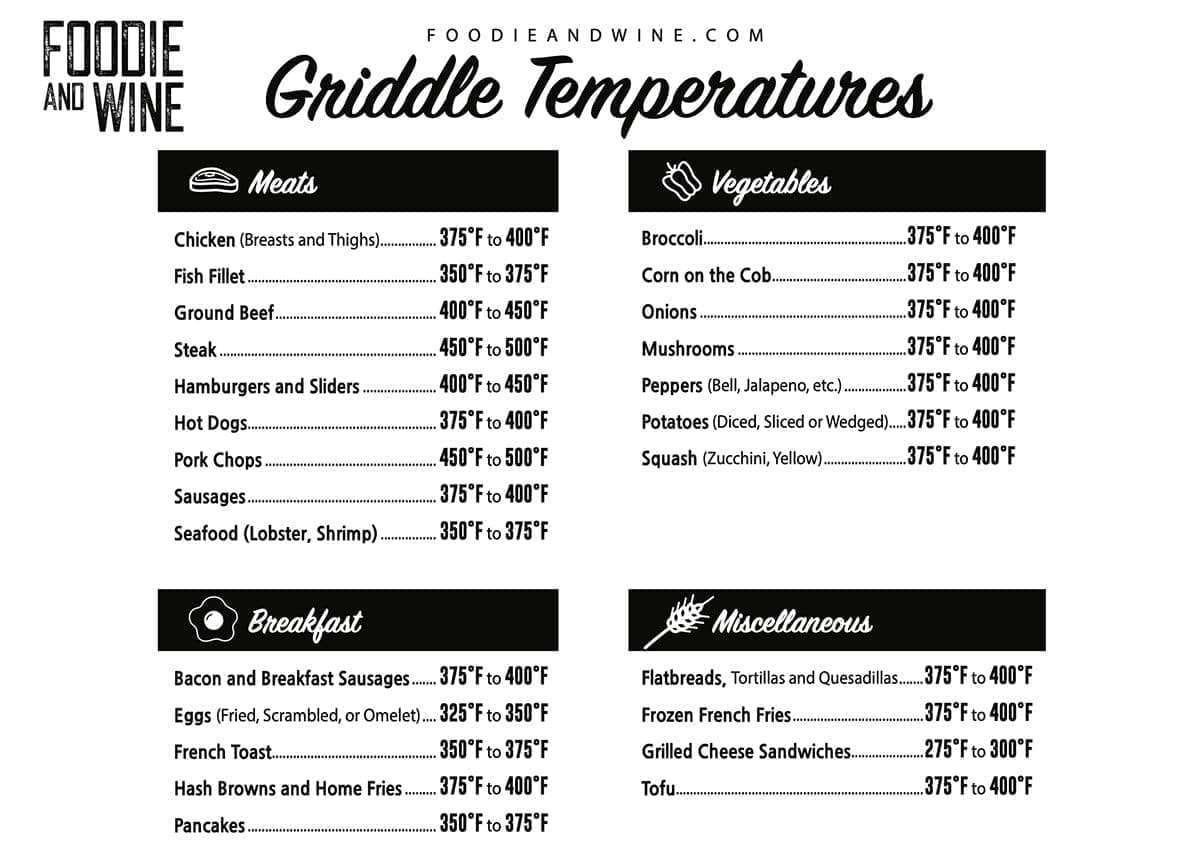
Your Cuisinart’s temperature control makes or breaks every recipe. These verified settings work across all Griddler models:
| Food Type | Temperature | Time | Visual Cue |
|---|---|---|---|
| Panini/Grilled Cheese | 375°F | 3-4 min | Golden grill marks, cheese flows |
| Breakfast Sandwiches | 350°F | 2-3 min | Internal temp 165°F |
| Pie Pockets | 360°F | 5-6 min | Pastry puffed, browned edges |
| Cake Triangles | 350°F | 6-7 min | Toothpick inserted comes clean |
Critical Note: Always preheat until the indicator light turns off—this ensures consistent cooking. Skipping preheating causes uneven browning and soggy centers.
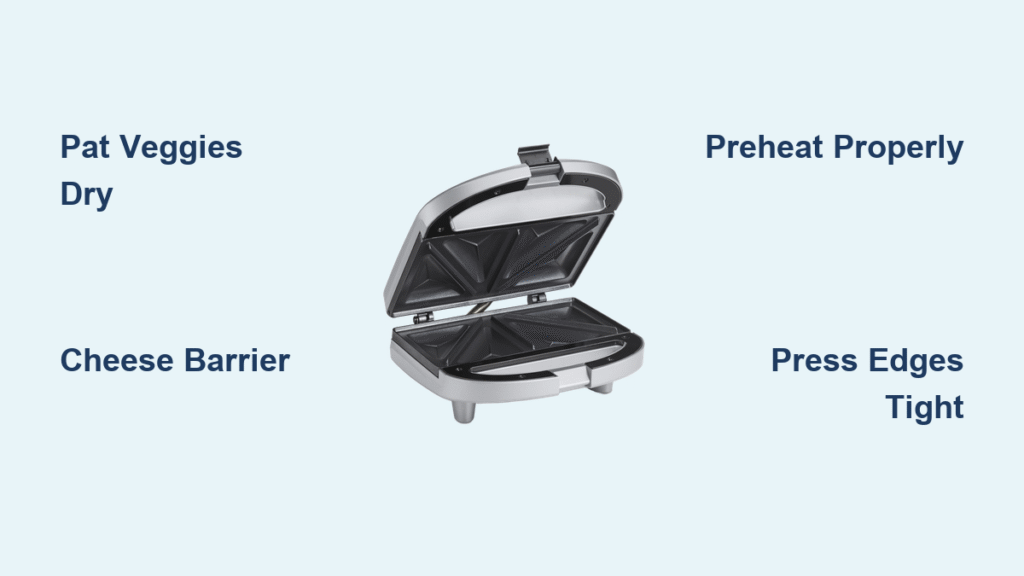
Troubleshooting Common Sandwich Maker Problems
Fix Soggy Sandwich Interiors Immediately
Three proven solutions when your sandwich emerges with a soft center:
- Pat all vegetable slices dry with paper towels before assembly (tomatoes lose 30% moisture this way)
- Create a cheese barrier by placing a thin cheese layer between bread and wet ingredients
- Reduce filling quantity by 25%—overstuffing traps steam that softens the crust
Stop Burnt Edges Without Undercooking
When exterior burns but center remains cold:
- Lower temperature by 25°F (e.g., 350°F instead of 375°F)
- Use thinner bread slices (⅜-inch instead of ½-inch)
- Check doneness 1 minute earlier than recipe states
- Rotate sandwich 180° halfway through cooking for even heating
Prevent Cheese Leaks During Grilling
The most common frustration has a simple fix:
- Keep all fillings at least ½ inch from sandwich edges
- Press edges firmly for 10 seconds before starting the timer
- Use shredded cheese instead of slices for better melt control
- Avoid high-moisture cheeses like feta in panini applications
Essential Maintenance for Long-Lasting Performance
Your Cuisinart’s Quantanium® non-stick coating requires specific care:
- Daily cleaning: Wipe plates with damp cloth while still warm (never cold)
- Drip tray care: Remove and wash separately after every 3-4 uses
- Storage method: Interlock plates when storing to prevent scratching
- Seasoning tip: Lightly coat plates with cooking spray monthly to maintain non-stick properties
Never use metal utensils—they permanently damage the non-stick surface. For stubborn residue, use a soft sponge with warm soapy water after the unit has cooled completely.
Your Cuisinart sandwich maker unlocks restaurant-quality meals with minimal effort when you follow these precise techniques. Start with the mozzarella tomato basil panini to master the assembly process, then experiment with breakfast stacks and dessert pockets using the temperature guidelines. Remember the universal rule: proper ingredient preparation and moisture control make the difference between a soggy disappointment and a golden-brown masterpiece. With these Cuisinart sandwich maker recipes, you’ll transform ordinary ingredients into extraordinary meals faster than ordering takeout—while impressing family and guests with professional results.


