
There’s nothing quite like the refreshing burst of homemade lemon ice cream on a sweltering afternoon. When you own a Cuisinart ice cream maker, transforming simple pantry staples into this vibrant dessert becomes surprisingly accessible—even if you’ve never churned ice cream before. The magic happens when your Cuisinart machine transforms a silky lemon custard base into a scoopable masterpiece with that perfect balance of tart and sweet.
Whether you’re using a Cuisinart ICE-21, ICE-70, or another model in their lineup, achieving professional-quality lemon ice cream at home is within reach. This guide walks you through every critical step, from selecting the right lemons to avoiding common texture pitfalls that can turn your dream dessert into icy disappointment. You’ll learn why certain ingredients matter, how to properly prepare your machine, and when to stop churning for that ideal creamy consistency.
Essential Ingredients for Perfect Lemon Ice Cream
Fresh Lemons vs Bottled Juice
Your choice of citrus makes or breaks authentic lemon flavor. Bottled lemon juice simply can’t compete with the bright, complex notes of freshly squeezed fruit. Plan for 4-5 large lemons to yield the ½ cup of juice plus zest required for optimal flavor. Meyer lemons offer a sweeter, floral profile ideal for those sensitive to tartness, while traditional Eureka lemons deliver that classic sharp punch that defines perfect lemon ice cream.
Heavy Cream Selection
The fat content in your cream directly impacts texture. Heavy cream with 36-40% milk fat creates the luxurious mouthfeel that distinguishes homemade from store-bought. Ultra-pasteurized varieties should be avoided when possible—they contain proteins that don’t incorporate air as effectively during churning, often resulting in a slightly grainy texture that undermines your efforts.
Sugar and Sweetener Options
Granulated sugar serves dual purposes: sweetening and preventing ice crystals. Its molecular structure interferes with water molecules bonding together during freezing. For lighter options, substitute ¼ cup honey for ½ cup sugar, but expect a softer final texture as honey lowers the freezing point. Artificial sweeteners generally fail in frozen desserts—they crystallize during freezing and create unpleasant mouthfeel.
Egg Yolk Considerations
Traditional custard-based recipes use 4-6 egg yolks to create richness and stability. The proteins in yolks help emulsify the mixture while their fat contributes to creaminess. If you prefer Philadelphia-style (egg-free) lemon ice cream, increase your heavy cream by ½ cup and reduce milk accordingly to maintain proper fat content.
Step-by-Step Cuisinart Preparation

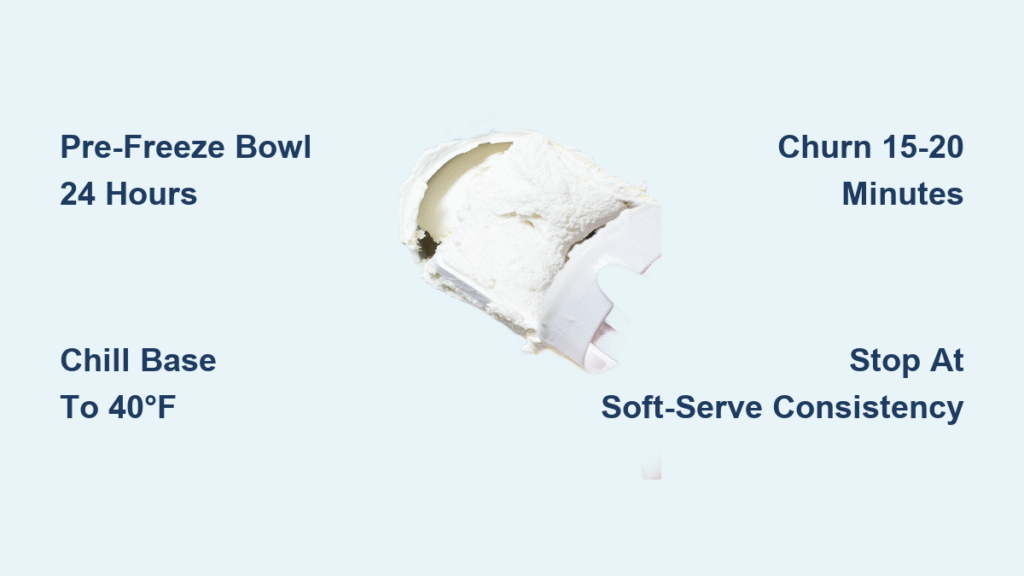
Pre-Freeze Bowl Timing
Your Cuisinart bowl must freeze for a full 24 hours—no shortcuts. Place it toward the back of your freezer where temperatures remain most consistent. To test readiness, gently shake the bowl; if you hear liquid sloshing inside, it needs more time. Properly frozen bowls feel completely solid with no movement of the freezing agent.
Equipment Checklist
Gather these essentials before starting: your Cuisinart ice cream maker with frozen bowl insert, a sharp microplane for zesting, medium saucepan, fine-mesh strainer, instant-read thermometer, and airtight freezer containers. Having everything ready prevents delays that could warm your base mixture, compromising final texture.
Temperature Requirements
Chill your base mixture to 40°F or below before churning—this is non-negotiable. Warm mixtures won’t freeze properly against the bowl walls, creating icy texture. Speed cooling by placing the bowl in an ice bath and stirring occasionally. Check temperature with your thermometer; patience here prevents hours of disappointment later.
Classic Lemon Ice Cream Base
Zesting Technique
Wash lemons thoroughly under warm water to remove any wax or residue. Using a microplane, carefully remove only the yellow outer layer—avoid the bitter white pith underneath. You’ll need approximately 2 tablespoons of loosely packed zest for vibrant lemon flavor throughout without bitterness.
Creating the Custard
Heat 2 cups heavy cream, 1 cup whole milk, and ¾ cup sugar over medium heat until steaming (175°F), but don’t boil. Meanwhile, whisk 4 egg yolks in a separate bowl. Slowly temper the yolks by adding a small amount of hot cream mixture while whisking constantly—this gradual temperature increase prevents curdling.
Straining and Chilling
After combining all ingredients, pour the mixture through a fine-mesh strainer to remove zest pieces and any potential cooked egg bits. Add ½ cup fresh lemon juice and 2 tablespoons zest. Chill completely—this takes 2-4 hours in refrigeration or 30 minutes in an ice bath with frequent stirring. Proper chilling is essential for smooth churning.
Churning Process in Cuisinart
Machine Setup
Assemble your Cuisinart according to your specific model’s instructions. Always turn on the machine BEFORE adding the base—this prevents immediate freezing against the bowl sides that creates difficult-to-remove clumps. The paddle should be rotating steadily before pouring in your mixture.
Churning Timeline
Pour chilled base into the running machine. Churning time varies by model: the ICE-21 typically takes 15-20 minutes, while the ICE-70 may finish in 12-15 minutes thanks to its more powerful motor. Set a timer—you’ll be surprised how quickly it transforms from liquid to soft-serve consistency.
Consistency Checkpoints
After 10 minutes, your mixture should thicken to soft-serve consistency. At 15 minutes, it should mound nicely when you lift a spoonful. Over-churning beyond 25 minutes incorporates too much air, creating a fluffy rather than creamy texture. Stop churning when it coats the back of a spoon thickly.
Texture Troubleshooting Guide
:max_bytes(150000):strip_icc()/2025081220250722-SEA-LemonWaterIce-QiAi-HERO-ddaafeaabe4848d19cc8165b80d559db.jpg)
Icy Ice Cream Solutions
Ice crystals form from insufficient fat content, excessive water, or temperature fluctuations during storage. If your ice cream turns icy, add 2 tablespoons corn syrup or ¼ cup additional cream to your base next time. Ensure your base is thoroughly chilled before churning—this simple step prevents most texture issues.
Too Soft After Churning
Soft results typically indicate your base mixture was too warm when added to the machine or insufficient freezing time. Return the mixture to your freezer for 2-3 hours, stirring every 30 minutes to redistribute temperature. Verify your freezer maintains 0°F or below—many home freezers run too warm for optimal ice cream storage.
Over-Churning Recovery
If your mixture becomes butter-like with visible separation, immediately fold in ¼ cup cold milk to loosen the texture. While this won’t restore perfect creaminess, it prevents total waste. For future batches, set a timer for 5 minutes before your expected finish time and check consistency frequently.
Flavor Variations and Add-Ins
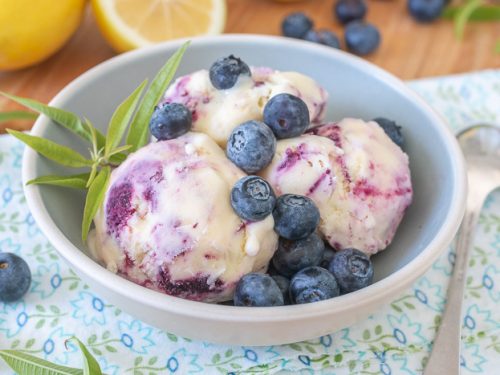
Lemon Blueberry Swirl
Create a stunning swirl by cooking 1 cup blueberries with ¼ cup sugar until syrupy. Cool completely, then layer into finished ice cream during the last 2 minutes of churning. The vibrant purple ribbons against yellow ice cream make this variation as beautiful as it is delicious.
Lemon Cheesecake Style
Add sophistication by incorporating 4 oz softened cream cheese into your warm custard base. Whisk until completely smooth, then proceed with chilling. During the final minutes of churning, fold in ½ cup crushed graham crackers for that classic cheesecake texture contrast.
Dairy-Free Alternative
For those avoiding dairy, replace all dairy with 2 cups full-fat coconut milk and 1 cup cashew cream. Add 1 tablespoon vodka to prevent iciness without affecting flavor—the alcohol content is too low to impact freezing but enough to disrupt ice crystal formation.
Storage and Serving Tips
Proper Freezing Containers
Use shallow, flat containers for faster freezing and more even temperature distribution. Press plastic wrap directly onto the surface of your ice cream before sealing the container—this simple step prevents ice crystal formation that ruins texture. Store at the back of your freezer where temperatures remain most consistent.
Optimal Serving Temperature
Remove your lemon ice cream from the freezer 5-10 minutes before serving. It reaches peak flavor and texture at approximately 10-15°F—cold enough to hold its shape but soft enough to release the full lemon aroma and create that luxurious creamy mouthfeel you worked so hard to achieve.
Shelf Life Expectations
Homemade lemon ice cream maintains best quality for 1-2 weeks when properly stored. Flavor peaks in the first 3-5 days as the lemon essence fully develops. After two weeks, texture becomes increasingly icy despite proper storage techniques—freeze smaller batches you can finish quickly for consistently perfect results.
Mastering Your Cuisinart Lemon Ice Cream
Creating exceptional lemon ice cream in your Cuisinart machine transforms you from store-bought consumer to dessert artisan. The secret lies in respecting the science behind the process: proper chilling, accurate ingredient ratios, and knowing precisely when to stop churning. Once you’ve mastered this basic recipe, experiment with different citrus combinations—adding lime zest creates a refreshing key lime variation, while orange zest produces a creamsicle effect that delights both children and adults. Your Cuisinart ice cream maker isn’t just another appliance; it’s your gateway to endless frozen creativity that will have family and friends begging for your signature dessert all summer long.


