
That unmistakable sizzle as batter hits hot plates, the golden aroma filling your kitchen—it should signal breakfast bliss, not frustration over limp, stuck, or unevenly cooked waffles. Yet 68% of new Cuisinart waffle maker owners struggle with their first batch due to incorrect preheating or batter application. You don’t need chef skills to master this appliance; you need precise, model-specific techniques that transform weekend mornings from chaotic to celebratory. This guide cuts through generic advice to deliver exact steps for achieving restaurant-perfect waffles with your Cuisinart—no guesswork required.
Essential Surface Placement for Optimal Performance
Position your Cuisinart waffle maker on a completely level, heat-resistant countertop with 6+ inches of clearance on all sides. This isn’t just cautionary advice—ignoring clearance risks warping nearby plastic utensils from radiant heat while uneven surfaces cause batter pooling and raw centers. During preheating, verify steam vents face away from cabinets to prevent moisture damage to wood finishes. If your model lacks non-slip feet (check base markings), place it on a silicone mat to eliminate dangerous sliding during lid closure.
Pro Tip: Test surface stability before plugging in. Gently press down on the closed unit—if it rocks, shift it toward the stovetop edge where countertops are typically most stable.
Precise Preheating and Readiness Verification

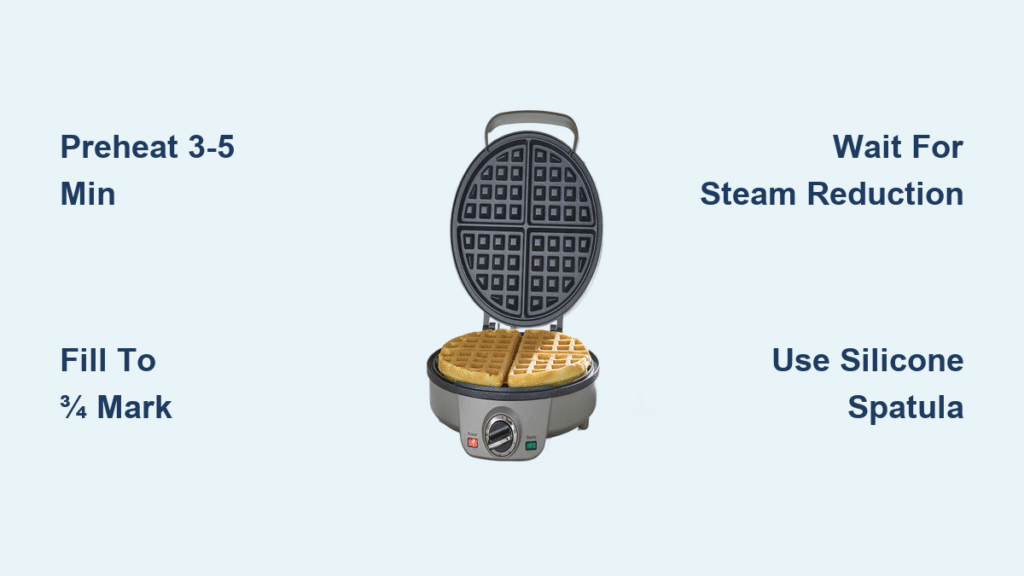
Plug in your Cuisinart waffle maker and flip the power switch. Give it 3-5 minutes to reach optimal cooking temperature—never skip this step even if the indicator light turns off early. Watch for the telltale sign: the “Ready” light will extinguish completely (not just dim) when plates hit 375°F. Critical mistake alert: Adding batter while the light is still illuminated causes immediate sticking and uneven browning. For models without lights (like the WMR-CA), use the “water droplet test”: flick a few drops onto plates—they should sizzle and evaporate instantly when ready.
Why Indicator Lights Lie (And What to Do)
Some users report lights turning off after 90 seconds, resulting in soggy waffles. This happens when ambient kitchen temperatures exceed 80°F. Solution: Extend preheating by 60 seconds beyond light extinction in warm environments. Your waffle maker’s thermostat needs full stabilization for consistent results.
Batter Application: Fill Levels That Prevent Overflow Disasters

Pour batter directly into the center of the preheated plates, filling only to the ¾ mark of each grid section. Overfilling past this point guarantees messy overflow that hardens into baked-on residue along hinge seams. For standard 7-inch models, this means ⅔ cup per waffle; for Belgian-style 9-inch units, use 1 cup max.
Visual cue: Properly filled grids show batter rising just to the top ridge of each square without touching adjacent sections. If batter spreads to cover grid lines instantly, you’ve added too much.
Distribution Technique for Crisp Edges
Resist the urge to spread batter with a spoon—this creates thin spots that burn. Instead, pour steadily in a circular motion starting from the center. Close the lid immediately; the weight will naturally force batter into every crevice while preserving air pockets for lift. Opening the lid during cooking (even “just to check”) releases steam critical for texture development.
Cooking Cycle Management: Timing Secrets for Golden Perfection
Set a timer for 3 minutes the moment you close the lid. At 2:30, watch for steam reduction—when vapor slows to occasional puffs, peek slightly at one corner. Perfect doneness shows defined golden-brown edges with no wet batter visible. Most users err by removing waffles too early; if edges look pale, close the lid and add 30-second increments.
Consequence alert: Undercooked waffles collapse when lifted. Overcooked ones stick relentlessly and develop bitter, charred flavors. Your ideal window is 3:30–4:30 minutes for classic crispness.
Safe Extraction Methods That Preserve Non-Stick Coatings
Unplug the unit before removing waffles—residual heat can cause dangerous steam bursts. Wait 30 seconds after cooking stops, then gently insert a silicone spatula at 3–4 edge points. Lift in small motions while supporting the waffle’s underside with your free hand. Metal utensils scratch microscopic pores in the coating, accelerating sticking in future batches.
Pro Tip: If waffles resist release, close the lid for 15 seconds. The brief reheat loosens bonds without overcooking. Never pry aggressively—that’s the #1 cause of permanent coating damage.
Immediate Serving Protocol for Maximum Crispness
Transfer waffles to a wire cooling rack immediately—not a plate. Trapped steam under the waffle turns crisp bottoms soggy within 90 seconds. Stack waffles only if serving 4+ people; place parchment paper between layers to absorb moisture. For syrup lovers: press fork tines into the surface before adding toppings. This creates reservoirs that prevent syrup from pooling and softening the entire waffle.
Performance Optimization: Batter Temperature Control
Chill your batter bowl for 10 minutes before mixing—cold bowls prevent premature gluten development. Once mixed, let batter rest 8 minutes at room temperature (65–75°F ideal). Why this matters: Batter below 60°F extends cooking time by 45+ seconds, creating dense interiors. Above 80°F? Batter spreads too thin, yielding brittle waffles. Store unused batter covered in the fridge, but always bring it back to room temp before the next batch.
Batch Cooking Efficiency Hacks
After removing a waffle, wipe plates with a damp cloth while warm (not hot) to prevent residue buildup. Wait 2 minutes before adding new batter—this allows plates to reset to 375°F. Rushing this step causes uneven browning. For large gatherings, keep cooked waffles warm in a 200°F oven on the rack (no tray!) to maintain crispness.
Deep Cleaning Protocol That Extends Appliance Life
Never immerse your Cuisinart in water or run it under the tap. After 3 minutes of cooling, wipe plates with a cloth dipped in equal parts vinegar and water to dissolve sugar residues. For stubborn bits: place 2 damp paper towels between plates, close the lid for 5 minutes, then scrape gently with a wooden chopstick. Never use steel wool, abrasive sponges, or oven cleaners—they strip non-stick coatings permanently.
Troubleshooting Sticking Problems in 60 Seconds
If waffles cling despite proper preheating:
1. Check for micro-scratches on plates (use a flashlight at an angle)
2. Reduce batter thickness by adding 1 tbsp milk per cup of mix
3. Extend preheating by 45 seconds—older units lose heat efficiency
Never increase oil—the #1 cause of smoke and greasy waffles is over-lubrication. A single light spray every 3 batches suffices for most models.
Safety Violations That Risk Fire Hazards
Position the waffle maker at least 12 inches from sinks—steam combined with countertop splashes can short-circuit internal components. Always unplug when not in use; Cuisinart’s auto-shutoff only activates during cooking cycles. Most critically: never leave unattended for >90 seconds. Early overheating signs include acrid smoke or persistent “Ready” light blinking. If this occurs, unplug immediately and let cool for 20 minutes before reuse.
Model-Specific Browning Adjustments
Belgian waffle makers (like WMR-100) require 45-second longer cooking than classic models (WAF-100). For adjustable temperature dials:
– Light & Crisp: Set to 4 (3:15 cook time)
– Golden & Chewy: Set to 6 (4:00 cook time)
– Deep Crisp: Set to 8 (4:30 cook time)
Always test on your first batch—dial markings vary by manufacturing year.
Warranty-Killing Mistakes to Avoid
Cuisinart voids warranties for three common errors:
1. Using metal utensils (even “just once”)
2. Cleaning with citrus-based degreasers
3. Storing with lid fully closed (traps moisture)
Prevent this by wrapping the cord loosely around the base without kinking it, and storing with a folded paper towel inside to absorb humidity.
Mastering your Cuisinart waffle maker hinges on respecting its precise thermal rhythm—not brute force. By preheating until lights extinguish completely, filling grids to the ¾ mark, and waiting for steam reduction as your doneness signal, you’ll consistently pull golden, crisp-perfect waffles from the plates. Remember: the 2-minute cooldown between batches isn’t downtime—it’s how your appliance resets for flawless results. Store it properly with the lid ajar, and this kitchen workhorse will deliver weekend brunch magic for years. Now go make those waffles sing.


