
Imagine coming home to fall-apart tender pulled pork or a rich beef bourguignon after a busy workday—all cooked while you were away. Your Cuisinart slow cooker makes this effortless magic possible, but only if you master its unique programming. Unlike basic crockpots, Cuisinart models feature digital precision that demands specific techniques to avoid rubbery meats or unevenly cooked vegetables. This guide cuts through the confusion with model-specific instructions straight from Cuisinart’s engineering specs, so you’ll consistently achieve restaurant-quality results from day one.
Whether you own the CSC-650, PSC-650, or probe-equipped CSC-650TX, you’ll learn exactly how to leverage delay-start programming, temperature probes, and fill-level science. Forget generic advice—these steps are calibrated for Cuisinart’s hotter cooking environment (up to 300°F on HIGH) that often trips up first-time users. By the end, you’ll confidently convert oven recipes, troubleshoot error codes, and extend your unit’s lifespan with pro cleaning methods.
Essential First Setup Steps
Unbox and Clean Before First Use
Unpack all materials and remove protective films before handling. Wash the ceramic insert and glass lid in warm, soapy water—both are top-rack dishwasher-safe but handwashing prevents thermal shock. Never submerge the heating base; wipe it only with a damp cloth to avoid electrical damage. Run a critical test cycle: fill the insert one-third with water, set to HIGH for 1 hour, and verify steam production. This eliminates manufacturing residues and confirms proper function. Skipping this risks off-flavors in your first meal.
Identify Your Cuisinart Model
Match your unit to these key models before proceeding:
– CSC-650/PSC-650: 6.5-quart round programmable with digital display
– MSO-57X: 7-quart oval ideal for roasts and whole chickens
– CSC-650TX: Includes a temperature probe for meat precision
All share universal components: a removable ceramic pot, tempered glass lid with cool-touch handle, and non-slip rubber feet. Your model’s specific features—like stainless steel housing (PSC-650) or probe technology (CSC-650TX)—dictate advanced functions, so locate your model number (typically on the base) immediately.
Decode Control Panel Functions

Basic Digital Navigation
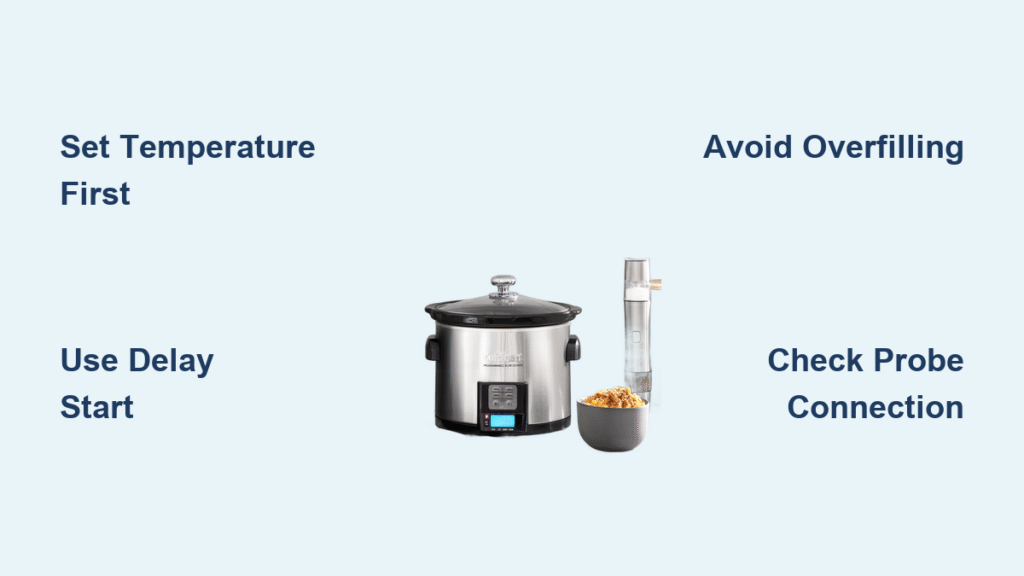
Your Cuisinart’s control panel uses intuitive sequences. When programming, the Cook Time display flashes; during operation, it shows remaining hours. Press Temp to cycle through LOW → HIGH → WARM → OFF. Critical tip: Always set temperature before time. For example: Press Temp until “LOW” appears, then use +/- to set 8 hours, and hit Start/Stop. The unit beeps to confirm activation.
Advanced Programming Features
Unlock professional results with these often-missed functions:
– Delay Start: After setting cook time, press Delay Start and use +/- to add 1-24 hours before auto-start. Perfect for meals ready at dinnertime when prepped at 8 AM.
– Temperature Probe Mode (CSC-650TX only): Insert the probe into meat’s thickest part (avoiding bone), press Probe, then select target temperature (150-200°F). The cooker switches to WARM automatically when reached—eliminating guesswork for perfect steaks or roasts.
Master Your Cuisinart Slow Cooker Temperature Settings
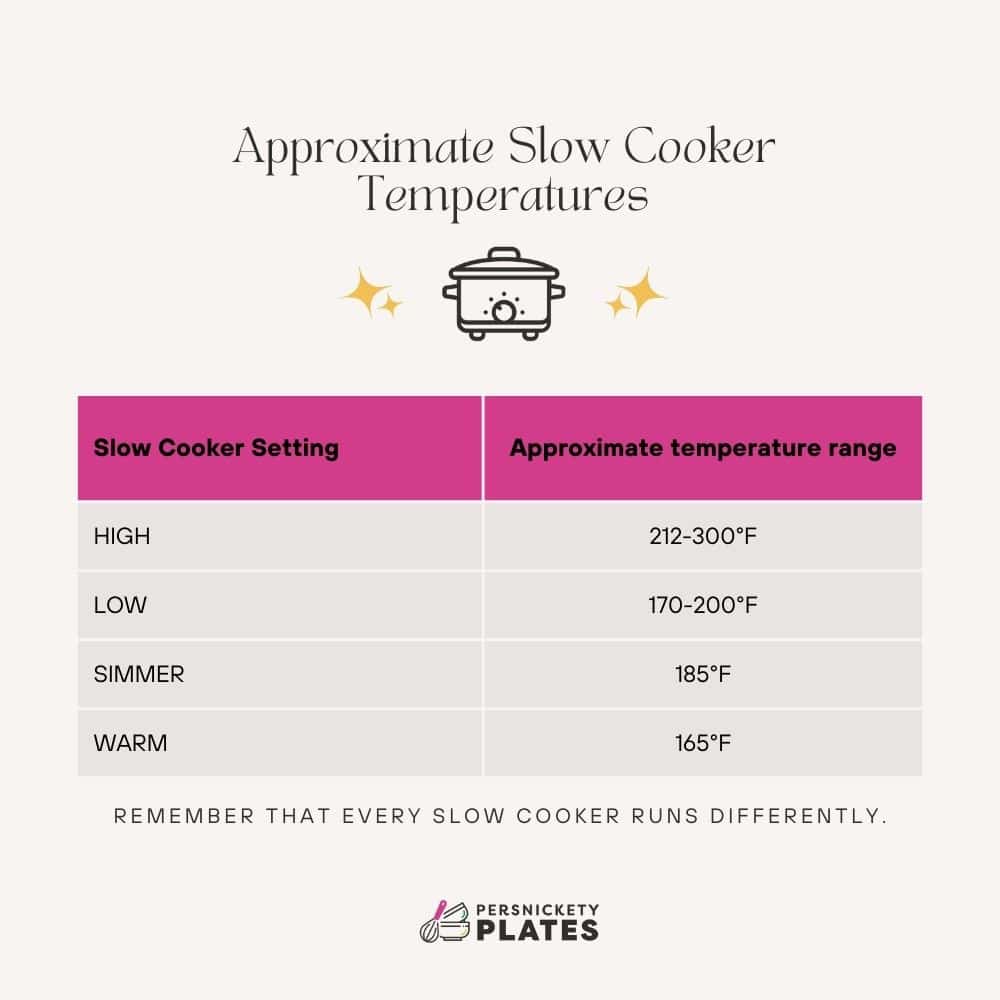
Low vs High Heat Explained
LOW (190°F) isn’t just “slower”—it’s essential for collagen breakdown in tough cuts like chuck roast or pork shoulder. Use for 8-10 hours when you’re out all day. HIGH (300°F) reaches cooking temps 30% faster than competitors, so reduce standard recipes by 1-2 hours to prevent mushiness—ideal for 4-hour chicken stews or reheating soups. WARM (165°F) activates automatically after cooking but never exceed 4 hours to stay within food safety limits.
Fill Level Guidelines
Cuisinart’s even heating requires precise fill levels:
– Minimum: 1/3 full (prevents scorching on the ceramic sides)
– Maximum: 3/4 full (avoids dangerous boil-overs)
– Liquid Rule: Always add at least 1 cup broth/water for braises—unlike older slow cookers, Cuisinart’s tight seal minimizes evaporation, so excess liquid causes sogginess.
Step-by-Step Cuisinart Slow Cooker Cooking Process
Prepare Ingredients Correctly
Follow this layering sequence for even cooking:
1. Place dense root vegetables (potatoes, carrots) on the bottom
2. Add meat in the middle layer, fat-side up
3. Top with quick-cooking items (zucchini, peas)
4. Pour liquids last until they reach 1/3 up the insert’s sides
Pro tip: Sear meats in a skillet first, then deglaze with wine or broth—the fond adds depth Cuisinart’s steam environment can’t replicate alone. Skip this, and your “beef stew” tastes flat.
Program Your Cooking Cycle
- Place the ceramic insert into the base (ensure it clicks into position)
- Secure the lid firmly—tilt it slightly to vent steam initially
- Press Temp to select LOW or HIGH
- Set time with +/- (30-min increments up to 24 hours)
- Hit Start/Stop—the unit beeps twice to confirm
Critical warning: Each lid lift adds 20+ minutes to cook time due to Cuisinart’s rapid heat loss. Resist checking—use the glass lid’s condensation as a visual cue instead.
Prevent Common Cuisinart Slow Cooker Mistakes
:max_bytes(150000):strip_icc()/faw-slow-cookers-oct-24-test-cuisinart-cook-central-3-1-4qt-multicooker-nsimpson-182-1-1-a7ea4d10afd44f4ca91e37a7e5256b8c.jpeg)
Overcooking Prevention
Cuisinart models run hotter than vintage slow cookers, so:
– Reduce recipe times by 25% (e.g., a “10-hour LOW” recipe becomes 7-8 hours)
– Add extra 1/2 cup liquid if sauces thicken too early
– Place meats on a trivet to avoid sitting in liquid, which causes shredding
Food Safety Guidelines
Never use Delay Start with perishables like dairy or raw meat—ingredients must stay below 40°F until cooking begins. Always verify meats hit safe internal temps with a thermometer (chicken: 165°F, beef: 145°F). If the unit displays E2, it means overheating protection triggered—reduce food volume by 20% next time.
Clean and Maintain Your Unit
Daily Cleaning Routine
Cool the insert for 30 minutes before cleaning. Handwash with non-abrasive sponges to preserve the ceramic glaze—dishwasher use accelerates cracking. For the lid, soak in warm water to loosen stuck food, then gently scrub crevices with a soft brush. Wipe the heating base immediately after use with a damp cloth; dried spills near buttons cause malfunctions.
Deep Cleaning Solutions
For baked-on residue:
1. Fill the insert with hot water and 2 tablespoons baking soda
2. Soak 30 minutes (do not cook—this is a cleaning soak only)
3. Scrub gently with a nylon brush
Stainless steel exteriors (PSC-650) need specialized cleaner monthly to prevent fingerprint etching.
Troubleshoot Performance Issues
Unit Won’t Start or Heat
First, verify the ceramic insert is fully seated—Cuisinart’s base won’t activate if misaligned. Test the outlet with another device. If E1 appears, it’s a temperature sensor failure; unplug for 30 seconds to reset. Persistent issues require Cuisinart service—don’t force the insert.
Error Message Decoding
- E1: Sensor malfunction (contact support)
- E2: Overheating (reduce food quantity; never fill beyond 3/4)
- E3: Probe not detected (reseat firmly; wipe contacts with dry cloth)
Adapt Traditional Recipes
Oven-to-Slow Cooker Conversions
Cuisinart’s intense heat changes conversion rules:
– 350°F oven recipe = 3 hours on LOW (not 4) or 1.5 hours on HIGH
– 300°F oven recipe = 6 hours on LOW (not 8)
Always reduce liquid by 25% compared to stovetop recipes—Cuisinart’s seal prevents evaporation.
Ingredient Timing Secrets
- Dairy: Add milk/cream in the last 20 minutes to prevent curdling
- Pasta: Stir in dry during final 40 minutes (absorbs liquid perfectly)
- Seafood: Add shrimp/scallops only in the last 20 minutes
- Herbs: Stir in fresh basil or cilantro during the last 5 minutes
Optimize Performance and Safety
Energy Efficiency Tips
Cuisinart uses 30% less energy than ovens, but maximize savings by:
– Keeping the lid sealed (each peek wastes 15% heat)
– Using the smallest insert that fits your recipe (a half-full 7-quart unit wastes energy)
– Batch-cooking 2x portions and freezing extras in mason jars
Critical safety check: Models made 2010-2015 may have faulty handles. Verify yours at Cuisinart.com or call 1-800-726-0190 before first use.
Your Cuisinart slow cooker transforms weeknight chaos into culinary triumphs when used correctly. Start with simple 4-hour HIGH recipes to learn its heat profile, then graduate to probe-programmed roasts. Remember: never exceed 3/4 fill capacity, reduce standard cook times by 25%, and clean the ceramic insert by hand to prevent cracks. Register your unit online within 30 days for the 3-year warranty—then call Cuisinart’s live support (7am-11pm EST) for personalized troubleshooting. Within weeks, you’ll master the art of “set it and forget it” without the common pitfalls that turn promise into porridge.


